Camera User Guide
Please read the Read This First section p
Installing the Software
Connecting the Camera to a Computer
Using the Printer and Printing
Shooting with the Camera
Camera Body Temperature
Charging the Date/Time Battery
About the LCD Monitor
Video Format
When the Shooting mode is set to the following modes
Postcard Date Imprint Mode
Conventions Used in the Text
Read This First
Components Guide
Preparing the Camera
Basic Functions
Playback
Shooting Close-Ups/ Infinity Shots
Erasing
Please Read
Warranty Limitations
Test Shots
Safety Precautions
Storing SD cards
Page
Page
Page
Page
Avoid Condensation Related Problems
Preventing Malfunctions
Avoid Strong Magnetic Fields
If Condensation Forms Inside the Camera
Front View
OUT Audio/Video OUT Terminal p
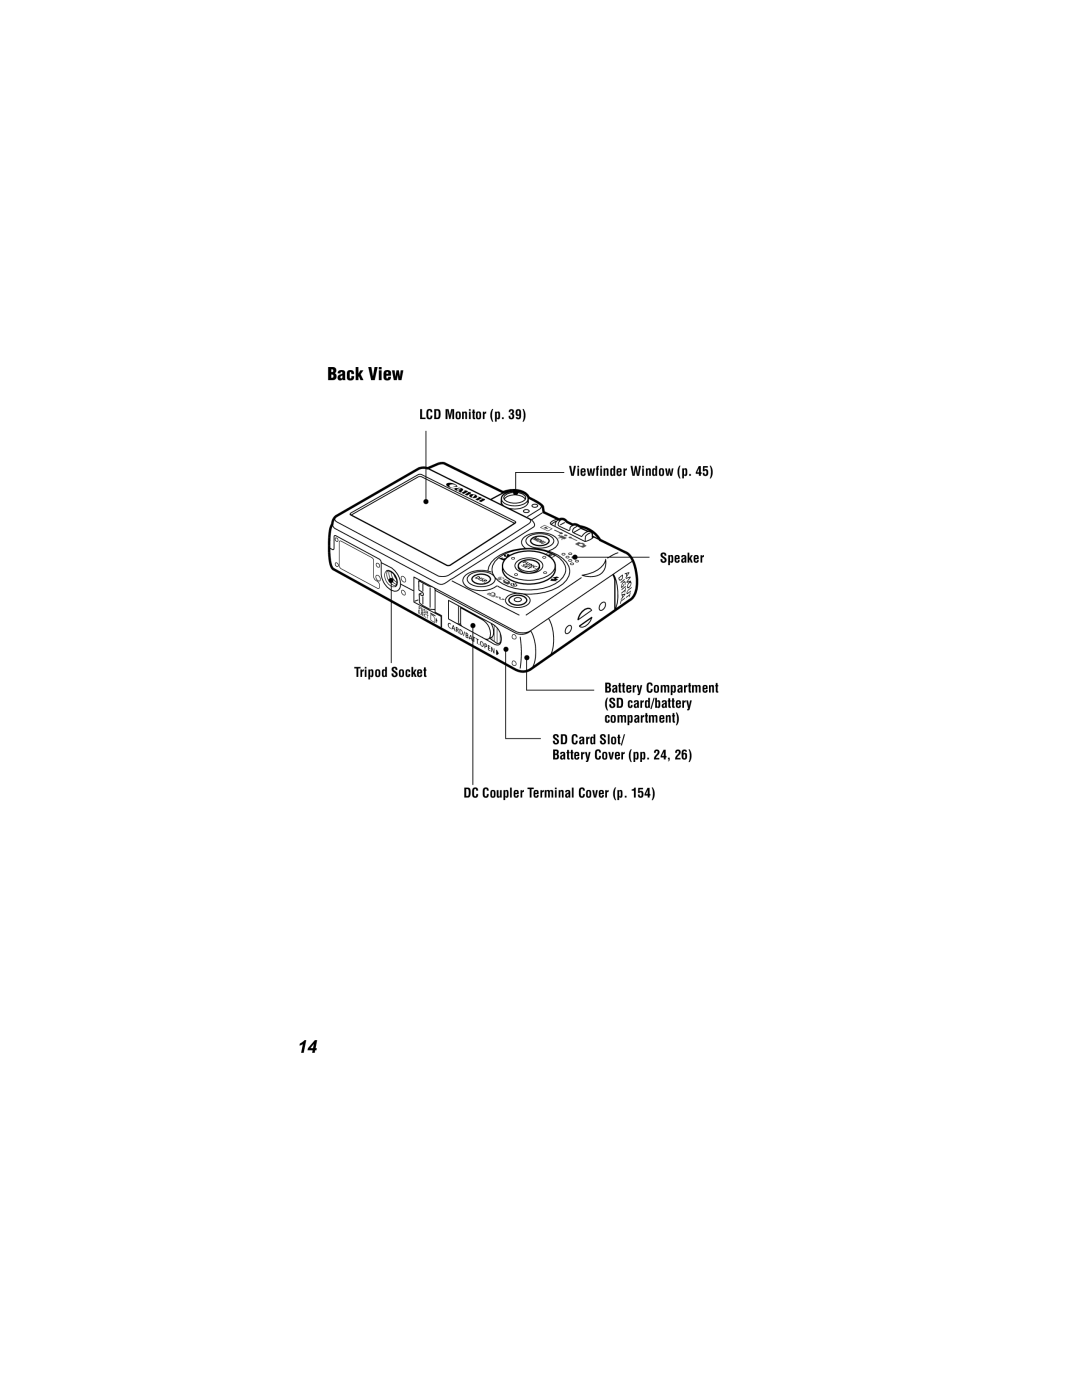
Back View
SD Card Slot Battery Cover pp DC Coupler Terminal Cover p
LCD Monitor p Viewfinder Window p Speaker Tripod Socket
Operation Panel
Digital Ixus
Battery Compartment SD card/battery compartment
Indicators p Playback
Zoom Lever ON/OFF Button p Shooting Wide Angle
Indicators
Upper Indicator
Lower Indicator
Holding the Camera
Interface Cable IFC-400PCU supplied with the camera
Direct Print Compatible Printers Sold Separately
Charging the Battery Pack
Battery charger
Power outlet
Plug the battery charger into a
Battery Pack Handling Precautions
This will shorten battery life
Fig. a
Symbol Battery Lock
Battery pack
Battery Pack Charge
Change
Insert the SD card
Installing the SD Card
Write Protect Tab
Closed
To Remove the SD card
Press the ON/OFF button until the power lamp lights green
Formatting SD Cards
Press the Menu button
Rec. or Play menu is displayed
To exit instead of formatting, select Cancel
Use the button to select OK and press the FUNC./SET button
SD Card Handling Precautions
Precaution for Multi Media Cards
Setting the Date and Time
Use the button to select the Set up menu
Setting is complete
Set the date and time
Press the FUNC./SET button
Display will return to the shooting or playback screen
Pressing and Holding the FUNC./SET Button in Shooting Mode
Using the Clock
You can display the current date and time for
Setting the Language
Display will return to the shooting or playback screen
Turning the Power On
Press the ON/OFF button until the indicator lights green
To Turn the Power Off
Turning On the Power without the Start-Up Sound
Power Saving Function
Connected to a Printer sold separately
Switching Between Shooting/Playback
To Shoot Still Images Shooting Mode
To Shoot Movies Movie Mode
To Play Back Images Playback Mode
Using the LCD Monitor
Shooting Mode Press the DISP. button
Display mode changes as follows with each press
Standard No Information Detailed Information View Off
Playback Mode
Standard Detailed No Information
Shooting Information Shooting Mode
Information Displayed on the LCD Monitor
Metering Mode p
Spot AE Point Frame Mode AF Frame p
Low Battery p Flash
ISO Speed p Resolution pp Photo Effect p
Histogram Shooting Mode pp , 78 Exposure Compensation p
Metering Mode p Movie Length Shown on
Compression Still Images p
Movie Files p
Histogram Function
Following information may also be displayed with some images
About the Autofocus Function
Using the Viewfinder
Image Seen in Viewfinder vs. Recorded Image
Telephoto/Wide Angle Press the zoom lever toward or
Using the Zoom
Digital Zoom
Pressing the Shutter Button
Pressing Halfway
Press the shutter button fully
Pressing Fully
AF-assist Beam
Selecting Menus and Settings
Use the or button to select an option
Shooting Mode p Movie Mode p
FUNC. Menu
See Menu Settings and Factory Defaults p
Shooting Mode
Set up Menu My Camera Menu
Rec. Menu
Menu will appear
Menu Settings and Factory Defaults
Embedded date stamps
Volume
Protect
Rotate
Sound Memo
Selftimer Vol
Shutter Volume
Power Saving
Operation Vol
File No. Reset
Auto Rotate
Language
Video System
Menu Item Available Settings
Power is turned on Operation Sound
Selftimer Sound
Theme
Resetting Settings to Their Default Values
Set the mode switch to any position
To exit without resetting, select Cancel
Press the ON/OFF button
Aim the camera at the subject
Shooting in Auto Mode
Press the shutter button halfway p
Monitor except in mode
Reviewing an Image Right after Shooting
Press the shutter button fully p
Picture appears for two seconds on the LCD monitor
Changing the Review Duration
InReview.the Rec. menu, select
Resolution Purpose
Small 640 x 480 pixels
1600 x 1200 pixels
Compression Purpose Superfine
Movies can be shot with the following resolutions
Frame Rate Resolution
FUNC. menu, select * or
Display will return to the shooting screen
Using the Flash
Selected flash mode appears on the LCD monitor
Press the button to switch between flash modes
Use the flash according to the guidelines below
Red-Eye Reduction
Auto
Selecting a Shooting Mode
Manual Portrait Night Snapshot
Choose a shooting mode from the FUNC. menu
Kids&Pets Indoor
To cancel the macro/infinity mode
Press the / button to select the macro/infinity mode
Shooting Close-Ups/ Infinity Shots
Image Area in Macro Mode
Zoom Setting
Magnified Close-Up Shooting Digital Macro
Digital Ixus 30 Approx .3x, 1.6x, 2.0x, 2.5x
Shooting
Using the Digital Zoom
Maximum optical telephoto setting
Press the zoom lever toward
Factor appears on the LCD monitor
To Cancel Continuous Shooting
Continuous Shooting
Press the button to display
Press the button twice to display
Postcard Date Imprint Mode
Use the or button to select
InStamp.the Rec. menu, select Date
Embedding the Date in the Image Data
Use the or button to select Date or Date & Time
Using the Self-timer
To Cancel the Self-Timer
Press the button to display or
Press the button to display
Use the or button to select Or and press the Menu Button
Slide the mode switch to Movie
Shooting a Movie
Following three movie modes are available
Sports photography
Use the or button to select , or
Press the shutter button fully again to stop recording
Systems
Changing the Frame Rate
Shooting Panoramic Images Stitch Assist
Framing a Subject
Do not include moving items in the overlap
Unnatural if the contrast in brightness is too great
FUNC. menu select
Images can be shot in two sequences in Stitch Assist mode
Left to right horizontally Right to left horizontally
Repeat the procedure for additional images
Shoot the first frame in the sequence
Press the Menu button after the last shot
Use the or button to check or retake the recorded images
Switching between Focusing Modes
InAiAF.the Rec. menu, select
Use the or button to select On or Off
You can shoot right after selecting an option
Shooting with the Focus Lock
Shooting Hard-to-Focus Subjects Focus Lock, AF Lock
Press the shutter button halfway two beeps will play
Focal distance to the object is locked
Re-aim the camera to compose the shot as desired and shoot
To Release the AF Lock
Press the / button
Focal distance to the object is locked
Locking the Exposure Setting AE Lock
Exposure setting is locked Icon will display
To Release the AE Lock
Press the button
To Release the FE Lock
Press Button
Selected metering mode appears on LCD monitor
Press
Between metering modes
Exposure for the main subject
Adjusting the Exposure Compensation
Use the or button to adjust the exposure compensation
To Reset the Exposure Compensation
Return the setting to
Shooting in Long Shutter Mode
Rec. menu, select Long Shutter
FUNC. menu, select * and press the Menu button
Use the or button to select a shutter speed
To Cancel the Long Shutter mode
Available Shutter Speeds
Adjusting the Tone White Balance
Setting a Custom White Balance
Press the FUNC./SET button
Use the or button to select an effect
Changing the Photo Effect
Effect Off
Adjusting the ISO Speed
Use the or button to select a speed
Set up menu, select Auto Rotate
Setting the Auto Rotate Function
Use the or button to select On and press the Menu button
Resetting the File Number
Set up menu, select
Button to select
100
About File Numbers and Folder Numbers
101
Folder File Capacity
102
Slide the mode switch to Playback
Displaying Images Individually
103
Use the or button to move between the images
Image advance mode will cancel
To Cancel the Magnified Display
Magnifying Images
Use the , , or button to move around the image
Viewing Images in Sets of Nine Index Playback
Switching between Sets of Nine Images
105
Viewing Movies
Use the or button to select a movie
106
Use the or button to select Play and press the FUNC./SET
Operating the Movie Control Panel
107
Movie control panel will display
Play Slow Motion Playback
108
Editing Movies
Use
109
Movie and press the FUNC./SET
110
SET button
Use the or button to select Save and press the Func
Rotating Images in the Display
111
Images can be rotated clockwise 90 or 270 in the display
Play menu, select and press the FUNC./SET button
Attaching Sound Memos to Images
SET button to record
112
Use the or button to select Record and press the Func
Playing/Erasing Sound Memos
113
Play
Erase
Automated Playback Slide Shows
Starting a Slide Show
114
Slide Show menu will display
Press the or button
Selecting Images for Slide Shows
Display the Slide Show menu
115
116
Select images for the Slide Show
Use the or button to move between
Adjusting the Play Time and Repeat Settings
117
Seconds, 15 seconds, 30 seconds and Manual
Displayed or continues until stopped
To Cancel Protection
Protecting Images
118
Icon appears on protected images
Erasing Single Images
To exit instead of erasing, select Cancel
119
120
Erasing All Images
You can erase all the images saved on the SD card
121
122
About Printing
Digital Print Order Format
Dpof Print Settings
123
Direct Print Compatible Printing
Dpof Transfer Order
Setting the Dpof Print Settings
To cancel the Print Order settings, select Reset
Selecting Images for Printing
124
Select images for printing
125
Print Type Standard/ Both
Index
Display switches to index playback 3 images
To cancel the Dpof print settings, select Reset
126
127
Setting the Print Style
128
129
Print Type
Date
File No
Selecting Images for Transferring
130
Button to move
131
Between images
While in index playback, pressing
132
Downloading via a Camera to Computer Connection
Windows 2000 Mac
Downloading Directly from an SD Card
Computer System Requirements
133
Windows
Macintosh
134
Set the mode switch to Playback
135
Windows
Proceed to below
136
Following window will display
All Images/New Images/DPOF Trans. Images
Downloading Images by Direct Transfer
137
Select & Transfer/Wallpaper
Button or FUNC./SET button
138
Use the or button to select or , and press
Downloading Directly from an SD Card
139
See steps 2-4 and onward starting on p.134
Double-click the icon of the drive containing the SD card
Turn on the TV and switch it to Video mode
Viewing Images on a TV set
On the TV
140
Slide the mode switch to Shooting, Movie or Playback
141
Select the My Camera menu
Changing My Camera Settings
142
143
Registering My Camera Settings
Shutter Sound Selftimer Sound
144
Operation Sound Start-up Sound
145
Select an image or record a sound
Start-up Image
Sounds
File Format of My Camera Settings
Start-up, Operation, Self-timer and Shutter Sounds
146
File Size KB or less
147
List of Messages
148
149
Unidentified Image
Cannot magnify
Cannot rotate
150
Problem Cause Solution
Blinking
151
152
Shoot
153
Locked
Using an AC Adapter Kit Sold Separately
154
Camera Care and Maintenance
Camera Body
Lens
LCD Monitor
Specifications
156
157
158
Pixels
Playback Modes
Direct Print
159
SD Cards and Estimated Capacities
160
Still Images
Movie
Image File Sizes Estimated
Resolution
161
Battery Capacity Battery Pack NB-4L Fully charged
162
Test Conditions
Included memory card is used
Battery Pack NB-4L
Battery Charger CB-2LV/CB-2LVE
Compact Power Adapter CA-DC10
SD Memory Card
Tip for Using the Self-timer p.76
How to Adjust the Exposure p.91
Photo Tips and Information
164
ISO Speed p.98
Advanced Technique for the Macro mode p.68
165
Digital Macro
166
Image Comparison
30 cm 1.0 ft
167
168
169
170
171
172
173
174
Disclaimer
Trademark Acknowledgments
Canon, Pixma and Selphy are trademarks of Canon Inc
175
176
Default setting Setting available
177
Standard
Compact
CEL-SE7WA210