1. Introduction

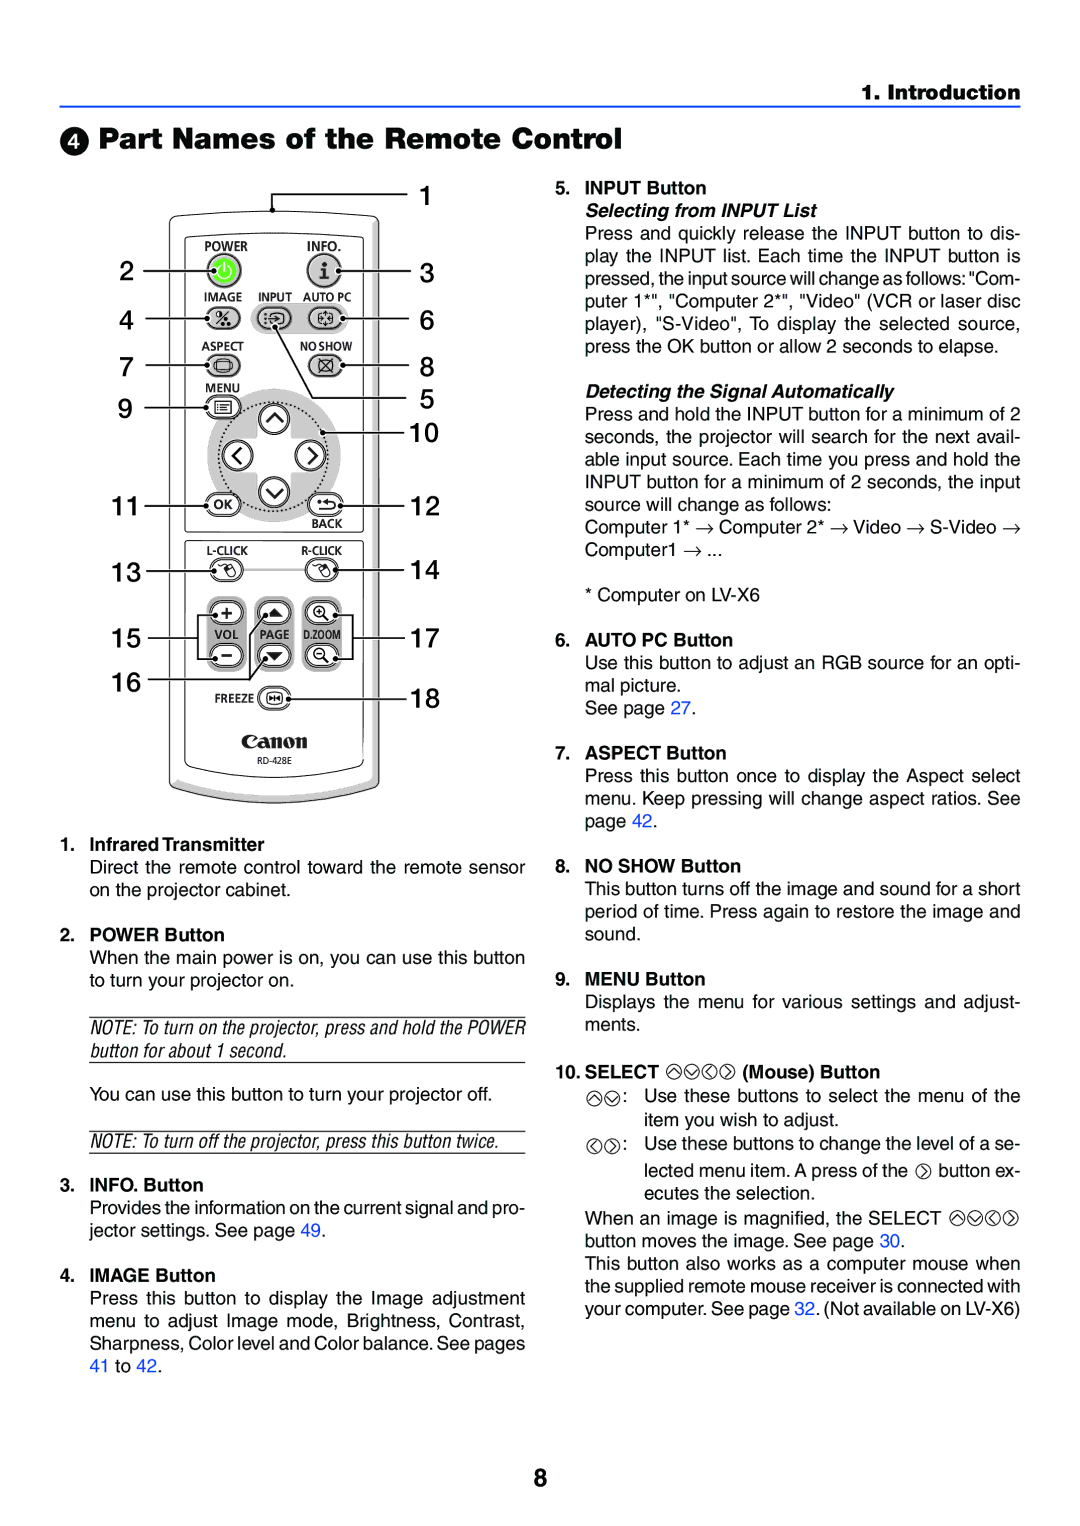
￿Part Names of the Remote Control

2

4

7

9

11

POWER INFO.

IMAGE INPUT AUTO PC

ASPECT

NO SHOW


MENU

BACK

L-CLICK R-CLICK

1

3

6

8

5

10

12

5.INPUT Button

Selecting from INPUT List

Press and quickly release the INPUT button to dis- play the INPUT list. Each time the INPUT button is pressed, the input source will change as follows: "Com- puter 1*", "Computer 2*", "Video" (VCR or laser disc player), "S-Video", To display the selected source, press the OK button or allow 2 seconds to elapse.

Detecting the Signal Automatically

Press and hold the INPUT button for a minimum of 2 seconds, the projector will search for the next avail- able input source. Each time you press and hold the INPUT button for a minimum of 2 seconds, the input

source will change as follows:

Computer 1* Computer 2* Video S-Video Computer1 ...

13 14

15


17


VOL

PAGE D.ZOOM


16

FREEZE

18


RD-428E

1.Infrared Transmitter

Direct the remote control toward the remote sensor on the projector cabinet.

2.POWER Button

When the main power is on, you can use this button to turn your projector on.

NOTE: To turn on the projector, press and hold the POWER button for about 1 second.

You can use this button to turn your projector off. NOTE: To turn off the projector, press this button twice.

3.INFO. Button

Provides the information on the current signal and pro- jector settings. See page 49.

4.IMAGE Button

Press this button to display the Image adjustment menu to adjust Image mode, Brightness, Contrast, Sharpness, Color level and Color balance. See pages 41 to 42.

*Computer on LV-X6

6.AUTO PC Button

Use this button to adjust an RGB source for an opti- mal picture.

See page 27.

7.ASPECT Button

Press this button once to display the Aspect select menu. Keep pressing will change aspect ratios. See page 42.

8.NO SHOW Button

This button turns off the image and sound for a short period of time. Press again to restore the image and sound.

9.MENU Button

Displays the menu for various settings and adjust- ments.

10.SELECT (Mouse) Button

: Use these buttons to select the menu of the item you wish to adjust.

: Use these buttons to change the level of a se-

lected menu item. A press of the button ex- ecutes the selection.

When an image is magnified, the SELECT button moves the image. See page 30.

This button also works as a computer mouse when the supplied remote mouse receiver is connected with your computer. See page 32. (Not available on LV-X6)

8

Page 17
Image 17
Canon LV-X6, LV-7250 manual Part Names of the Remote Control

LV-X6, LV-7250 specifications

The Canon LV-7250 and LV-X6 are advanced projector models renowned for their quality, versatility, and ease of use. Designed primarily for educational and corporate environments, these projectors combine high-performance features with user-friendly technology, making them ideal for presentations, lectures, and business meetings.

Starting with the Canon LV-7250, this model boasts a bright 2600 ANSI lumens lamp, ensuring clear and vivid images even in well-lit environments. Its native XGA resolution (1024 x 768) guarantees sharp text and detailed graphics, crucial for presentations and visual displays. The projector supports a variety of input options, including HDMI and standard VGA, making connectivity to various devices seamless. Additionally, the LV-7250 includes a 1.2x optical zoom and keystone correction features, allowing for flexible setup and easy alignment of images.

The Canon LV-X6, on the other hand, elevates the projection experience with its enhanced brightness of 3000 ANSI lumens and native SVGA resolution (800 x 600). This model is specifically designed for larger venues, where higher luminosity is essential. The LV-X6 features multiple connectivity options, including HDMI, USB, and composite video, accommodating different presentation formats and devices.

Both models incorporate advanced DLP technology, offering high contrast ratios that enhance the clarity and depth of projected images. They also ensure long-lasting performance with an extended lamp life of up to 6000 hours in Eco mode, reducing the need for frequent replacements and enhancing cost-effectiveness.

In terms of portability, both projectors are lightweight and compact, making them easy to transport between locations. They come equipped with built-in speakers, providing clear audio playback without the need for external sound systems, although connections for separate audio systems are available for enhanced sound quality.

The user-friendly interface and remote control availability further simplify operation, allowing users to navigate menus swiftly and access features easily. A robust cooling system ensures efficient thermal management, keeping the projectors operational for extended periods without overheating.

Overall, the Canon LV-7250 and LV-X6 models epitomize reliability, performance, and practicality, making them excellent choices for anyone seeking high-quality projection solutions in professional settings.