1. Introduction

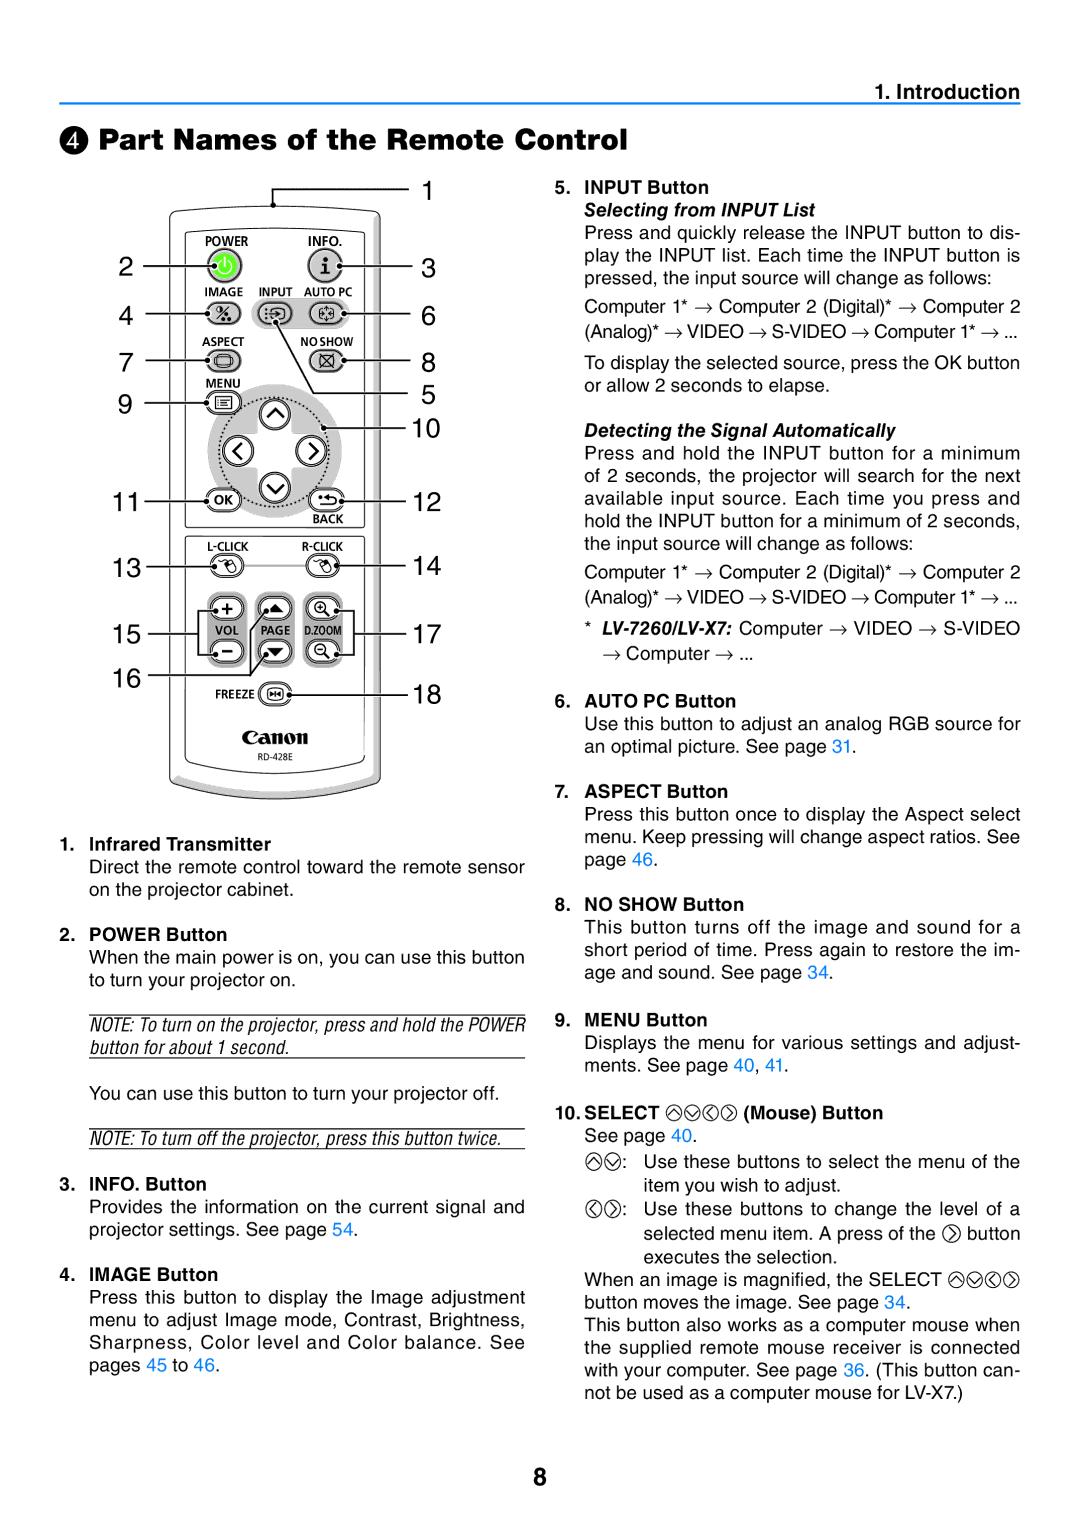
Part Names of the Remote Control


1


POWER

INFO.


2


3


IMAGE

INPUT AUTO PC


4


6

7

ASPECT

NO SHOW

8

MENU


9


5


10


11


BACK

12


13

L-CLICK

R-CLICK

14


15

VOL

PAGE D.ZOOM

17


16


FREEZE

18


RD-428E

1.Infrared Transmitter

Direct the remote control toward the remote sensor on the projector cabinet.

2.POWER Button

When the main power is on, you can use this button to turn your projector on.

NOTE: To turn on the projector, press and hold the POWER button for about 1 second.

You can use this button to turn your projector off.

NOTE: To turn off the projector, press this button twice.

3.INFO. Button

Provides the information on the current signal and projector settings. See page 54.

4.IMAGE Button

Press this button to display the Image adjustment menu to adjust Image mode, Contrast, Brightness, Sharpness, Color level and Color balance. See pages 45 to 46.

5.INPUT Button

Selecting from INPUT List

Press and quickly release the INPUT button to dis- play the INPUT list. Each time the INPUT button is pressed, the input source will change as follows:

Computer 1* → Computer 2 (Digital)* → Computer 2 (Analog)* → VIDEO → S-VIDEO → Computer 1* → ...

To display the selected source, press the OK button or allow 2 seconds to elapse.

Detecting the Signal Automatically

Press and hold the INPUT button for a minimum of 2 seconds, the projector will search for the next available input source. Each time you press and hold the INPUT button for a minimum of 2 seconds, the input source will change as follows:

Computer 1* → Computer 2 (Digital)* → Computer 2 (Analog)* → VIDEO → S-VIDEO → Computer 1* → ...

* LV-7260/LV-X7:Computer → VIDEO → S-VIDEO → Computer → ...

6.AUTO PC Button

Use this button to adjust an analog RGB source for an optimal picture. See page 31.

7.ASPECT Button

Press this button once to display the Aspect select menu. Keep pressing will change aspect ratios. See page 46.

8.NO SHOW Button

This button turns off the image and sound for a short period of time. Press again to restore the im- age and sound. See page 34.

9.MENU Button

Displays the menu for various settings and adjust- ments. See page 40, 41.

10.SELECT (Mouse) Button See page 40.

: Use these buttons to select the menu of the item you wish to adjust.

: Use these buttons to change the level of a selected menu item. A press of the button executes the selection.

When an image is magnified, the SELECT button moves the image. See page 34.

This button also works as a computer mouse when the supplied remote mouse receiver is connected with your computer. See page 36. (This button can- not be used as a computer mouse for LV-X7.)

Page 17
Image 17
Canon LV-7365 user manual ❹ Part Names of the Remote Control

LV-7365 specifications

The Canon LV-7365 is a compact and versatile multimedia projector that stands out for its high-quality performance and advanced features, making it an excellent choice for both professional and educational environments. With a native resolution of WXGA (1280 x 800), this projector delivers clear and vibrant images, ensuring that presentations and videos are displayed with stunning detail and clarity.

One of the standout features of the Canon LV-7365 is its brightness, rated at 3,500 lumens. This high brightness level allows it to perform well in various lighting conditions, making it suitable for use in well-lit classrooms or conference rooms. The projector utilizes DLP technology, which not only contributes to its high brightness but also enhances color accuracy and contrast, resulting in vivid visuals that captivate audiences.

The LV-7365 has a projection ratio of 1.5:1, providing flexibility in setting up the projector at different distances from the screen. This feature is particularly useful in situations where space may be limited, allowing users to achieve an optimal image size without compromising on quality. Additionally, it supports a wide range of aspect ratios, including 16:10, 16:9, and 4:3, catering to various content formats.

Connectivity is another strong point of the Canon LV-7365. It offers HDMI, VGA, USB, and composite video inputs, allowing for seamless integration with various devices such as laptops, Blu-ray players, and document cameras. The inclusion of a 5-watt built-in speaker further enhances its usability, providing audio support without the need for external sound equipment.

In terms of portability, the LV-7365 is lightweight and compact, making it easy to transport and set up in different locations. Its robust design and reliable build quality ensure that it can withstand the rigors of regular use, making it a dependable choice for ongoing presentations or classroom instruction.

Moreover, the projector features an Eco Mode, which helps to extend the lamp life to approximately 8,000 hours while reducing power consumption. This not only helps to lower operational costs but also contributes to a more environmentally friendly usage.

Overall, the Canon LV-7365 combines impressive brightness, flexible connectivity options, and portability, making it an ideal choice for educators, business professionals, and anyone in need of a reliable projector that delivers consistent performance. Its advanced DLP technology ensures that every presentation is impactful, making it a valuable asset for any setting where visual communication is key.