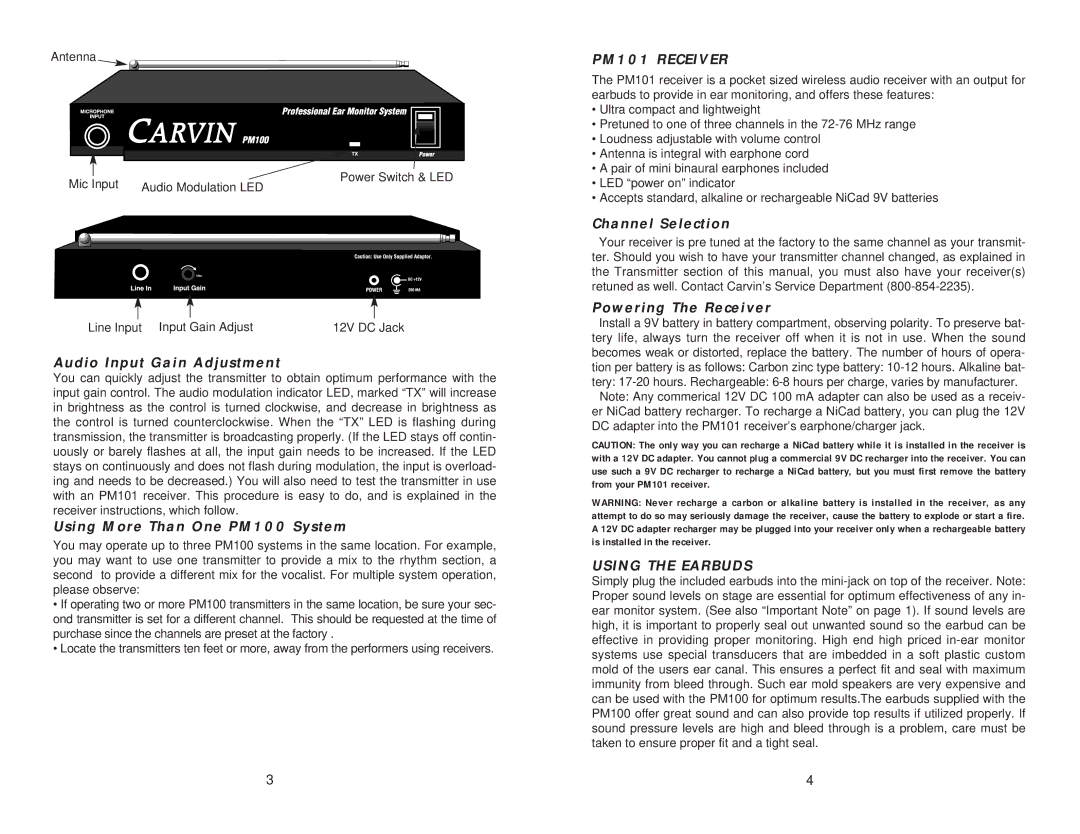
Antenna
|
|
|
|
|
|
|
|
|
|
|
|
|
|
|
|
| Power Switch & LED |
|
| ||||
|
|
|
|
|
|
| |||||
Mic Input |
|
|
| ||||||||
Audio Modulation LED |
|
| |||||||||
|
|
|
|
|
|
|
|
|
|
|
|
|
|
|
|
|
|
|
|
|
|
|
|
|
|
|
|
|
|
|
|
|
|
|
|
Line Input Input Gain Adjust | 12V DC Jack |
Audio Input Gain Adjustment
You can quickly adjust the transmitter to obtain optimum performance with the input gain control. The audio modulation indicator LED, marked “TX” will increase in brightness as the control is turned clockwise, and decrease in brightness as the control is turned counterclockwise. When the “TX” LED is flashing during transmission, the transmitter is broadcasting properly. (If the LED stays off contin- uously or barely flashes at all, the input gain needs to be increased. If the LED stays on continuously and does not flash during modulation, the input is overload- ing and needs to be decreased.) You will also need to test the transmitter in use with an PM101 receiver. This procedure is easy to do, and is explained in the receiver instructions, which follow.
Using More Than One PM100 System
You may operate up to three PM100 systems in the same location. For example, you may want to use one transmitter to provide a mix to the rhythm section, a second to provide a different mix for the vocalist. For multiple system operation, please observe:
•If operating two or more PM100 transmitters in the same location, be sure your sec- ond transmitter is set for a different channel. This should be requested at the time of purchase since the channels are preset at the factory .
•Locate the transmitters ten feet or more, away from the performers using receivers.
PM101 RECEIVER
The PM101 receiver is a pocket sized wireless audio receiver with an output for earbuds to provide in ear monitoring, and offers these features:
•Ultra compact and lightweight
•Pretuned to one of three channels in the
•Loudness adjustable with volume control
•Antenna is integral with earphone cord
•A pair of mini binaural earphones included
•LED “power on” indicator
•Accepts standard, alkaline or rechargeable NiCad 9V batteries
Channel Selection
Your receiver is pre tuned at the factory to the same channel as your transmit- ter. Should you wish to have your transmitter channel changed, as explained in the Transmitter section of this manual, you must also have your receiver(s) retuned as well. Contact Carvin’s Service Department
Powering The Receiver
Install a 9V battery in battery compartment, observing polarity. To preserve bat- tery life, always turn the receiver off when it is not in use. When the sound becomes weak or distorted, replace the battery. The number of hours of opera- tion per battery is as follows: Carbon zinc type battery:
Note: Any commerical 12V DC 100 mA adapter can also be used as a receiv- er NiCad battery recharger. To recharge a NiCad battery, you can plug the 12V DC adapter into the PM101 receiver’s earphone/charger jack.
CAUTION: The only way you can recharge a NiCad battery while it is installed in the receiver is with a 12V DC adapter. You cannot plug a commercial 9V DC recharger into the receiver. You can use such a 9V DC recharger to recharge a NiCad battery, but you must first remove the battery from your PM101 receiver.
WARNING: Never recharge a carbon or alkaline battery is installed in the receiver, as any attempt to do so may seriously damage the receiver, cause the battery to explode or start a fire. A 12V DC adapter recharger may be plugged into your receiver only when a rechargeable battery is installed in the receiver.
USING THE EARBUDS
Simply plug the included earbuds into the
3 | 4 |