SPECIFICATIONS

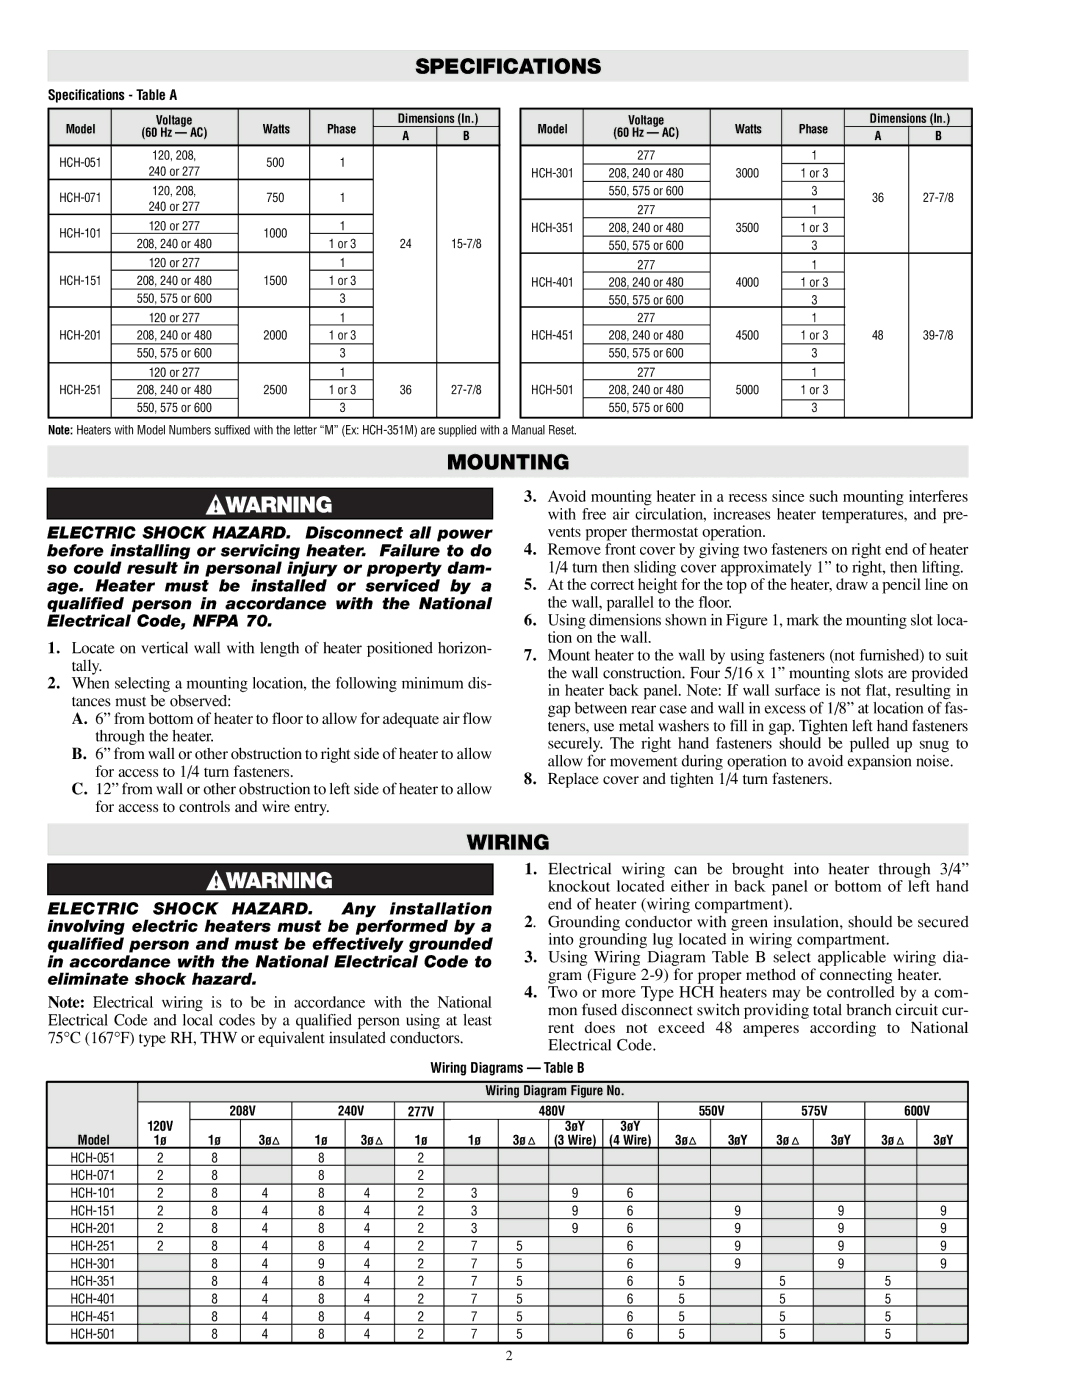
Specifications - Table A

Model

Voltage

Watts

Phase

Dimensions (In.)

(60 Hz — AC)

A

B

HCH-051

120, 208,

500

1


240 or 277


HCH-071

120, 208,

750

1


240 or 277


HCH-101

120 or 277

1000

1


208, 240 or 480

1 or 3

24

15-7/8


120 or 277


1


HCH-151

208, 240 or 480

1500

1 or 3


550, 575 or 600


3


120 or 277


1


HCH-201

208, 240 or 480

2000

1 or 3


550, 575 or 600


3


120 or 277


1


HCH-251

208, 240 or 480

2500

1 or 3

36

27-7/8


550, 575 or 600


3


Model

Voltage

Watts

Phase


Dimensions (In.)

(60 Hz — AC)


A

B


277


1


HCH-301

208, 240 or 480

3000

1 or 3


550, 575 or 600


3

36

27-7/8


277


1


HCH-351

208, 240 or 480

3500

1 or 3


550, 575 or 600


3


277


1


HCH-401

208, 240 or 480

4000

1 or 3


550, 575 or 600


3


277


1


HCH-451

208, 240 or 480

4500

1 or 3

48

39-7/8


550, 575 or 600


3


277


1


HCH-501

208, 240 or 480

5000

1 or 3


550, 575 or 600


3


Note: Heaters with Model Numbers suffixed with the letter “M” (Ex: HCH-351M) are supplied with a Manual Reset.

MOUNTING

ELECTRIC SHOCK HAZARD. Disconnect all power before installing or servicing heater. Failure to do so could result in personal injury or property dam- age. Heater must be installed or serviced by a qualified person in accordance with the National Electrical Code, NFPA 70.

1.Locate on vertical wall with length of heater positioned horizon- tally.

2.When selecting a mounting location, the following minimum dis- tances must be observed:

A.6” from bottom of heater to floor to allow for adequate air flow through the heater.

B.6” from wall or other obstruction to right side of heater to allow for access to 1/4 turn fasteners.

C.12” from wall or other obstruction to left side of heater to allow for access to controls and wire entry.

3.Avoid mounting heater in a recess since such mounting interferes with free air circulation, increases heater temperatures, and pre- vents proper thermostat operation.

4.Remove front cover by giving two fasteners on right end of heater 1/4 turn then sliding cover approximately 1” to right, then lifting.

5.At the correct height for the top of the heater, draw a pencil line on the wall, parallel to the floor.

6.Using dimensions shown in Figure 1, mark the mounting slot loca- tion on the wall.

7.Mount heater to the wall by using fasteners (not furnished) to suit the wall construction. Four 5/16 x 1” mounting slots are provided in heater back panel. Note: If wall surface is not flat, resulting in gap between rear case and wall in excess of 1/8” at location of fas- teners, use metal washers to fill in gap. Tighten left hand fasteners securely. The right hand fasteners should be pulled up snug to allow for movement during operation to avoid expansion noise.

8.Replace cover and tighten 1/4 turn fasteners.

WIRING

ELECTRIC SHOCK HAZARD. Any installation involving electric heaters must be performed by a qualified person and must be effectively grounded in accordance with the National Electrical Code to eliminate shock hazard.

Note: Electrical wiring is to be in accordance with the National Electrical Code and local codes by a qualified person using at least 75°C (167°F) type RH, THW or equivalent insulated conductors.

1.Electrical wiring can be brought into heater through 3/4” knockout located either in back panel or bottom of left hand end of heater (wiring compartment).

2. Grounding conductor with green insulation, should be secured into grounding lug located in wiring compartment.

3.Using Wiring Diagram Table B select applicable wiring dia- gram (Figure 2-9) for proper method of connecting heater.

4.Two or more Type HCH heaters may be controlled by a com- mon fused disconnect switch providing total branch circuit cur- rent does not exceed 48 amperes according to National Electrical Code.

Wiring Diagrams — Table B


Wiring Diagram Figure No.


208V


240V

277V


480V


550V


575V


600V


120V


3øY

3øY


Model

(3 Wire)

(4 Wire)

3øY

3øY

3øY

HCH-051

2

8


8


2


HCH-071

2

8


8


2


HCH-101

2

8

4

8

4

2

3


9

6


HCH-151

2

8

4

8

4

2

3


9

6


9


9


9

HCH-201

2

8

4

8

4

2

3


9

6


9


9


9

HCH-251

2

8

4

8

4

2

7

5


6


9


9


9

HCH-301


8

4

9

4

2

7

5


6


9


9


9

HCH-351


8

4

8

4

2

7

5


6

5


5


5


HCH-401


8

4

8

4

2

7

5


6

5


5


5


HCH-451


8

4

8

4

2

7

5


6

5


5


5


HCH-501


8

4

8

4

2

7

5


6

5


5


5


2


Page 2
Image 2
Chromalox PF422-5 manual Mounting, Specifications Table a, Wiring Diagrams Table B

PF422-5 specifications

The Chromalox PF422-5 is a state-of-the-art industrial heating solution designed to meet the demands of various high-temperature applications while prioritizing efficiency and safety. This product stands out in the market due to its advanced features and integrated technologies that provide reliable performance.

One of the key characteristics of the PF422-5 is its high power density, allowing it to deliver rapid heating in applications where time is critical. The unit is equipped with precision temperature control, enabling operators to maintain optimal thermal conditions within a specified range. This level of control is critical for processes requiring specific temperature thresholds, such as in the chemical and food industries.

The PF422-5 utilizes advanced heating technologies, including robust heating elements engineered from high-quality materials that ensure durability and long life expectancy. This durability translates into reduced maintenance needs and lower operational costs over time. The heating elements are also designed to withstand harsh environments, making the PF422-5 suitable for a wide range of industrial settings.

Safety is paramount in any industrial heating application, and the PF422-5 comes equipped with multiple safety features. These include over-temperature protection, integrated monitoring systems, and fail-safe designs that prevent overheating and potential damage to surrounding systems or materials. Such precautions are integral to ensuring both personnel safety and equipment reliability.

Another notable feature of the PF422-5 is its energy efficiency. Innovative engineering has led to lower energy consumption without compromising performance. This makes the PF422-5 not only a cost-effective choice but also an environmentally friendly one. Many industries are now looking for ways to reduce their carbon footprint, and the PF422-5 meets this demand by minimizing energy waste.

The PF422-5 is versatile and can be customized to fit various installation configurations. Whether it is used in commercial heating systems, industrial ovens, or specialized equipment, its adaptability highlights its relevance across numerous industries. The controls are designed to integrate seamlessly with existing systems, making upgrades straightforward for any operation.

In conclusion, the Chromalox PF422-5 is an innovative and reliable industrial heating solution characterized by high power density, advanced safety features, energy efficiency, and adaptability to diverse applications. Its technological advancements make it a leader in the heating solutions market, making it an ideal choice for industries looking to enhance their heating processes.