Adding or Replacing an AC Power Supply

Step 3 Disconnect the power cable from the power supply that you are replacing.

Step 4 Loosen the captive screws on the power supply and pull the power supply from the chassis using the handle on the faceplate.

Step 5 Before you install the new power supply, make sure that its power switch is set to the standby position (see Figure 4).

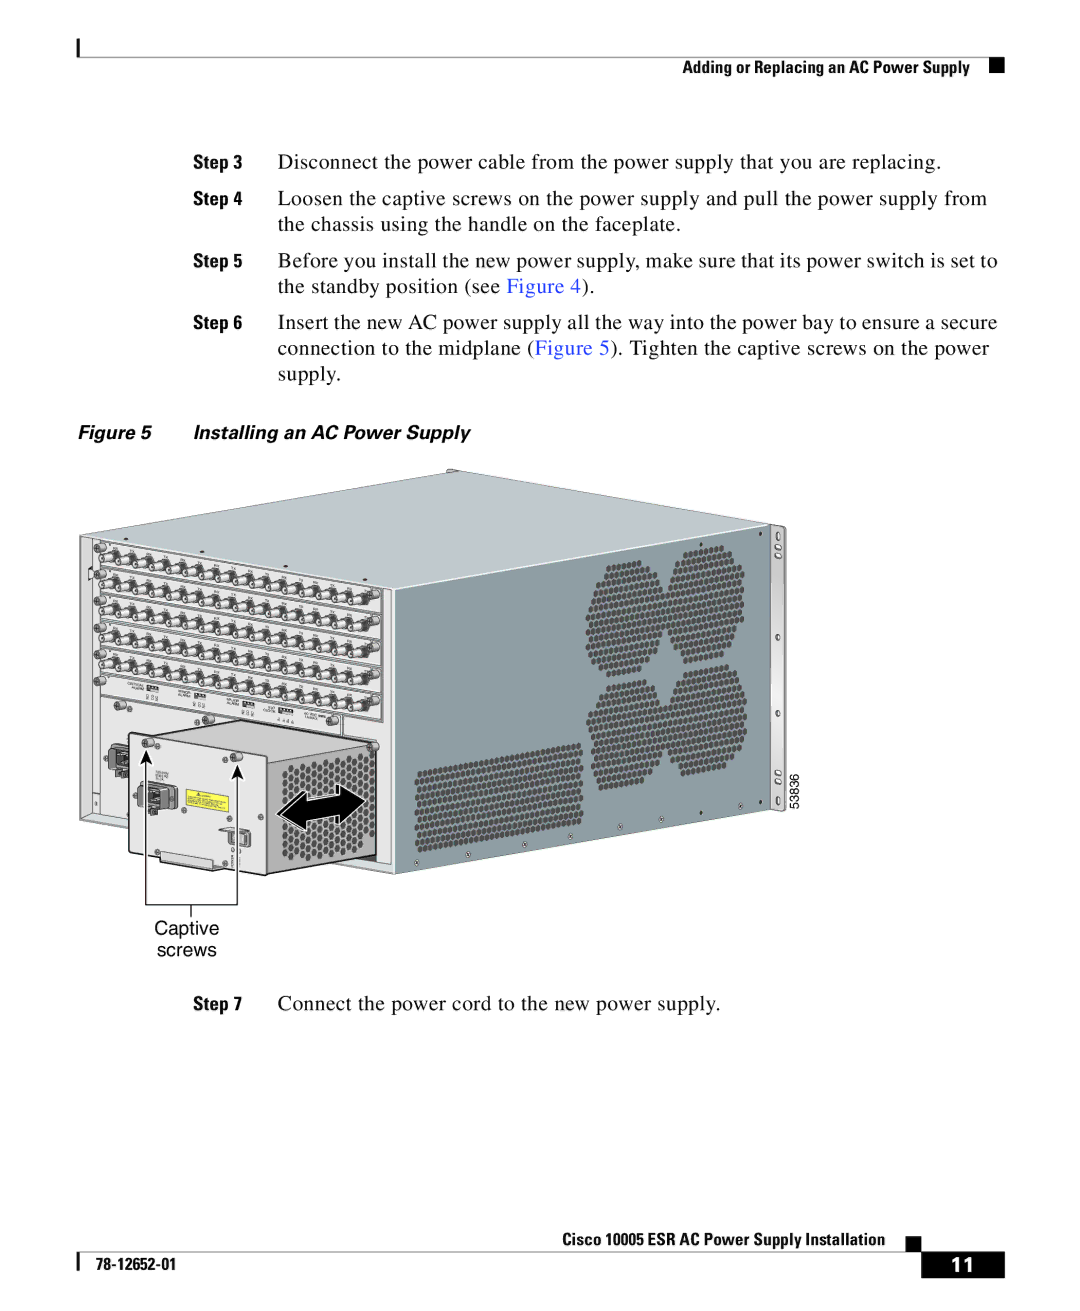
Step 6 Insert the new AC power supply all the way into the power bay to ensure a secure connection to the midplane (Figure 5). Tighten the captive screws on the power supply.

Figure 5 Installing an AC Power Supply

RX

TX


RX


TX


RX

TX


RX


TX


RX


RX

TX


TX


RX


RX


TX


TX


RX


RX


TX


TX


RX


RX

TX


TX


RX


RX


TX


TX


RX


RX

TX


TX

RX


RX


TX


TX


RX


RX

TX


TX


RX


RX


TX


TX


RX

TX


RX

TX


RX

TX


RX


TX


RX

TX


TX


RX


RX


TX


TX


RX


RX


TX


TX


RX


RX

TX


TX


RX


RX

TX


TX


RX

TX


CRITICAL


RX


TX

RX


ALARM


MINOR


TX


NO CO

NC


ALARM


MAJOR


RX

TX


NO

CO

NC


ALARM


EXT


NO

CO NC

CLOCK


60 VDC


A+

A-

B+ B-

1A MAX


100-240V


50/60

HZ


15-7A


THIS UNIT HASCAUTION


SUPPLY CORD. MORE THAN


POWER SUPPLYDISCONNECTONE POWER


SERVICING

CORDS

TWO


TO AVOID


BEFORE (2)


100-240V


ELECTRIC SHOCK.


53836


50/60 HZ


SPSTHEOURISPWVPEUICLRYNINITSCGUOHPRTAPODSL.YCADMVACISOOUOCRIDTREOIODENTNSLNHEBEACENCTFTOROTNICRWEESOPHO(2OW)CEKR.


15-7A


POWER

FAULT


POWER

FAULT


Captive


screws


Step 7 Connect the power cord to the new power supply.

Cisco 10005 ESR AC Power Supply Installation


78-12652-01

11


Page 11
Image 11
Cisco Systems 10005 manual Connect the power cord to the new power supply

10005 specifications

Cisco Systems has established itself as a leader in networking solutions, and one of its prominent offerings is the Cisco 10005 geared towards service providers and large enterprises. This high-performance router is part of the ASR 1000 Series and is designed to deliver exceptional scalability, flexibility, and security.

The Cisco 10005 is optimized for various network architectures and supports both IPv4 and IPv6 protocols. One of its main features is its ability to provide a rich set of services such as firewall protection, intrusion prevention, and content filtering. This multi-service capability makes it a versatile solution for organizations looking to consolidate their networking infrastructure while ensuring robust security measures.

Regarding performance, the Cisco 10005 boasts an impressive data throughput that can be utilized for a variety of applications including video streaming, cloud computing, and high-traffic web services. Equipped with advanced hardware, it can process millions of packets per second, making it suitable for heavy-duty data center environments.

One of the key technologies employed in the Cisco 10005 is the Cisco IOS XE software, which enables better automation and orchestration capabilities. This software supports programmability, allowing network operators to manage their networks more efficiently. The device also supports various APIs that facilitate integration with third-party applications, enhancing its flexibility to adapt to changing business needs.

Another distinguishing characteristic of the Cisco 10005 is its modular architecture. This enables organizations to scale their investments by adding or removing interfaces and features as required. The router supports a variety of interfaces including Ethernet, T1/E1, and others, catering to different connectivity needs.

Energy efficiency is also a priority with the Cisco 10005. The router is designed to consume less power while delivering high performance, thus supporting organizations’ goals towards sustainability.

The support for quality of service (QoS) ensures that critical applications receive the bandwidth they need, preventing latency and enabling seamless connectivity for users. Additionally, it includes advanced monitoring and reporting tools to help network administrators maintain optimal performance.

In summary, the Cisco 10005 offers an extensive suite of features and technologies aimed at delivering high performance, security, and scalability for modern networking demands. With its advanced capabilities and modular design, it has positioned itself as an ideal solution for organizations looking to enhance their network infrastructure.