Cisco Systems CTSMX30055K9 dimensions Connecting the cables, Switching on the system, Finishing up

Models: MX300 CTSMX30055K9

1 2
Download 2 pages 49.92 Kb
Page 2
Image 2

Installing Cisco TelePresence MX300 - Floor Stand

4 Connecting the cables

iConnect the cables. The connectors are placed at the rear side of the LCD video unit. See illustration for details.

iiLead the cables down the cable channel.

Local area network (LAN)

Touch controller

PC video input

PC audio input

5 Switching on the system

iPlug in the cables from the LCD video unit as appropriate, and make sure the Touch controller is connected.

SAFETY REQUIREMENT: The equipment shall be installed close to the socket outlet. The socket outlet shall be easily accessible after installation.

iiSwitch on the system.

The power switch is located above the power connector on the rear side of the LCD video unit.

iiiWait while the MX300 starts up. Normally this takes just a few minutes. If an automatic software upgrade occurs the start-up process may take up to 15 minutes.

When the home menu and contact list appear on the Touch controller the system is ready to use.

CAUTION: To alter the camera position always use the Camera Control panel on the Touch controller; never move the camera manually when the power is switched on.

7 Finishing up

iRemove the protective foil from the LCD video unit.

iiIf required, clean the Touch display (not the LCD video display) using the dry cleaning cloth provided.

iiiUnfold the rear-mounted foot on the Touch controller to increase its tilt.

LCD video unit placement

The placement of the video system in a room will influence the overall conferencing experience both at the local and remote sites.

You should aim for:

Good illumination of a person’s face to avoid annoying shadows.

No direct light on the LCD video display to avoid reflections.

The illustrations to the right show in general where to place your MX300 system depending on the window positions in the room. For each room layout the MX300 position(s) marked with A are preferred, then B and finally C. You should avoid any position not shown in the illustrations.

B

A B


C

C


B A

A

A


A

Power

switch

Audio line output (cable not included)

6 Snapping on the floor stand covers and back cover

EMC A-Class declaration

声 明

B

iii Snap on the cable channel


lid for strain relief.

Power

Note: When you position

supply

the cables side by side it


is easier to snap on the lid.


Microphones

AC Input

For maintenance only

Reset factory settings

LCD video unit connectors

iEnsure that the cables are placed under the hooks in the cable slots.

Then snap on the two floor stand covers, one at a time. The covers are fastened with magnets when they are lowered toward the base.

ii Snap on the back cover to hide the connectors and cables.

The back cover is delivered in a separate box.

此为A级产品,在生活环境中,该产品可能会造成无线电干扰。在这种 情况下,可能需要用户对其干扰采取切实可行的措施。

WARNING: This is a class A product. In a domestic environment this product may cause radio interference in which case the user may be required to take adequate measures.

Microphone placement

Correctly placed microphones are very important to obtain a

ivLead the cables in the cable slots in the floor stand. Be careful to put the cables below the hooks.

You can lead the cables out at the front or back of the system as appropriate.

Note: If cables are longer than you need, you can lead them around the cable slot several times. If more convenient, do this before connecting the cables to the unit.

You can lock/unlock the back cover by lifting this handle. Use both hands if required.

On our web site you will find an overview of the

worldwide Cisco contacts.

Go to: http://www.cisco.com/web/siteassets/contacts.

Corporate Headquarters

Cisco Systems, Inc.

170 West Tasman Dr.

San Jose, CA 95134 USA

good conferencing experience.

We recommend that you place the microphone(s) as close to all users as possible, and that you avoid putting equipment with noisy fans, such as computers and projectors, close to a microphone.

If you are using more than one microphone, place them far apart to minimize the interference. The required distance between the microphones depends on the acoustics of your room; normally 2 m (6.5 ft) will suffice.

The MX300 internal microphone may suffice in a small office or meeting room when all participants are closer to the display than 2.5 m (8 ft). Still a correctly placed external microphone often performs better. The internal microphone is automatically disabled when connecting an external microphone.

If you want to learn more about optimizing your office or meeting room for video conferencing, please read the Video conferencing room primer and Guidelines for video conferencing room acoustics documents that are available on the Cisco web site, http://www.cisco.com/go/telepresence/docs.

78-20502-01 MX300 Floor Stand Installation Sheet 2011 NOVEMBER © 2011 Cisco Systems, Inc. All rights reserved.

Page 2
Image 2
Cisco Systems CTSMX30055K9 Connecting the cables, Switching on the system, Finishing up, LCD video unit placement

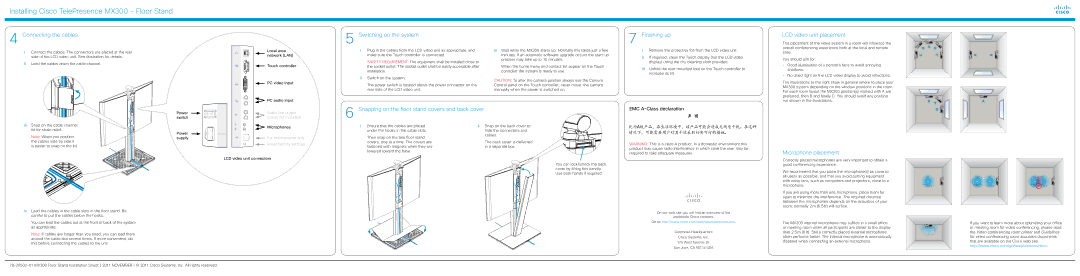
MX300, CTSMX30055K9 specifications

Cisco Systems has long been recognized as a leader in networking and communication technologies, and the Cisco TelePresence MX300 (CTSMX30055K9) exemplifies the company’s commitment to fostering exceptional video collaboration solutions. The MX300 is particularly designed for medium-sized meeting rooms, making it an ideal choice for enterprises looking to enhance their videoconferencing capabilities.

One of the standout features of the Cisco MX300 is its remarkable video experience. With support for up to 1080p high-definition video at 30 frames per second, users can enjoy crisp and clear visual quality during meetings. This resolution ensures that participants feel as though they are in the same room, regardless of their physical location. The MX300 also includes advanced video processing technology, which helps optimize picture quality even in varying bandwidth conditions.

In terms of audio, the MX300 is equipped with Cisco's intelligent audio technology. It utilizes multiple microphones and smart processing to ensure that all voices in the room are captured clearly, eliminating unwanted background noise. This results in a natural conversational experience, allowing for seamless interactions among participants.

Another significant characteristic of the MX300 is its user-friendly interface. The device comes with a simple remote control and touchscreen capabilities that make it easy for users to initiate calls, share content, and manage meetings. Integration with Cisco's Webex platform further enhances its usability, allowing users to join meetings with just one click.

The MX300 is known for its flexibility and scalability. It can be easily integrated into an existing IT infrastructure, supporting various endpoints and devices, which contributes to a more cohesive video collaboration experience. Additionally, it features interoperability with other video conferencing systems, ensuring that organizations can connect with partners and clients regardless of their technology stack.

Security is another strong suit of the Cisco MX300. The device incorporates robust security protocols, including encryption and secure access controls, safeguarding sensitive information shared during meetings. This emphasis on security is critical for organizations seeking to maintain compliance and protect their data.

Overall, the Cisco TelePresence MX300 (CTSMX30055K9) is a powerful solution for medium-sized meeting rooms, offering high-definition video, intelligent audio processing, and a user-friendly interface. With its flexibility, scalability, and strong security features, the MX300 stands out as an ideal choice for organizations committed to effective communication and collaboration. By enhancing the quality of virtual meetings, Cisco's MX300 continues to play a vital role in transforming the workplace into an environment where ideas can be shared effortlessly, fostering innovation and productivity.