change the default SSID linksys to a unique name.
I Wireless Channel. Select the appropriate channel from the list provided to correspond with your network settings. All devices in your wireless network must broadcast on the same channel in order to function correctly.
J Wireless SSID Broadcast. When wireless clients survey the local area for wireless networks to associate with, they will detect the SSID broadcast by the Router. To broadcast the Router's SSID, keep the default setting, Enable. If you do not want to broadcast the Router's SSID, then select Disable.
K Change these settings as described here and click the Save Settings button to apply your changes.
L Power your modem off and back on again.
M
N Test the setup by opening your web browser and entering
http://www.linksys.com/ registration. (Figure N)
The installation of the Wireless-G Broadband Router is complete.
N
NOTE: For more advanced settings and security options, refer to the User Guide on the Setup CD-ROM.
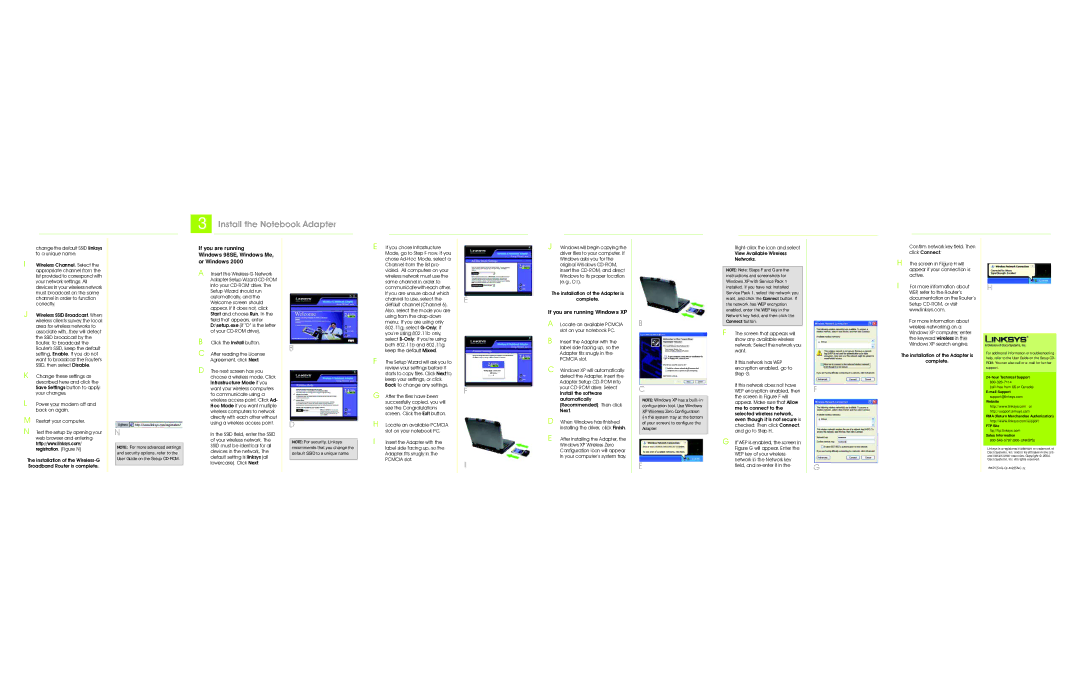
If you are running
Windows 98SE, Windows Me, or Windows 2000
A Insert the Wireless-G Network Adapter Setup Wizard CD-ROM into your CD-ROM drive. The Setup Wizard should run automatically, and the Welcome screen should appear. If it does not, click Start and choose Run. In the field that appears, enter D:\setup.exe (if “D” is the letter of your CD-ROM drive).
B Click the Install button.
C After reading the License Agreement, click Next.
D The next screen has you choose a wireless mode. Click Infrastructure Mode if you want your wireless computers to communicate using a wireless access point. Click Ad- Hoc Mode if you want multiple wireless computers to network directly with each other without using a wireless access point.
In the SSID field, enter the SSID of your wireless network. The SSID must be identical for all devices in the network. The default setting is linksys (all lowercase). Click Next.
B
D
NOTE: For security, Linksys recommends that you change the default SSID to a unique name.
E If you chose Infrastructure Mode, go to Step F now. If you chose Ad-Hoc Mode, select a Channel from the list pro- vided. All computers on your wireless network must use the same channel in order to communicate with each other. If you are unsure about which channel to use, select the default channel (Channel 6). Also, select the mode you are using from the drop-down menu: If you are using only 802.11g, select G-Only; if you’re using 802.11b only, select B-Only; if you’re using both 802.11b and 802.11g, keep the default Mixed.
F The Setup Wizard will ask you to review your settings before it starts to copy files. Click Next to keep your settings, or click Back to change any settings.
G After the files have been successfully copied, you will see the Congratulations screen. Click the Exit button.
H Locate an available PCMCIA slot on your notebook PC.
I Insert the Adapter with the label side facing up, so the Adapter fits snugly in the PCMCIA slot.
J Windows will begin copying the driver files to your computer. If Windows asks you for the original Windows CD-ROM, insert the CD-ROM, and direct Windows to its proper location (e.g., D:\).
The installation of the Adapter is
complete.
If you are running Windows XP
A Locate an available PCMCIA slot on your notebook PC.
B Insert the Adapter with the label side facing up, so the Adapter fits snugly in the PCMCIA slot.
C Windows XP will automatically detect the Adapter. Insert the Adapter Setup CD-ROM into your CD-ROM drive. Select Install the software automatically (Recommended). Then click Next.
D
E After installing the Adapter, the
Windows XP Wireless Zero Configuration icon will appear in your computer’s system tray.
B
C
NOTE: Windows XP has a built-in configuration tool. Use Windows XP Wireless Zero Configuration (in the system tray at the bottom of your screen) to configure the Adapter.
E
Right-click the icon and select View Available Wireless Networks.
NOTE: Note: Steps F and G are the instructions and screenshots for Windows XP with Service Pack 1 installed. If you have not installed Service Pack 1, select the network you want, and click the Connect button. If the network has WEP encryption enabled, enter the WEP key in the Network key field, and then click the
Connect button.
F The screen that appears will show any available wireless network. Select the network you want.
If this network has WEP encryption enabled, go to Step G.
If this network does not have WEP encryption enabled, then the screen in Figure F will appear. Make sure that Allow me to connect to the selected wireless network, even though it is not secure is checked. Then click Connect, and go to Step H.
G If WEP is enabled, the screen in Figure G will appear. Enter the WEP key of your wireless network in the Network key field, and re-enter it in the
Confirm network key field. Then click Connect.
H The screen in Figure H will appear if your connection is active.
I For more information about WEP, refer to the Router’s documentation on the Router’s Setup CD-ROM, or visit www.linksys.com.
For more information about wireless networking on a Windows XP computer, enter the keyword wireless in the Windows XP search engine.
The installation of the Adapter is
complete.
H
For additional information or troubleshooting help, refer to the User Guide on the Setup CD- ROM. You can also call or e-mail for further support.
24-hour Technical Support
800-326-7114
(toll-free from US or Canada) E-mail Support
support@linksys.com Website
http://www.linksys.com or http://support.linksys.com
RMA (Return Merchandise Authorization)
http://www.linksys.com/support
FTP Site
ftp://ftp.linksys.com
Sales Information
800-546-5797 (800-LINKSYS)
Linksys is a registered trademark or trademark of Cisco Systems, Inc. and/or its affiliates in the U.S. and certain other countries. Copyright © 2004 Cisco Systems, Inc. All rights reserved.
WKPC54G-QI-40225NC JL