®
A Division of Cisco Systems, Inc.
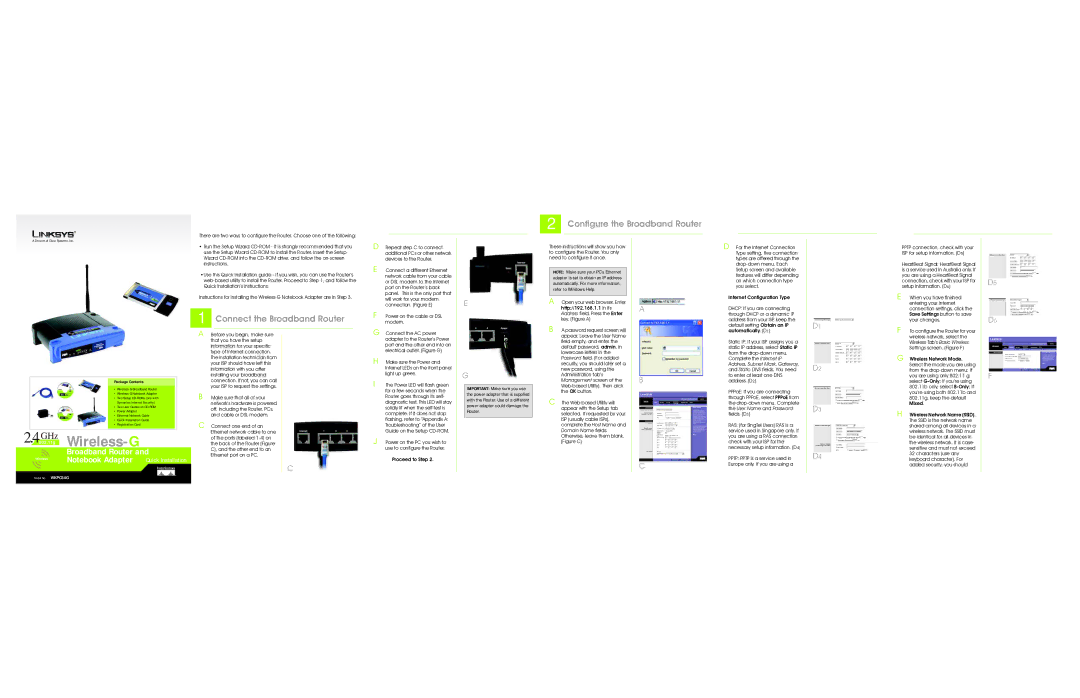
Package Contents
• Wireless-G Broadband Router
• Wireless-G Notebook Adapter
• Two Setup CD-ROMs (one with Symantec Internet Security)
• Two User Guides on CD-ROM
• Power Adapter
• Ethernet Network Cable
• Quick Installation Guide
• Registration Card
2.4802.11gGHz | Wireless-G | |
| | Broadband Router and |
Wireless | | Notebook Adapter | Quick Installation |
Model No. | WKPC54G | |
There are two ways to configure the Router. Choose one of the following:
•Run the Setup Wizard CD-ROM - It is strongly recommended that you use the Setup Wizard CD-ROM to install the Router. Insert the Setup Wizard CD-ROM into the CD-ROM drive, and follow the on-screen instructions.
•Use this Quick Installation guide - If you wish, you can use the Router’s web-based utility to install the Router. Proceed to Step 1, and follow the Quick Installation’s instructions.
Instructions for installing the Wireless-G Notebook Adapter are in Step 3.
1 Connect the Broadband Router
A Before you begin, make sure that you have the setup information for your specific type of Internet connection. The installation technician from your ISP should have left this information with you after installing your broadband connection. If not, you can call your ISP to request the settings.
B Make sure that all of your network’s hardware is powered off, including the Router, PCs, and cable or DSL modem.
C Connect one end of an Ethernet network cable to one of the ports (labeled 1-4) on the back of the Router (Figure C), and the other end to an Ethernet port on a PC.
C
D Repeat step C to connect additional PCs or other network devices to the Router.
E Connect a different Ethernet network cable from your cable or DSL modem to the Internet port on the Router’s back panel. This is the only port that will work for your modem connection. (Figure E)
F
G Connect the AC power adapter to the Router’s Power port and the other end into an electrical outlet. (Figure G)
H Make sure the Power and Internet LEDs on the front panel light up green.
I The Power LED will flash green for a few seconds when the Router goes through its self- diagnostic test. This LED will stay solidly lit when the self-test is complete. If it does not stop flashing, refer to “Appendix A: Troubleshooting” of the User Guide on the Setup CD-ROM.
J Power on the PC you wish to use to configure the Router.
Proceed to Step 2.
E
G
IMPORTANT: Make sure you use the power adapter that is supplied with the Router. Use of a different power adapter could damage the Router.
2 Configure the Broadband Router
These instructions will show you how | | |
to configure the Router. You only | | |
need to configure it once. | | |
| | |
NOTE: Make sure your PC’s Ethernet | | |
adapter is set to obtain an IP address | | |
automatically. For more information, | | |
refer to Windows Help. | | |
| | |
A Open your web browser. Enter | | A |
http://192.168.1.1 in its | |
Address field. Press the Enter | | |
key. (Figure A) | | |
B A password request screen will | | |
appear. Leave the User Name | | |
field empty, and enter the | | |
default password, admin, in | | |
lowercase letters in the | | |
Password field. (For added | | |
security, you should later set a | | |
new password, using the | | |
Administration tab’s | | B |
Management screen of the | |
Web-based Utility). Then click | | |
the OK button. | | |
C The Web-based Utility will | | |
appear with the Setup tab | | |
selected. If requested by your | | |
ISP (usually cable ISPs), | | |
complete the Host Name and | | |
Domain Name fields. | | |
Otherwise, leave them blank. | | |
(Figure C) | | |
| | C |
| | |
D For the Internet Connection Type setting, five connection types are offered through the drop-down menu. Each Setup screen and available features will differ depending on which connection type you select.
Internet Configuration Type
DHCP: If you are connecting through DHCP or a dynamic IP address from your ISP, keep the default setting Obtain an IP automatically. (D1)
Static IP: If your ISP assigns you a static IP address, select Static IP from the drop-down menu.
Complete the Internet IP Address, Subnet Mask, Gateway, and Static DNS fields. You need to enter at least one DNS address. (D2)
PPPoE: If you are connecting through PPPoE, select PPPoE from the drop-down menu. Complete the User Name and Password fields. (D3)
RAS: (for SingTel Users) RAS is a service used in Singapore only. If you are using a RAS connection check with your ISP for the necessary setup information. (D4)
PPTP: PPTP is a service used in Europe only. If you are using a
PPTP connection, check with your ISP for setup information. (D5)
HeartBeat Signal: HeartBeat Signal is a service used in Australia only. If you are using a HeartBeat Signal connection, check with your ISP for setup information. (D6)
E When you have finished entering your Internet connection settings, click the Save Settings button to save your changes.
F To configure the Router for your wireless network, select the Wireless Tab’s Basic Wireless Settings screen. (Figure F)
G Wireless Network Mode. Select the mode you are using from the drop-down menu: If you are using only 802.11 g, select G-Only; if you’re using 802.11b only, select B-Only; if you’re using both 802.11b and 802.11g, keep the default Mixed.
H Wireless Network Name (SSID). The SSID is the network name shared among all devices in a wireless network. The SSID must be identical for all devices in the wireless network. It is case- sensitive and must not exceed 32 characters (use any keyboard character). For added security, you should