Printed in China / Imprimé en Chine / Impreso en China

2005/11 (A·C) SE-759A/SE-760A/SE-761A


SRS1726

2-Way Component System

Installation/Wire Connection Guide


SRS1626

Système de haut-parleurs à 2 voies

Guide d’installatio/câblage


SRS1326

Sistema de componentes de 2 vías


Guia de instalación/Conexión


EXAMPLE OF MID-RANGE/WOOFER INSTALLATION

EXEMPLE D’INSTALLATION D’UN HAUT-PARLEUR DE MÉDIUM-GRAVE EJEMPLO DE INSTALACIÓN DE ALTAVOZ DE GAMA MEDIA/GRAVES

English Français Español

EXAMPLE OF TWEETER INSTALLATION

EXEMPLE D’INSTALLATION D’UN TWEETER

EJEMPLO DE INSTALACIÓN DEL ALTAVOZ DE AGUDOS

Dashboard installation example

1. Using the provided mounting screws and speed nuts, install the mount

Speaker / Haut-parleur /Altavoz

adapter on the dashboard.


If you wish to install the mount adapter without using the provided

2–Mounting screws

mounting screws, fix the unit in placing using the accessory two-sided

2–Vis à tôle

cushion tape.

2–Tornillos de montaje

2. Pass the speaker lead wire through the hole in the mount adapter.

3. Fix the speaker in the mount adapter with the finisher ring. The speaker

Mount adapter

Adaptateur de montage

can be fixed firmly in place by pressing the finisher ring and twisting it.

Adaptador de montaje


Finisher ring

Exemple d’installation en tableau de bord

Bague de finition

Anillo de acabado

1. Au moyen des vis à tôle et de écrous fendus, installez l’adaptateur de


Cushion tape

montage sur le tableau de bord.


Bande souple

Si vous souhaitez installer l’adaptateur de montage sans utiliser les vis à


Cinta acolchada

tôle, fixez l’unité au moyen de la bande souple réversible fournie comme


accessoire.


Backing paper

2. Passez le fil du haut-parleur par l’orifice de l’adaptateur de montage.


Papier de fond

3. Fixez le haut-parleur sur l’adaptateur de montage au moyen de la bague


2–Speed nuts

Papel del dorso

de finition. Le haut-parleur pourra être maintenu fermement en place en


2–Ecrous fendus


poussant sur la bague de finition et en la tournant.


2–Tuercas rápidas


Ejemplo de instalación en el tablero de instrumentos

Figure 1 / Figure 1 / Figura 1

1.Remove the grille’s punching net (SRS1726/SRS1326 only).

2.Using the template, open holes for the speaker and for the screws.

3.Install the speed nuts in the screw holes in the door trim, then use the mounting screws to install the speaker grille. (Figure 4)

4.Attach the punching net to the grill (SRS1726/SRS1326 only).

1.Déposez la grille de protection (SRS1726/SRS1326 seulement).

2.A l’aide du modèle, percez des trous pour le haut-parleur et les vis.

3.Posez les écrous fendus sur les trous percés dans la garniture de porte, puis installez la grille de haut-parleur avec les vis à tôle. (Figure 4)

4.Fixez la grille de protection sur la grille (SRS1726/SRS1326 seulement).

1.Extraiga la red de la rejilla (sólo el SRS1726/SRS1326).

2.Utilizando la plantilla, taladre orificios para el altavoz y para los tornillos.

3.Instale las tuercas rápidas en los orificios para los tornillos del panel de adorno de la puerta, y después utilice los tornillos de montaje para instalar la rejilla del altavoz. (Figura 4)

4.Coloque la red en la rejilla (sólo el SRS1726/SRS1326).

Door trim Garniture de porte Panel de adorno de la puerta

Speaker

Haut-parleur

Door trim

Garniture de porte

Panel de adorno de la puerta

Speaker

Haut-parleur

Altavoz

4–Mounting screws

4–Vis à tôle

4–Tornillos de montaje

4–Speed nuts

4–Ecrous fendus

4–Tuercas rápidas

Grille

Grille

Punching net Rejilla

Grille de protection

Red

Figure 4 / Figure 4 / Figura 4 (SRS1326)

Door trim

1.

Empleando los tornillos de montaje y las tuercas rápidas suministrados,


instale el adaptador de montaje en el tablero de instrumentos.


Si desea instalar el adaptador de montaje sin emplear los tornillos de


montaje suministrados, fije la unidad en su lugar empleando la cinta


acolchada por ambos lados accesoria.

2.

Pase el cable de altavoz por el orificio del adaptador de montaje.

3.

Fije el altavoz en el adaptador de montaje con el anillo de acabado. El

Altavoz

Garniture de porte

Panel de adorno de la puerta

Speaker

Haut-parleur

Altavoz

altavoz podrá fijarse con seguridad en su lugar presionando el anillo de

acabado y girándolo.

Door trim installation example

1.

Remove the door trim, then use template and open holes for the screws


and speaker leads.

2.

Using the provided machine screws, attach the lever arm to the bottom


surface of the flush-mount spacer.

Machine screw Vis à métaux Tornillo para metal

Lever arms Leviers

Brazos de palanca

Flush-mount spacer Monture encastrable Separador para montaje a ras


4–Speed nuts

4–Mounting screws


4–Vis à tôle


4–Ecrous fendus

4–Tornillos de montaje


4–Tuercas rápidas


Grille

4–Mounting screws


Grille

4–Vis à tôle


Rejilla

4–Tornillos de montaje


4–Speed nuts

Figure 5 / Figure 5 / Figura 5 (SRS1626)

4–Ecrous fendus


4–Tuercas rápidas

3.

Using the flush-mount ring, attach the flush-mount spacer to the speaker.


When installing the speaker, rotate the flush-mount ring clockwise to tighten.

4.

Insert the speaker unit into the mounting hole in the door trim.

Exemple d’installation en garniture de porte

1.

Enlevez la garniture de porte et, à l’aide du modèle, percez des trous pour


les vis et les fils de haut-parleur.

2.

Au moyen des vis à métaux fournies, fixez le levier sur la surface du fond


de la monture encastrable.

3.

Au moyen de la bague de montage encastré, fixez la monture encastrable


sur le haut-parleur. Lors de l’installation du haut-parleur, tournez la bague

Figure 2 / Figure 2 / Figura 2

Flush-mount spacer ass’y Monture encastrable avec support

Conjunto del separador para montaje a ras


Grille


Grille

Punching net

Rejilla


Grille de protection

Red


Figure 6 / Figure 6 / Figura 6 (SRS1726)

WIRE CONNECTIONS / CONNECTIQUE / CONEXIÓN DE CABLES

de montage encastré dans le sens horaire pour l’immobiliser.

4. Insérez le haut-parleur dans l’orifice de montage dans la garniture de porte.

Ejemplo de instalación en el panel de adorno de la puerta

1.Quite el panel de adorno de la puerta, y después utilice la plantilla para taladrar orificios para los tornillos y el cable del altavoz.

2.Empleando los tornillos maquinados suministrados, monte el brazo de la palanca en la superficie inferior del separador de montaje empotrado.

3.Empleando el anillo de montaje empotrado, coloque el separador de montaje empotrado en el altavoz. Cuando instale el altavoz, gire hacia la derecha el anillo de montaje empotrado para apretarlo.

4.Inserte el altavoz en el orificio de montaje del panel de adorno de la puerta.

Speaker

Haut-parleur

Altavoz

Door trim Garniture de porte Panel de adorno de la puerta

Flush-mount ring

Bague de montage encastré

Anillo de montaje empotrado

Figure 3 / Figure 3 / Figura 3

Center Unit Appareil pilote Unidad central

(+)

(+)


(–)


(+)

(–)

*Connect the L side in the same

(–)


way as for the R side.

L


* Raccorder le côté L (gauche) de


la même manière que le côté R


(droit).


* Conecte el lado L igual que el R.

(+)

(–)

R

(+)

(–)

Tweeter

Tweeter

Altavoz de agudos

Mid-range / Woofer Médium-GraveAltavoz de gama media / graves

Page 1
Image 1
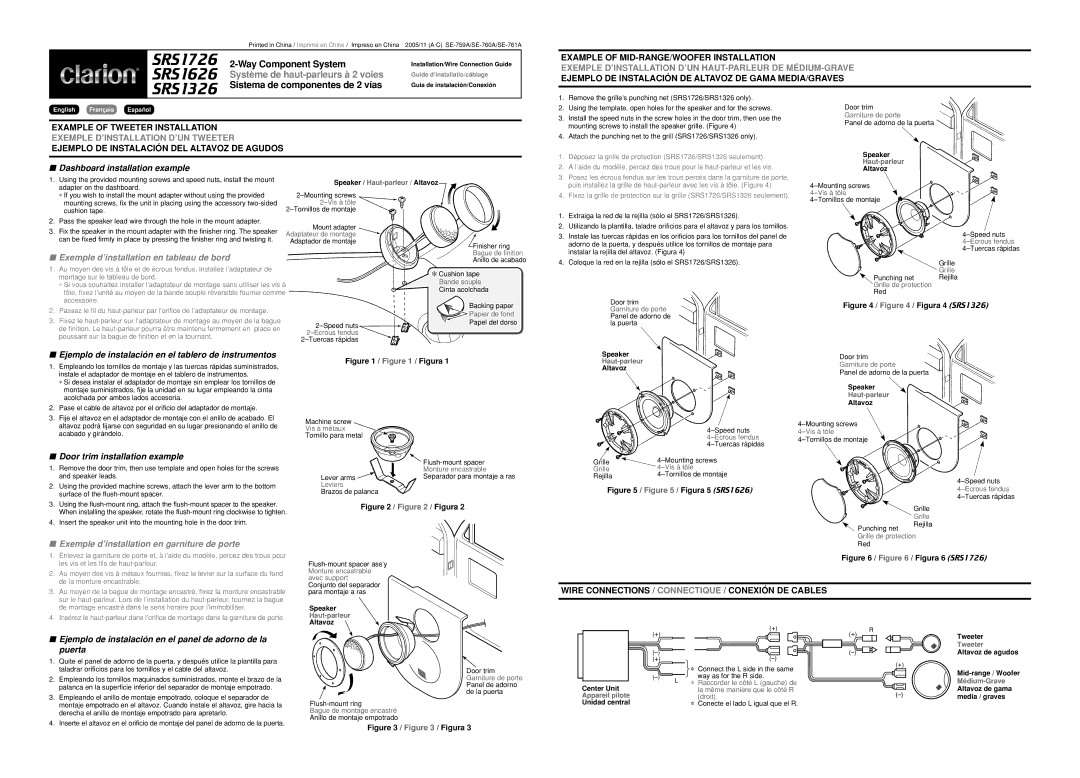
Clarion SRS1726, SRS1326 manual Exemple d’installation en tableau de bord, Exemple d’installation en garniture de porte

SRS1626, SRS1726, SRS1326 specifications

The Clarion SRS1726, SRS1626, and SRS1326 are a series of advanced car audio systems designed to provide an exceptional listening experience while on the road. Known for their impressive sound quality and innovative features, these models cater to different consumer requirements, making them a popular choice among audiophiles and casual listeners alike.

Starting with the Clarion SRS1726, this model comes with a robust 2-way speaker system that delivers rich, dynamic sound. Its power handling capability ensures that it can handle the most intense audio tracks without distortion. The speaker features a high-quality polypropylene cone for the woofers, which enhances the lower frequencies, while the silk dome tweeters provide crystal clear highs. Built with durability in mind, the SRS1726 is designed to withstand various environmental conditions, ensuring longevity and reliable performance.

Moving to the SRS1626, this model is tailored for those who demand both quality and versatility. Featuring an upgraded sound system, the SRS1626 offers enhanced sound separation and clarity, making it perfect for enjoying a wide range of music genres. With a powerful built-in amplifier, the system can easily reach higher volume levels while maintaining audio fidelity. The SRS1626 is also equipped with adjustable crossovers which allow users to customize their audio experience based on personal preferences.

Lastly, the Clarion SRS1326 is an entry-level model that doesn't compromise on sound quality. It combines simplicity and efficiency, making it an ideal choice for those who are looking to upgrade their car sound system without overwhelming features. The SRS1326 features a compact design, which makes installation easier in various vehicles. Despite its size, it delivers commendable performance with solid bass response and clear high frequencies. The user-friendly interface ensures effortless navigation through different audio sources.

All three models incorporate advanced technologies such as high-frequency response, superior damping materials, and wide frequency ranges, enhancing overall audio performance. The Clarion SRS series also emphasizes compatibility with various media formats, ensuring that users can easily connect their portable devices for an optimized audio experience. Overall, the Clarion SRS1726, SRS1626, and SRS1326 offer a range of features and characteristics to suit diverse audio needs, making them reliable options for transforming in-car listening into a great experience.