Gedruckt in China / Stampato in Cina 2005/11 (A·C) SE-759A/SE-760A/SE-761A

SRS1726

2-Wege-Komponentensystem

Installation-/Anschluß-Anleitung

SRS1626

Sistema di componenti a 2 vie

Installazione/Guida al Collegamento dei fili

BEISPIEL FÜR MITTELTÖNER/TIEFTÖNER-MONTAGE ESEMPIO DI INSTALLAZIONE DI MID-RANGE/WOOFER

SRS1326

Deutsch Italiano

BEISPIEL FÜR TWEETER-MONTAGE ESEMPIO DI INSTALLAZIONE DEL TWEETER

1.Das Stanznetz des Gitters entfernen (nur SRS1726/SRS1326).

2.Mittels der Schablone Lochungen für den Lautsprecher und die Schrauben vornehmen.

3.Die Klemmmuttern in die Schraubenlöcher in der Türleiste einsetzen und dann die Befestigungsschrauben zur Montage des Lautsprechergitters verwenden. (Abbildung 4)

4.Das Stanznetz am Gitter anbringen (nur SRS1726/SRS1326).

Türleiste

Copertura della portiera

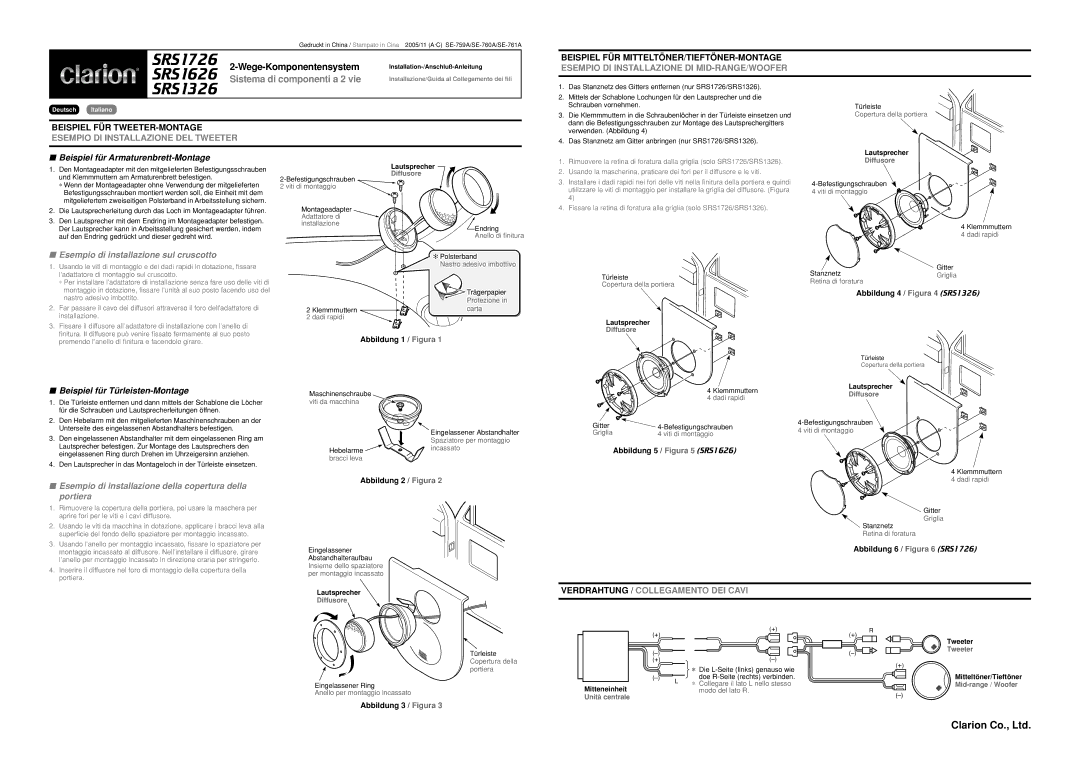
Beispiel für Armaturenbrett-Montage

1.Den Montageadapter mit den mitgelieferten Befestigungsschrauben und Klemmmuttern am Armaturenbrett befestigen.

Wenn der Montageadapter ohne Verwendung der mitgelieferten Befestigungsschrauben montiert werden soll, die Einheit mit dem mitgeliefertem zweiseitigen Polsterband in Arbeitsstellung sichern.

2.Die Lautsprecherleitung durch das Loch im Montageadapter führen.

3.Den Lautsprecher mit dem Endring im Montageadapter befestigen. Der Lautsprecher kann in Arbeitsstellung gesichert werden, indem auf den Endring gedrückt und dieser gedreht wird.

Esempio di installazione sul cruscotto

1.

Usando le viti di montaggio e dei dadi rapidi in dotazione, fissare


l’adattatore di montaggio sul cruscotto.


Per installare l’adattatore di installazione senza fare uso delle viti di


montaggio in dotazione, fissare l’unità al suo posto facendo uso del


nastro adesivo imbottito.

2.

Far passare il cavo dei diffusori attraverso il foro dell'adattatore di


installazione.

3.

Fissare il diffusore all’adattatore di installazione con l’anello di


finitura. Il diffusore può venire fissato fermamente al suo posto

2-Befestigungschrauben

2 viti di montaggio

Montageadapter Adattatore di installazione

2Klemmmuttern

2dadi rapidi

Lautsprecher

Diffusore

Endring

Anello di finitura

Polsterband

Nastro adesivo imbottivo

Trägerpapier Protezione in carta

1.Rimuovere la retina di foratura dalla griglia (solo SRS1726/SRS1326).

2.Usando la mascherina, praticare dei fori per il diffusore e le viti.

3.Installare i dadi rapidi nei fori delle viti nella finitura della portiera e quindi utilizzare le viti di montaggio per installare la griglia del diffusore. (Figura 4)

4.Fissare la retina di foratura alla griglia (solo SRS1726/SRS1326).

Türleiste

Copertura della portiera

Lautsprecher

Diffusore

Lautsprecher

Diffusore

4-Befestigungschrauben

4 viti di montaggio

4 Klemmmuttern

4 dadi rapidi

Gitter

StanznetzGriglia

Retina di foratura

Abbildung 4 / Figura 4 (SRS1326)

premendo l’anello di finitura e facendolo girare.

Beispiel für Türleisten-Montage

1.Die Türleiste entfernen und dann mittels der Schablone die Löcher für die Schrauben und Lautsprecherleitungen öffnen.

2.Den Hebelarm mit den mitgelieferten Maschinenschrauben an der Unterseite des eingelassenen Abstandhalters befestigen.

3.Den eingelassenen Abstandhalter mit dem eingelassenen Ring am Lautsprecher befestigen. Zur Montage des Lautsprechers den eingelassenen Ring durch Drehen im Uhrzeigersinn anziehen.

4.Den Lautsprecher in das Montageloch in der Türleiste einsetzen.

Abbildung 1 / Figura 1

Maschinenschraube viti da macchina

Eingelassener Abstandhalter Spaziatore per montaggio

Hebelarme incassato bracci leva

Türleiste

Copertura della portiera

Lautsprecher

4 KlemmmutternDiffusore

4 dadi rapidi

Gitter

4-Befestigungschrauben

4-Befestigungschrauben

4 viti di montaggio

Griglia

4 viti di montaggio


Abbildung 5 / Figura 5 (SRS1626)

4 Klemmmuttern

Esempio di installazione della copertura della portiera

1.Rimuovere la copertura della portiera, poi usare la maschera per aprire fori per le viti e i cavi diffusore.

2.Usando le viti da macchina in dotazione, applicare i bracci leva alla superficie del fondo dello spaziatore per montaggio incassato.

3.Usando l’anello per montaggio incassato, fissare lo spaziatore per montaggio incassato al diffusore. Nell’installare il diffusore, girare l’anello per montaggio incassato in direzione oraria per stringerlo.

4.Inserire il diffusore nel foro di montaggio della copertura della portiera.

Abbildung 2 / Figura 2

Eingelassener Abstandhalteraufbau Insieme dello spaziatore per montaggio incassato

Lautsprecher

Diffusore

4 dadi rapidi

Gitter

Griglia

Stanznetz

Retina di foratura

Abbildung 6 / Figura 6 (SRS1726)

VERDRAHTUNG / COLLEGAMENTO DEI CAVI

Türleiste Copertura della portiera

Eingelassener Ring

Anello per montaggio incassato

Abbildung 3 / Figura 3

Mitteneinheit Unità centrale

(+)

(+)


(–)


(+)

(–)

*Die L-Seite (links) genauso wie

(–)

L

doe R-Seite (rechts) verbinden.


* Collegare il lato L nello stesso


modo del lato R.

(+)

(–)

R

Tweeter

Tweeter

(+)

Mitteltöner/Tieftöner

Mid-range / Woofer

(–)

Clarion Co., Ltd.

Page 2
Image 2
Clarion SRS1626, SRS1326, SRS1726 manual Beispiel für Armaturenbrett-Montage, Esempio di installazione sul cruscotto

SRS1626, SRS1726, SRS1326 specifications

The Clarion SRS1726, SRS1626, and SRS1326 are a series of advanced car audio systems designed to provide an exceptional listening experience while on the road. Known for their impressive sound quality and innovative features, these models cater to different consumer requirements, making them a popular choice among audiophiles and casual listeners alike.

Starting with the Clarion SRS1726, this model comes with a robust 2-way speaker system that delivers rich, dynamic sound. Its power handling capability ensures that it can handle the most intense audio tracks without distortion. The speaker features a high-quality polypropylene cone for the woofers, which enhances the lower frequencies, while the silk dome tweeters provide crystal clear highs. Built with durability in mind, the SRS1726 is designed to withstand various environmental conditions, ensuring longevity and reliable performance.

Moving to the SRS1626, this model is tailored for those who demand both quality and versatility. Featuring an upgraded sound system, the SRS1626 offers enhanced sound separation and clarity, making it perfect for enjoying a wide range of music genres. With a powerful built-in amplifier, the system can easily reach higher volume levels while maintaining audio fidelity. The SRS1626 is also equipped with adjustable crossovers which allow users to customize their audio experience based on personal preferences.

Lastly, the Clarion SRS1326 is an entry-level model that doesn't compromise on sound quality. It combines simplicity and efficiency, making it an ideal choice for those who are looking to upgrade their car sound system without overwhelming features. The SRS1326 features a compact design, which makes installation easier in various vehicles. Despite its size, it delivers commendable performance with solid bass response and clear high frequencies. The user-friendly interface ensures effortless navigation through different audio sources.

All three models incorporate advanced technologies such as high-frequency response, superior damping materials, and wide frequency ranges, enhancing overall audio performance. The Clarion SRS series also emphasizes compatibility with various media formats, ensuring that users can easily connect their portable devices for an optimized audio experience. Overall, the Clarion SRS1726, SRS1626, and SRS1326 offer a range of features and characteristics to suit diverse audio needs, making them reliable options for transforming in-car listening into a great experience.