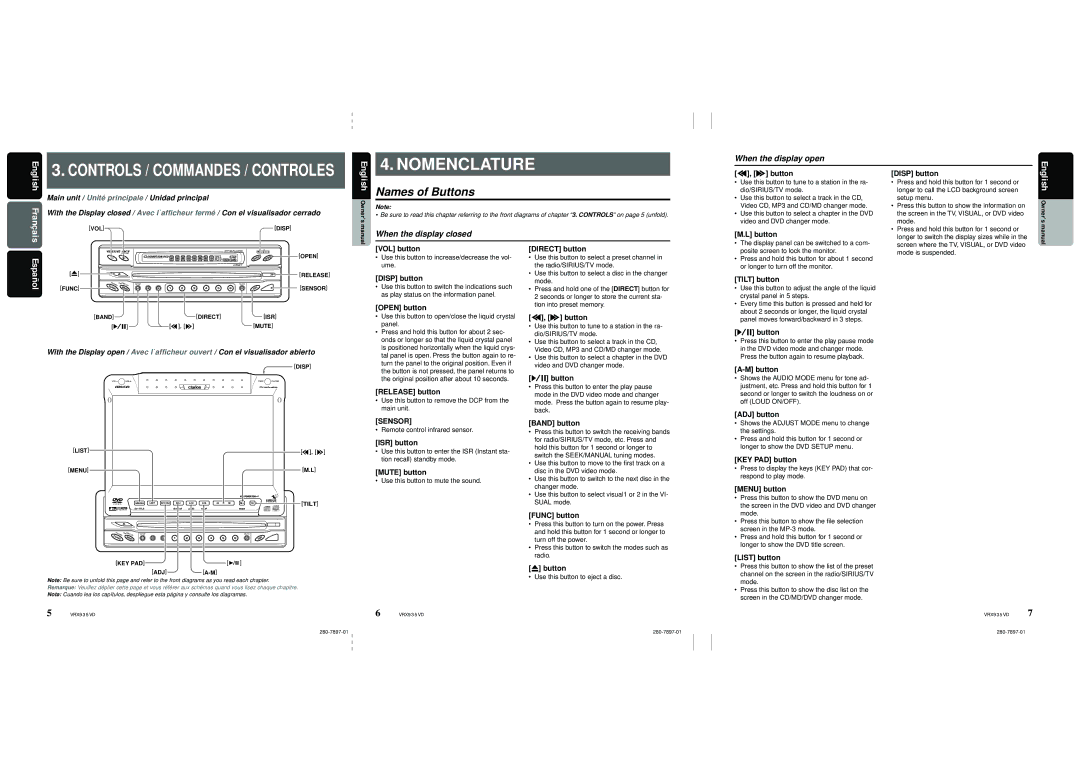
3. CONTROLS / COMMANDES / CONTROLES

4. NOMENCLATURE

When the display open

English


Main unit / Unité principale / Unidad principal


Français

With the Display closed / Avec l`afficheur fermé / Con el visualisador cerrado

[VOL]

[DISP]


English Owner’s manual

Names of Buttons

Note:

• Be sure to read this chapter referring to the front diagrams of chapter “3. CONTROLS” on page 5 (unfold).

When the display closed

[a], [d] button

Use this button to tune to a station in the ra- dio/SIRIUS/TV mode.

Use this button to select a track in the CD, Video CD, MP3 and CD/MD changer mode.

Use this button to select a chapter in the DVD video and DVD changer mode.

[M.L] button

• The display panel can be switched to a com-

[DISP] button

Press and hold this button for 1 second or


longer to call the LCD background screen


setup menu.

Press this button to show the information on


the screen in the TV, VISUAL, or DVD video


mode.

Press and hold this button for 1 second or


longer to switch the display sizes while in the


screen where the TV, VISUAL, or DVD video

English Owner’s manual

Español


[OPEN]

[Q]

[RELEASE]


[VOL] button

Use this button to increase/decrease the vol- ume.

[DIRECT] button

Use this button to select a preset channel in


the radio/SIRIUS/TV mode.

Use this button to select a disc in the changer

posite screen to lock the monitor.

• Press and hold this button for about 1 second

or longer to turn off the monitor.

mode is suspended.

[FUNC]

[SENSOR]

[BAND]

[DIRECT]

[ISR]

[s]


[MUTE]

With the Display open / Avec l`afficheur ouvert / Con el visualisador abierto

[DISP]

[DISP] button

Use this button to switch the indications such as play status on the information panel.

[OPEN] button

Use this button to open/close the liquid crystal panel.

Press and hold this button for about 2 sec- onds or longer so that the liquid crystal panel is positioned horizontally when the liquid crys- tal panel is open. Press the button again to re- turn the panel to the original position. Even if the button is not pressed, the panel returns to the original position after about 10 seconds.

[RELEASE] button

Use this button to remove the DCP from the main unit.

mode.

• Press and hold one of the [DIRECT] button for

2 seconds or longer to store the current sta-

tion into preset memory.

[a], [d] button

Use this button to tune to a station in the ra- dio/SIRIUS/TV mode.

Use this button to select a track in the CD, Video CD, MP3 and CD/MD changer mode.

Use this button to select a chapter in the DVD video and DVD changer mode.

[s] button

Press this button to enter the play pause mode in the DVD video mode and changer mode. Press the button again to resume play- back.

[TILT] button

Use this button to adjust the angle of the liquid crystal panel in 5 steps.

Every time this button is pressed and held for about 2 seconds or longer, the liquid crystal panel moves forward/backward in 3 steps.

[s] button

Press this button to enter the play pause mode in the DVD video mode and changer mode. Press the button again to resume playback.

[A-M] button

Shows the AUDIO MODE menu for tone ad- justment, etc. Press and hold this button for 1 second or longer to switch the loudness on or off (LOUD ON/OFF).

[ADJ] button

[LIST]

[MENU]

[M.L]

[TILT]

[SENSOR]

• Remote control infrared sensor.

[ISR] button

Use this button to enter the ISR (Instant sta- tion recall) standby mode.

[MUTE] button

• Use this button to mute the sound.

[BAND] button

Press this button to switch the receiving bands for radio/SIRIUS/TV mode, etc. Press and hold this button for 1 second or longer to switch the SEEK/MANUAL tuning modes.

Use this button to move to the first track on a disc in the DVD video mode.

Use this button to switch to the next disc in the changer mode.

Use this button to select visual1 or 2 in the VI- SUAL mode.

Shows the ADJUST MODE menu to change the settings.

Press and hold this button for 1 second or longer to show the DVD SETUP menu.

[KEY PAD] button

Press to display the keys (KEY PAD) that cor- respond to play mode.

[MENU] button

• Press this button to show the DVD menu on

the screen in the DVD video and DVD changer

[KEY PAD]

[


]


[ADJ][A-M]

Note: Be sure to unfold this page and refer to the front diagrams as you read each chapter.

Remarque: Veuillez dé plier cette page et vous ré fé rer aux sché mas quand vous lisez chaque chapitre.

Nota: Cuando lea los capítulos, despliegue esta pá gina y consulte los diagramas.

5 VRX935VD

[FUNC] button

• Press this button to turn on the power. Press and hold this button for 1 second or longer to turn off the power.

• Press this button to switch the modes such as radio.

[Q] button

• Use this button to eject a disc.

6 VRX935VD


mode.

Press this button to show the file selection


screen in the MP-3 mode.

Press and hold this button for 1 second or


longer to show the DVD title screen.

[LIST] button

Press this button to show the list of the preset channel on the screen in the radio/SIRIUS/TV mode.

Press this button to show the disc list on the screen in the CD/MD/DVD changer mode.

VRX935VD 7

280-7897-01

280-7897-01

280-7897-01

Page 4
Image 4
Clarion VRX935VD manual Setup menu, Mode, Use this button to increase/decrease the vol- ume, Radio/SIRIUS/TV mode

VRX935VD specifications

The Clarion VRX935VD is a sophisticated in-car multimedia receiver that seamlessly combines functionality with cutting-edge technology, making it an essential addition for automotive enthusiasts and casual drivers alike. With its sleek design and user-friendly interface, this multimedia receiver caters to a wide range of audio and visual needs.

One of the standout features of the VRX935VD is its 7-inch motorized touchscreen display, which provides high-resolution visuals and allows users to easily navigate through settings, playlists, and apps. The display’s crisp, vibrant colors enhance the viewing experience, whether streaming videos or viewing navigation maps.

Another remarkable aspect of the VRX935VD is its multimedia capabilities. It can play DVD, CD, and various audio formats, ensuring that users have a variety of options for entertainment on the go. The device supports MP3, WMA, and AAC formats, among others. With this versatility, passengers can enjoy their favorite music or movie anywhere they travel.

The receiver also features built-in Bluetooth technology, allowing for hands-free calling and wireless audio streaming. This capability not only enhances safety while driving but also makes it convenient to enjoy music from compatible devices without the hassle of tangled cables. Additionally, the VRX935VD is compatible with a variety of smartphones, offering seamless connectivity to access playlists and apps.

Another noteworthy technology in the VRX935VD is its compatibility with SiriusXM Satellite Radio, providing users with access to a vast library of music, talk shows, and other programming. This feature ensures that drivers have a constant stream of content, no matter where their journeys take them.

For those who prioritize sound quality, the VRX935VD does not disappoint. It includes a built-in equalizer and various sound tuning features to optimize audio performance within the vehicle. The unit can drive up to four speakers, ensuring that every passenger enjoys an immersive audio experience.

The Clarion VRX935VD also boasts various connectivity options, including multiple USB ports and an auxiliary input, allowing users to connect a plethora of devices. Additionally, it features a rear-view camera input, enhancing safety while reversing.

In summary, the Clarion VRX935VD is an advanced multimedia receiver that provides an exceptional blend of features, technology, and audio quality. Its user-friendly interface, multimedia playback options, Bluetooth capabilities, and sound optimization make it a top choice for any car audio enthusiast. With the incorporation of essential modern technology, it transforms the driving experience into a more enjoyable and connected journey.