OPTIONAL BLADE ASSEMBLIES

CHANGING BLADE ASSEMBLIES

Within minutes your machine can be converted to a turf rake, turf seeder or turf slicer by purchasing the optional blade assemblies available complete with side plates, bearings and drive pulley. Changing the blade assembly can be done quickly as described below.

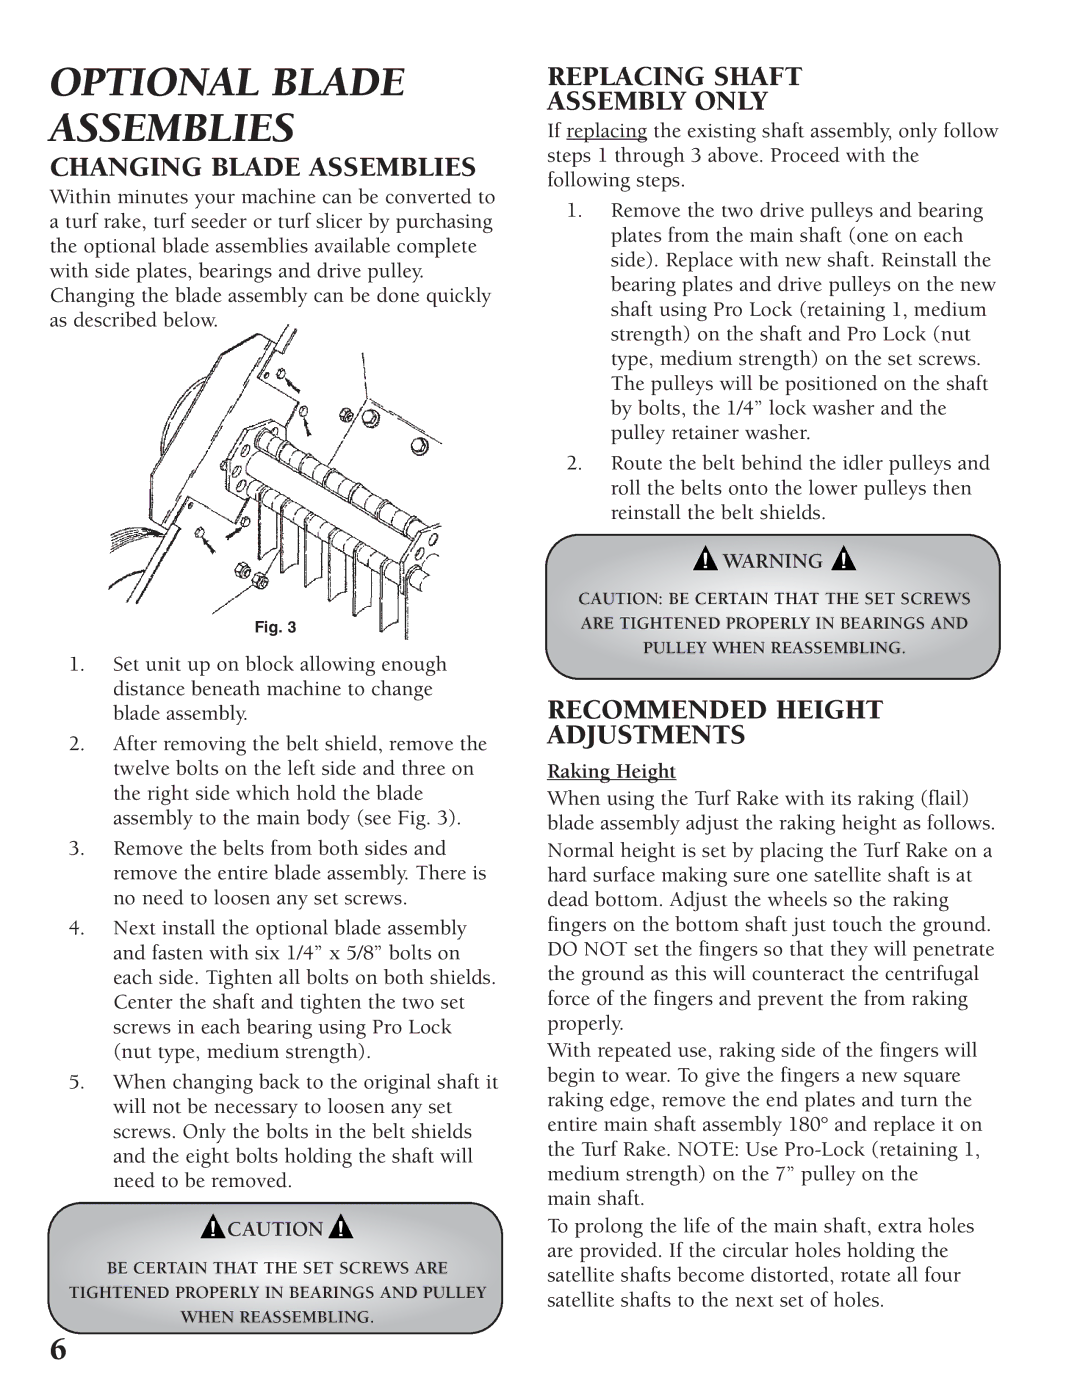
Fig. 3

1.Set unit up on block allowing enough distance beneath machine to change blade assembly.

2.After removing the belt shield, remove the twelve bolts on the left side and three on the right side which hold the blade assembly to the main body (see Fig. 3).

3.Remove the belts from both sides and remove the entire blade assembly. There is no need to loosen any set screws.

4.Next install the optional blade assembly and fasten with six 1/4” x 5/8” bolts on each side. Tighten all bolts on both shields. Center the shaft and tighten the two set screws in each bearing using Pro Lock (nut type, medium strength).

5.When changing back to the original shaft it will not be necessary to loosen any set screws. Only the bolts in the belt shields and the eight bolts holding the shaft will need to be removed.

CAUTION

BE CERTAIN THAT THE SET SCREWS ARE

TIGHTENED PROPERLY IN BEARINGS AND PULLEY

WHEN REASSEMBLING.

REPLACING SHAFT

ASSEMBLY ONLY

If replacing the existing shaft assembly, only follow steps 1 through 3 above. Proceed with the following steps.

1.Remove the two drive pulleys and bearing plates from the main shaft (one on each side). Replace with new shaft. Reinstall the bearing plates and drive pulleys on the new shaft using Pro Lock (retaining 1, medium strength) on the shaft and Pro Lock (nut type, medium strength) on the set screws. The pulleys will be positioned on the shaft by bolts, the 1/4” lock washer and the pulley retainer washer.

2.Route the belt behind the idler pulleys and roll the belts onto the lower pulleys then reinstall the belt shields.

WARNING

CAUTION: BE CERTAIN THAT THE SET SCREWS ARE TIGHTENED PROPERLY IN BEARINGS AND PULLEY WHEN REASSEMBLING.

RECOMMENDED HEIGHT

ADJUSTMENTS

Raking Height

When using the Turf Rake with its raking (flail) blade assembly adjust the raking height as follows. Normal height is set by placing the Turf Rake on a hard surface making sure one satellite shaft is at dead bottom. Adjust the wheels so the raking fingers on the bottom shaft just touch the ground. DO NOT set the fingers so that they will penetrate the ground as this will counteract the centrifugal force of the fingers and prevent the from raking properly.

With repeated use, raking side of the fingers will begin to wear. To give the fingers a new square raking edge, remove the end plates and turn the entire main shaft assembly 180° and replace it on the Turf Rake. NOTE: Use Pro-Lock (retaining 1, medium strength) on the 7” pulley on the main shaft.

To prolong the life of the main shaft, extra holes are provided. If the circular holes holding the satellite shafts become distorted, rotate all four satellite shafts to the next set of holes.

6

Page 6
Image 6
Classen TRS-20, TSS-20 manual Changing Blade Assemblies, Replacing Shaft Assembly only, Recommended Height Adjustments

TRS-20, TSS-20 specifications

Classen TSS-20 and TRS-20 are two powerful tools designed for turf care and soil management, specifically targeting professional landscapers and dedicated gardening enthusiasts. Both models are equipped with a host of features, technologies, and characteristics that facilitate efficient turf maintenance and soil aeration.

The Classen TSS-20 is primarily recognized for its superior turf seeding capabilities. With a 20-inch seeding width, it allows for wider coverage and faster operation, making it ideal for larger areas. The TSS-20 features a precision seed delivery system that ensures even seed distribution and minimizes waste. This system is designed to accommodate a variety of seed types, including fescue, rye, and bluegrass, enabling users to customize their seeding approach based on their specific lawn care needs.

On the other hand, the TRS-20 is tailored for aerating soil and enhancing root systems. The TRS-20 utilizes a core aeration method, where it pulls out soil plugs, thereby reducing soil compaction and promoting better drainage. The unit is equipped with heavy-duty tines that penetrate deep into the soil, enabling it to reach areas otherwise inaccessible. This process significantly enhances turf health by allowing essential nutrients, water, and air to penetrate the root zone.

Both the TSS-20 and TRS-20 are powered by reliable, high-performance engines, ensuring robust operation even in demanding conditions. Their compact and lightweight design allows for easy maneuverability, while the collapsible handles provide convenient storage options when not in use.

In terms of maintenance, both models are designed for durability and longevity. They feature corrosion-resistant components and are easy to service, ensuring minimal downtime for users. The intuitive control interfaces make operation straightforward, allowing even novice users to achieve professional-quality results.

In conclusion, the Classen TSS-20 and TRS-20 represent cutting-edge solutions for turf care and soil management. Their unique features, innovative technologies, and user-centric designs make them invaluable assets for anyone looking to maintain a healthy and vibrant lawn. Whether for professional landscaping or personal gardening projects, these machines deliver consistent performance and results that exceed expectations.