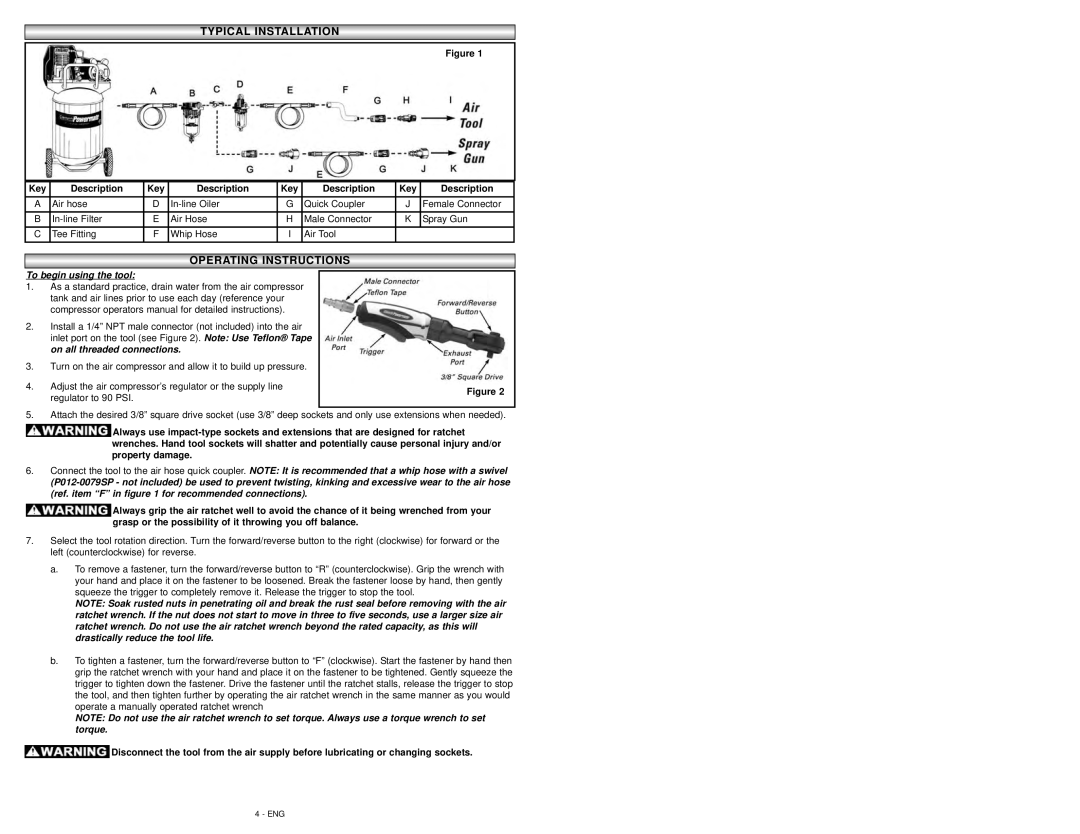
TYPICALTYPICAL INSTINSTALLAALLATIONTION
|
|
|
|
|
|
|
|
|
|
|
|
|
|
|
|
|
| Figure 1 | |
|
|
|
|
|
|
|
|
|
|
Key | Description | Key | Description | Key | Description | Key | Description | ||
A | Air hose | D | G | Quick Coupler | J | Female Connector | |||
B | E | Air Hose | H | Male Connector | K | Spray Gun | |||
C | Tee Fitting | F | Whip Hose | I | Air Tool |
|
|
|
|
OPERAOPERATINGTING INSTRUCTIONSINSTRUCTIONS
To begin using the tool:
1.As a standard practice, drain water from the air compressor tank and air lines prior to use each day (reference your compressor operators manual for detailed instructions).
2.Install a 1/4” NPT male connector (not included) into the air inlet port on the tool (see Figure 2). Note: Use Teflon® Tape on all threaded connections.
3.Turn on the air compressor and allow it to build up pressure.
4.Adjust the air compressor’s regulator or the supply line regulator to 90 PSI.
Figure 2
5.Attach the desired 3/8” square drive socket (use 3/8” deep sockets and only use extensions when needed).
![]() Always use
Always use
6.Connect the tool to the air hose quick coupler. NOTE: It is recommended that a whip hose with a swivel
![]() Always grip the air ratchet well to avoid the chance of it being wrenched from your grasp or the possibility of it throwing you off balance.
Always grip the air ratchet well to avoid the chance of it being wrenched from your grasp or the possibility of it throwing you off balance.
7.Select the tool rotation direction. Turn the forward/reverse button to the right (clockwise) for forward or the left (counterclockwise) for reverse.
a.To remove a fastener, turn the forward/reverse button to “R” (counterclockwise). Grip the wrench with your hand and place it on the fastener to be loosened. Break the fastener loose by hand, then gently squeeze the trigger to completely remove it. Release the trigger to stop the tool.
NOTE: Soak rusted nuts in penetrating oil and break the rust seal before removing with the air ratchet wrench. If the nut does not start to move in three to five seconds, use a larger size air ratchet wrench. Do not use the air ratchet wrench beyond the rated capacity, as this will drastically reduce the tool life.
b.To tighten a fastener, turn the forward/reverse button to “F” (clockwise). Start the fastener by hand then grip the ratchet wrench with your hand and place it on the fastener to be tightened. Gently squeeze the trigger to tighten down the fastener. Drive the fastener until the ratchet stalls, release the trigger to stop the tool, and then tighten further by operating the air ratchet wrench in the same manner as you would operate a manually operated ratchet wrench
NOTE: Do not use the air ratchet wrench to set torque. Always use a torque wrench to set torque.
![]() Disconnect the tool from the air supply before lubricating or changing sockets.
Disconnect the tool from the air supply before lubricating or changing sockets.
4 - ENG
