TYPICALTYPICAL INSTINSTALLAALLATIONTION
|
|
|
|
|
|
|
|
|
|
|
|
|
|
|
|
|
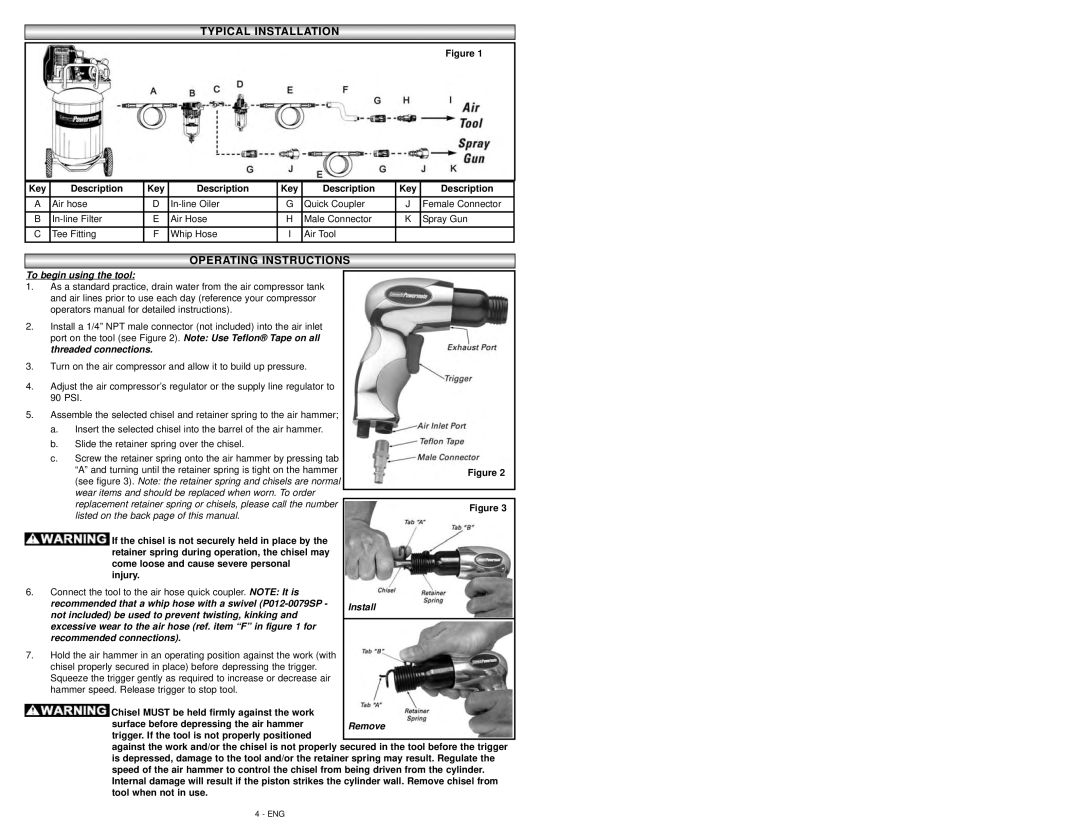
| Figure 1 | |
|
|
|
|
|
|
|
|
|
|
Key | Description | Key | Description | Key | Description | Key | Description | ||
A | Air hose | D | G | Quick Coupler | J | Female Connector | |||
B | E | Air Hose | H | Male Connector | K | Spray Gun | |||
C | Tee Fitting | F | Whip Hose | I | Air Tool |
|
|
|
|
OPERAOPERATINGTING INSTRUCTIONSINSTRUCTIONS
To begin using the tool: |
|
|
|
|
|
|
|
|
| ||
1. | As a standard practice, drain water from the air compressor tank |
|
|
|
|
|
|
|
|
| |
| and air lines prior to use each day (reference your compressor |
|
|
|
|
|
|
|
|
| |
| operators manual for detailed instructions). |
|
|
|
|
|
|
|
|
| |
2. | Install a 1/4” NPT male connector (not included) into the air inlet |
|
|
|
|
|
|
|
|
| |
| port on the tool (see Figure 2). Note: Use Teflon® Tape on all |
|
|
|
|
|
|
|
|
| |
| threaded connections. |
|
|
|
|
|
|
|
|
| |
3. | Turn on the air compressor and allow it to build up pressure. |
|
|
|
|
|
|
|
|
| |
4. | Adjust the air compressor’s regulator or the supply line regulator to |
|
|
|
|
|
|
|
|
| |
| 90 PSI. |
|
|
|
|
|
|
|
|
| |
5. | Assemble the selected chisel and retainer spring to the air hammer; |
|
|
|
|
|
|
|
|
| |
| a. | Insert the selected chisel into the barrel of the air hammer. |
|
|
|
|
|
|
|
|
|
| b. | Slide the retainer spring over the chisel. |
|
|
|
|
|
|
|
|
|
| c. | Screw the retainer spring onto the air hammer by pressing tab |
|
|
|
|
|
|
|
|
|
|
| “A” and turning until the retainer spring is tight on the hammer |
|
|
|
|
|
|
|
|
|
|
|
|
|
|
| Figure 2 | |||||
|
| (see figure 3). Note: the retainer spring and chisels are normal |
|
|
|
|
|
|
|
|
|
|
|
|
|
|
|
|
|
|
|
| |
|
| wear items and should be replaced when worn. To order |
|
|
|
|
|
|
|
|
|
|
|
|
|
|
|
|
|
|
|
| |
|
| replacement retainer spring or chisels, please call the number |
|
|
|
|
|
|
|
|
|
|
|
|
|
|
|
| Figure 3 |
|
| ||
|
| listed on the back page of this manual. |
|
|
|
|
|
|
| ||
|
|
|
|
|
|
|
|
|
|
| |
|
| If the chisel is not securely held in place by the |
|
|
|
|
|
|
|
|
|
|
| retainer spring during operation, the chisel may |
|
|
|
|
|
|
|
|
|
|
| come loose and cause severe personal |
|
|
|
|
|
|
|
|
|
|
| injury. |
|
|
|
|
|
|
|
|
|
6. | Connect the tool to the air hose quick coupler. NOTE: It is |
|
|
|
|
|
|
|
|
| |
| recommended that a whip hose with a swivel |
|
| Install |
|
|
|
|
|
| |
| not included) be used to prevent twisting, kinking and |
|
|
|
| ||||||
|
|
|
|
|
|
|
|
|
| ||
| excessive wear to the air hose (ref. item “F” in figure 1 for |
|
|
|
|
|
|
|
|
| |
| recommended connections). |
|
|
|
|
|
|
|
|
| |
7.Hold the air hammer in an operating position against the work (with chisel properly secured in place) before depressing the trigger. Squeeze the trigger gently as required to increase or decrease air hammer speed. Release trigger to stop tool.
![]() Chisel MUST be held firmly against the work
Chisel MUST be held firmly against the work
surface before depressing the air hammer Remove trigger. If the tool is not properly positioned
against the work and/or the chisel is not properly secured in the tool before the trigger is depressed, damage to the tool and/or the retainer spring may result. Regulate the speed of the air hammer to control the chisel from being driven from the cylinder. Internal damage will result if the piston strikes the cylinder wall. Remove chisel from tool when not in use.
4 - ENG