Cooper Lighting GT Series instruction manual Putting up your fixture, Wiring your fixture

Models: GT Series

1 12
Download 12 pages 16.7 Kb
Page 3
Image 3

Putting up your fixture

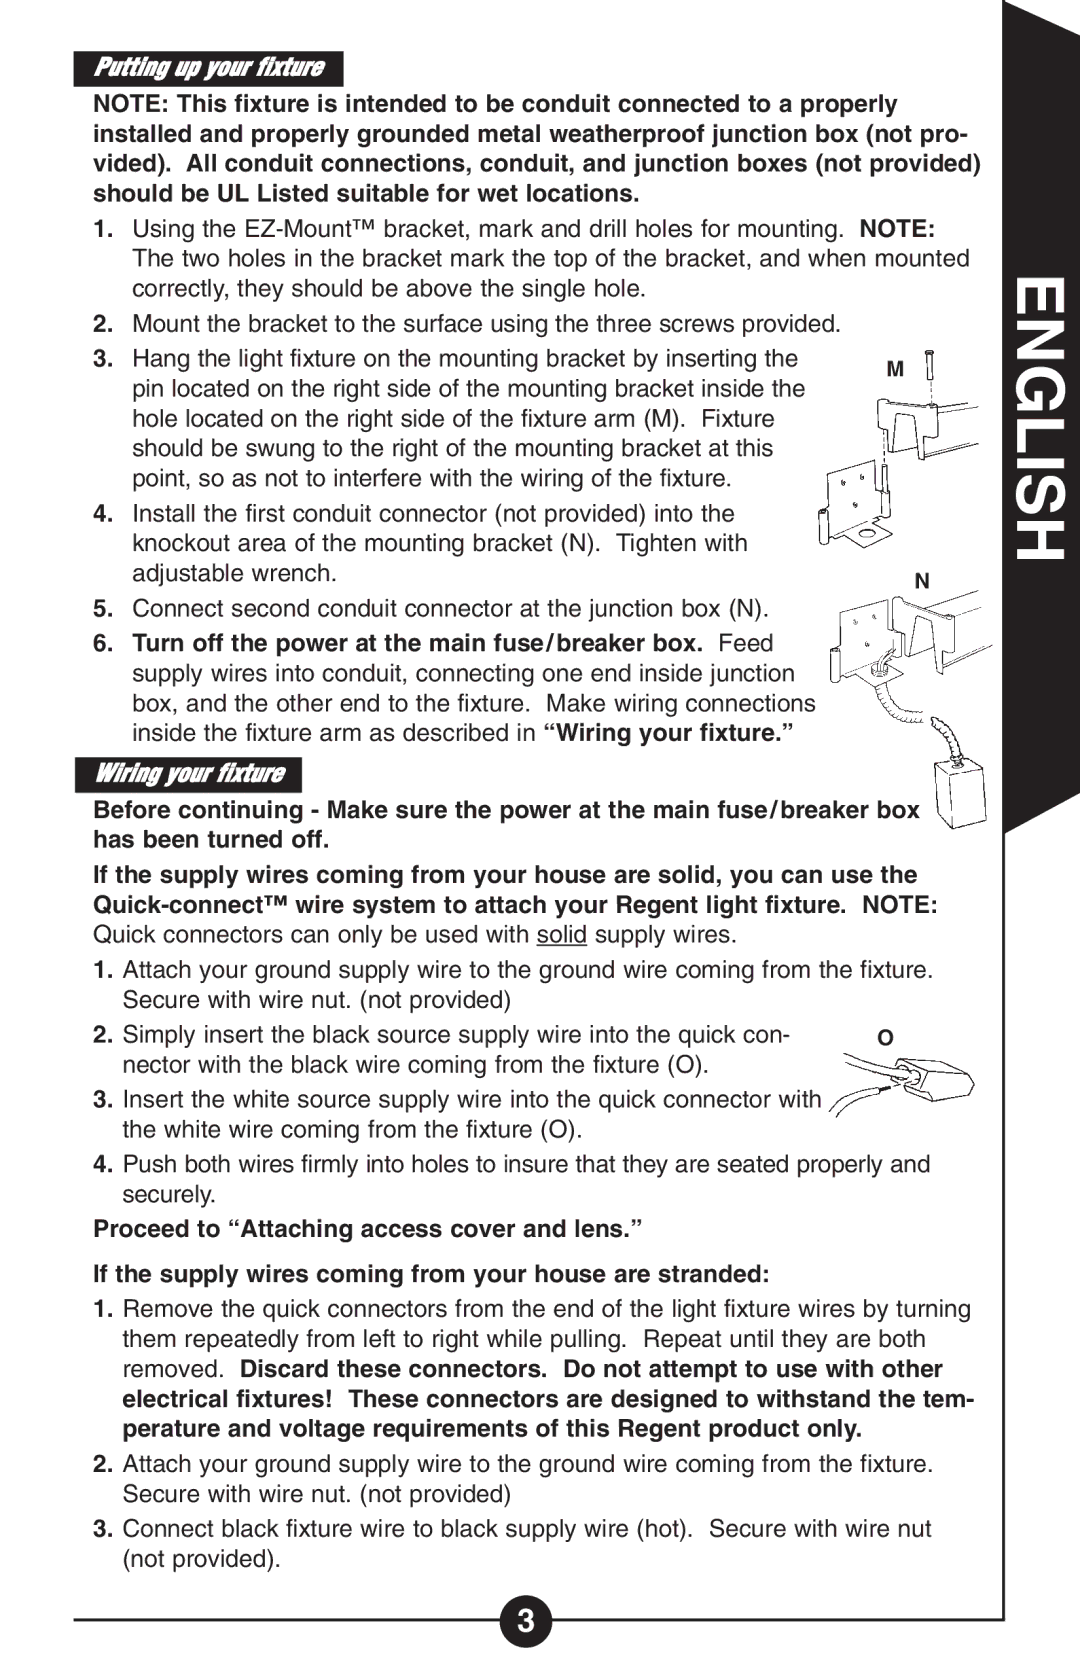
NOTE: This fixture is intended to be conduit connected to a properly installed and properly grounded metal weatherproof junction box (not pro- vided). All conduit connections, conduit, and junction boxes (not provided) should be UL Listed suitable for wet locations.

1.Using the EZ-Mount™ bracket, mark and drill holes for mounting. NOTE: The two holes in the bracket mark the top of the bracket, and when mounted correctly, they should be above the single hole.

2.Mount the bracket to the surface using the three screws provided.

3. Hang the light fixture on the mounting bracket by inserting the

M

pin located on the right side of the mounting bracket inside the


hole located on the right side of the fixture arm (M). Fixture


should be swung to the right of the mounting bracket at this


point, so as not to interfere with the wiring of the fixture.


4. Install the first conduit connector (not provided) into the


knockout area of the mounting bracket (N). Tighten with


adjustable wrench.

N


5.Connect second conduit connector at the junction box (N).

6.Turn off the power at the main fuse/breaker box. Feed supply wires into conduit, connecting one end inside junction box, and the other end to the fixture. Make wiring connections inside the fixture arm as described in “Wiring your fixture.”

Wiring your fixture

Before continuing - Make sure the power at the main fuse/breaker box has been turned off.

If the supply wires coming from your house are solid, you can use the Quick-connect™ wire system to attach your Regent light fixture. NOTE:

Quick connectors can only be used with solid supply wires.

1.Attach your ground supply wire to the ground wire coming from the fixture. Secure with wire nut. (not provided)

2. Simply insert the black source supply wire into the quick con-

O

nector with the black wire coming from the fixture (O).


3.Insert the white source supply wire into the quick connector with the white wire coming from the fixture (O).

4.Push both wires firmly into holes to insure that they are seated properly and securely.

Proceed to “Attaching access cover and lens.”

If the supply wires coming from your house are stranded:

1.Remove the quick connectors from the end of the light fixture wires by turning them repeatedly from left to right while pulling. Repeat until they are both removed. Discard these connectors. Do not attempt to use with other electrical fixtures! These connectors are designed to withstand the tem- perature and voltage requirements of this Regent product only.

2.Attach your ground supply wire to the ground wire coming from the fixture. Secure with wire nut. (not provided)

3.Connect black fixture wire to black supply wire (hot). Secure with wire nut (not provided).

ENGLISH

3

Page 3
Image 3
Cooper Lighting GT Series instruction manual Putting up your fixture, Wiring your fixture

GT Series specifications

Cooper Lighting, a leader in innovative lighting solutions, has made significant strides in the quest for energy efficiency and versatility with its GT Series. This line of fixtures has been designed to provide superior illumination while meeting the evolving needs of various commercial and industrial environments.

The GT Series is characterized by its robust construction and sleek design, which allows it to fit seamlessly into a variety of settings, from warehouses to retail spaces. One of its main features is the integration of LED technology, which not only reduces energy consumption but also enhances lighting quality. LED fixtures tend to have a longer lifespan compared to traditional lighting solutions, which translates to lower maintenance costs and less frequent replacements.

One of the standout technologies employed in the GT Series is the use of advanced optics. The fixtures are designed with precision-engineered optics that maximize light distribution and minimize glare, ensuring that spaces are illuminated evenly and effectively. This feature is particularly beneficial in settings where visual clarity is paramount, such as manufacturing floors and assembly lines.

Another significant characteristic of the GT Series is its adaptability. The fixtures come equipped with a range of lumen output options and various distribution patterns, allowing users to customize their lighting based on specific application needs. This flexibility makes the GT Series a versatile choice for a multitude of lighting scenarios, ensuring optimal performance regardless of the environment.

Moreover, the GT Series includes smart technology capabilities, enabling connectivity and integration with building management systems. This feature allows for automated controls, such as dimming and scheduling, to further enhance energy savings and improve overall efficiency.

In addition to its performance-related features, the GT Series is designed with sustainability in mind. By utilizing recyclable materials and reducing energy consumption, these fixtures support green building initiatives and contribute to a reduced carbon footprint.

Overall, the Cooper Lighting GT Series represents a forward-thinking approach to commercial lighting. With its combination of advanced technologies, customizable options, and energy-efficient design, this product line not only meets the demands of contemporary lighting applications but also sets a new standard for quality and performance in the industry. Investing in the GT Series ensures that spaces are not only well-lit but also equipped to meet future challenges in an ever-evolving landscape.