Para asegurar su operacibn segura
315MHz Garage Door Opener
Contents
Tools needed
Preparing your garage door
Sectional Door Installations
Planning
Carton inventory
Safety Labels
IlililiIililitililil
Assembly Hardware
Assemble the Rail & Instaff the Troffey
Assembly Step t
Fasten the Rail to the Motor Unit
Assembly Step
Atlach spreader to the motor unit with two screws
Use ONLYthose boitstfastenersmountedin the top Opener
Trolley Be sure the chain is not twisted
Chain/Cable
1t2 38 cm high objector a 2x4 laid flat on the floor
Tighten the Chain
Determine the Header Bracket Location
Iinstallatioh Step
TiHSTALLAT!ION Step
Install the Header Bracket
Mark the vertical set of bracket holes Drill 3/16
Attach the Ra! to the Header Bracket
MNSTALLATmON Step
Position the Opener
NNSTALLATHON Step
On E-PIECEDOOR with OUT Track
Hang the Opener
Nstallation Step
Iil 11tH I Ifi Itili iiliTil
To opener terminal screws white to 2 white/red to
Do NOTuse bulbs largerthan 75W ONLYuseA19 sizebulbs
MNSTALLATilON Step
Attach the Emergency Release
Rope and Handle
ENectrical Requirements
NSTALLATmON Step
Unstallatoh Step
Install The Protector System
Installing the Brackets
Floor installation Figure
Mounting and Wiring the Safety Reversing Sensors
Aligning the Safety Reversing Sensors
Fasten the Door Bracket
NSTALLATmON Step t t
ONE-PIECE Doors
Screws not provided to fasten the bracket to the door
Hole alignment alternative
IHSTALLATllON Step
Assemble the door arm, Figure
Adjustment procedures, Figure
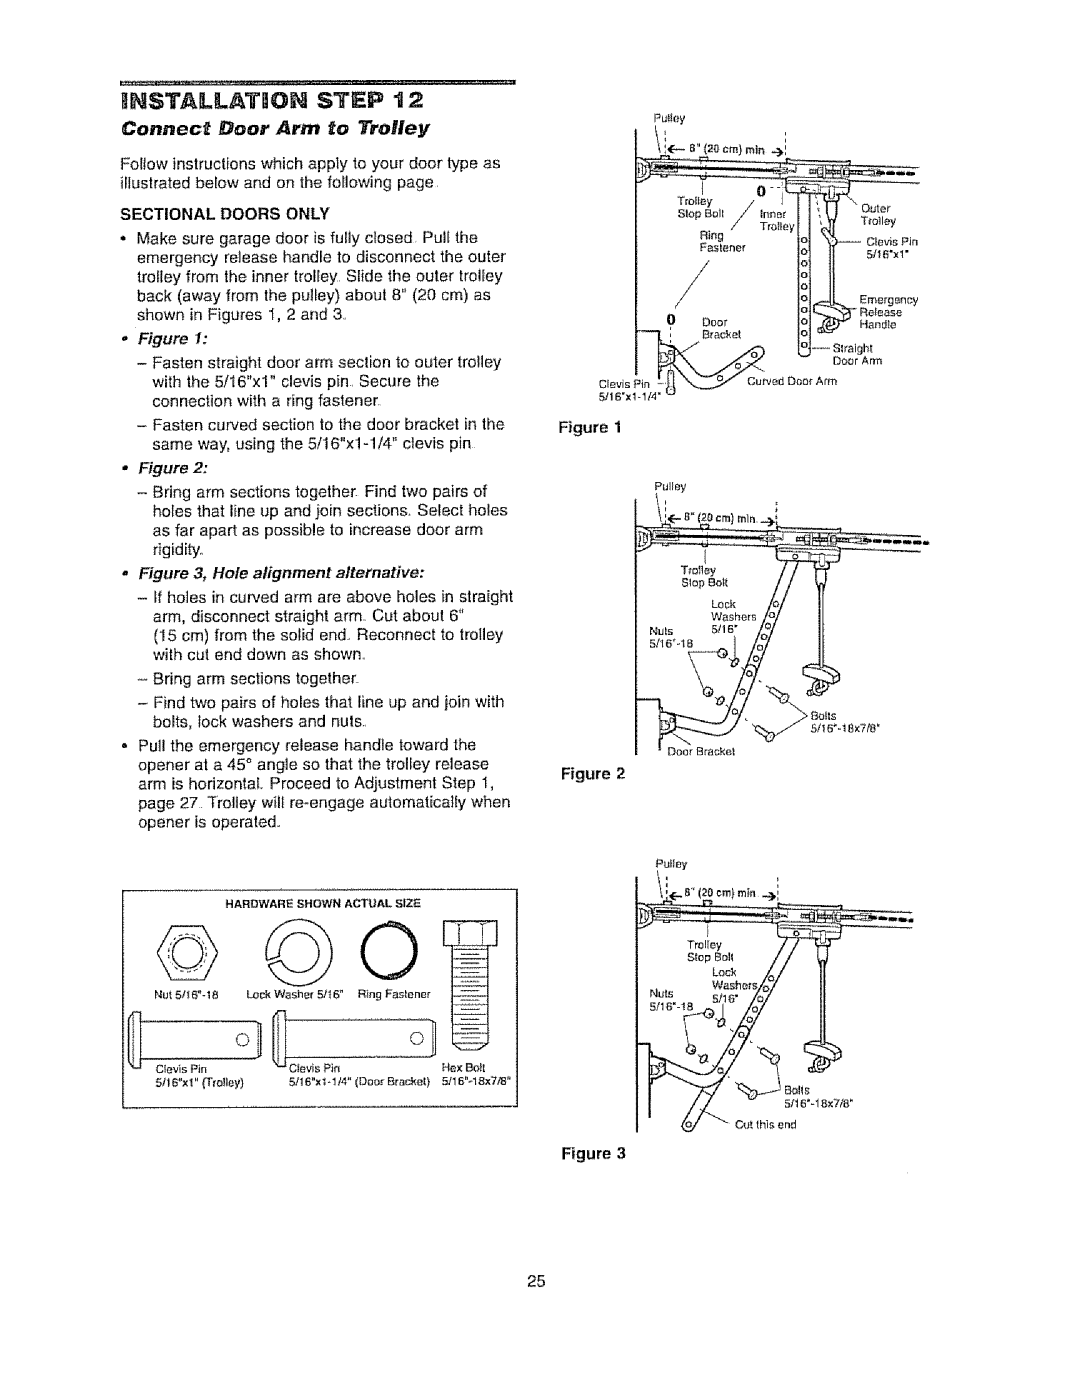
Connect the door arm to the trolley
Adjust the UP and Down Travel Limits
Adjustment Step t
HOW and When to Adjust the Limits
Adjust the Force
Adjustment Step
Test the Down close force
Test the UP open force
Test The Protector System s
Test the Safety Reversal System
Using Your Garage Door Opener
Important Safety ,NSTRUCTIONS
To Open the Door Manually
Door Control
Lockout
Maintenance Schedule
Limit Force Forcecontrols Adjustments
Care Your Garage Door Opener
Turning down limit adjustment screw clockwise
Refer to Adjustment , Adjust the Force
Symptom LED is not lit on door control
Diagnostic Chart
Programming
To Add or Reprogram a Hand.held Remote Control
To Erase All Codes From Motor Unit Memory
Function Remotes
To Add, Reprogram or Change a Keyless Entry PiN
To set a temporary PiN
Installation Parts
Repair Parts
Assembly & installation hardware bag see Ownersmanual
183A163 Wear pads
Drlva
Motor Unit Assembly Parts
KEY Part
Available only through Sears Parts & Service
Warranty
Emergency Key Release
For Sectional Doors Only
TNTRODUCCION
Contknido
Herramientas necesarias
PreparaciGn de la puerta de su cochera
Instalacion CON UNA Puerta Seccional
Pianificaci6n
Instalacion CON Puertas DE UNA Sola Pieza
Planificaci6n continUa
Puerta DE UNA Sola Pieza SIN Carril
Puerta DE UNA PtEZA CON Carril
Dosbl ndudores Dc4npanaBlar,coy. blanr.olroio
Nnventario de la Caja de CartOn
PemelocoI
TORNILLERtA Y Piezas Para EL Montaje
Monte el Riel e instale el Trole
MONTAJE, Paso
Instale la Polea Loca
Fije el Riel a la Unidad del Motor
De pulg no ajuste demasiado la tuerce
Estaspiezas SE Muestranen Sutamaio Real
#nstale ia Cadena y Cable
Paso
Eieroscado
INISTALACII6N
Determine d6nde va a instalar ia Mnsula del Cabezal
INSTALACI6N, Paso t
Extrema
Instalacon DE LA MleNSULA DEL Cabezal EN LA
Instale la Mnsula del Cabezal
Pared Delantera
Instalacion DE LA Mnsula DEL Cabezal EN EL Cielo Raso
Coloque el Riel en la Mnsula dei Cabezal
IINSTALACi6N, Paso
Estas Piezasse Mliestranen Sutamanoreal
16pot1q,2depulg
Puerta Seccional O Puerta DE UNA Sola Pieza CON Carril
Coloque el Abridor en Posici6n
Cueigue el Abridor
MNSTALACaON, Paso
80TQN Decontroldelapuerta
Lnstale la Unidad de Control de la Puerta
Voltios
Hnstale ia Luz
NSTALACaON, Paso
Coloque la Manija y la Cuerda de EEmergencia
Si la reglamentaci6n local exige que su abridor tenga
Bequisitos para la Instalaci6n ElcErica
Para evitar dificultades con la instalaci6n, no encienda
Nnstale La Sistema de Protecci6n
INSTALACmON, Paso t0
Informacin 1MPORTANTE CON Respects
DE Seguridad
Instalacion DE LAS Mensulas
I71
Instalaci6n en la pared y
InstalaciSn en el piss Figura
Si la luz indicadora del sensor que emile el rayo
LOS Sensores DEL Sistema DE Retroceso DE Seguridad
Fije la Mnsula de la Puerta
NNSTALACm6N, Paso
Puertas Seccionales
Puertas DE UNA Sola Pieza
Ep.CLOl
Conecte el Brazo de la Puerta al Trole
5zo-8,na
Solo Para Puertas Seccionales
Arme el braze de la puerta, Figura
Todas LAS Puertas DE UNA Sola Pieza
Conecte el braze de la puerta al trole
COMa Y CU.,NDO Ajustar LOS LiMITES
Durante un ciclo complete del recorrido
Si la puerta retrocede cuando est# en la posiciSn
Interferencia visible en el ciclo def recorrido
Como Y CU,NDO Ajustar LA Fuerza DEL Abridor
Ajuste la Fuerza
Eerrar
Pruebe La Sistema de Protecci6n e
Pruebe el Sisterna de Retroceso de Seguridad
Prueba
Ajuste
Seguridad de retroceso correctamente instalado y alineado
C6mo Usar su Abridor de Puerta de Cochera
C6mo Abrir ia Puerta Manualmente
C6rno Usar la Unidad de Control de Pared
Como Desconectar EL Trole
Como Reconectar EL Trole
Ajustes DE Limite Y Fuerza
IANTSNIMgEHTO DE SU
Controlesde Limite
Repita la prueba de retroceso de seguridad Ajustes
La puerta no cierra y las luces de la unidad del motor
Sl Tiene ALGgN Problema
E1 control remote no activa la puerta
Consults el apartado Ajustes, Paso 2 Ajuste la fuerza
Hay un cortocircuito en el cable de los sensores de
Tabla de Diagn6stico
Los sensores de retroceso
Motor se calienta o hay un posible fallo de RPM
Controles Rernotos de 3 Funciones
C6mo Agregar o Reprogramar un Control Remoto Manual
COMa Usar EL Baton Learn Aprender
Enter
Cierre con un bot6n
Meinsulas de soporte
Liberador de la Ilave de emergencia
Consota de control premium
Mnsulas de extensi6n
SU-HOGAR sM
LE-FOYER M
Call anytime, day or night U SeA, and Canada
Call anytime, day or night USoA. only