Reinstall the belt cover on front of the engine with the two self-tapping screws and flat washers.

Reattach the chute crank to the chute assembly with the hairpin clip and flat washer.

NOTE: Make sure that the auger cable is routed in front of the belt.

Drive Belt

Check drive belt every 50 hours of operation for wear and tear.

Drain the gasoline from the snow thrower, or place a piece of plastic under the gas cap.

Remove the plastic belt cover on the front of the engine by removing the two self-tapping screws.

Tip the snow thrower up and forward, so that it rests on the housing.

Remove six self-tapping screws from frame cover underneath the snow thrower.

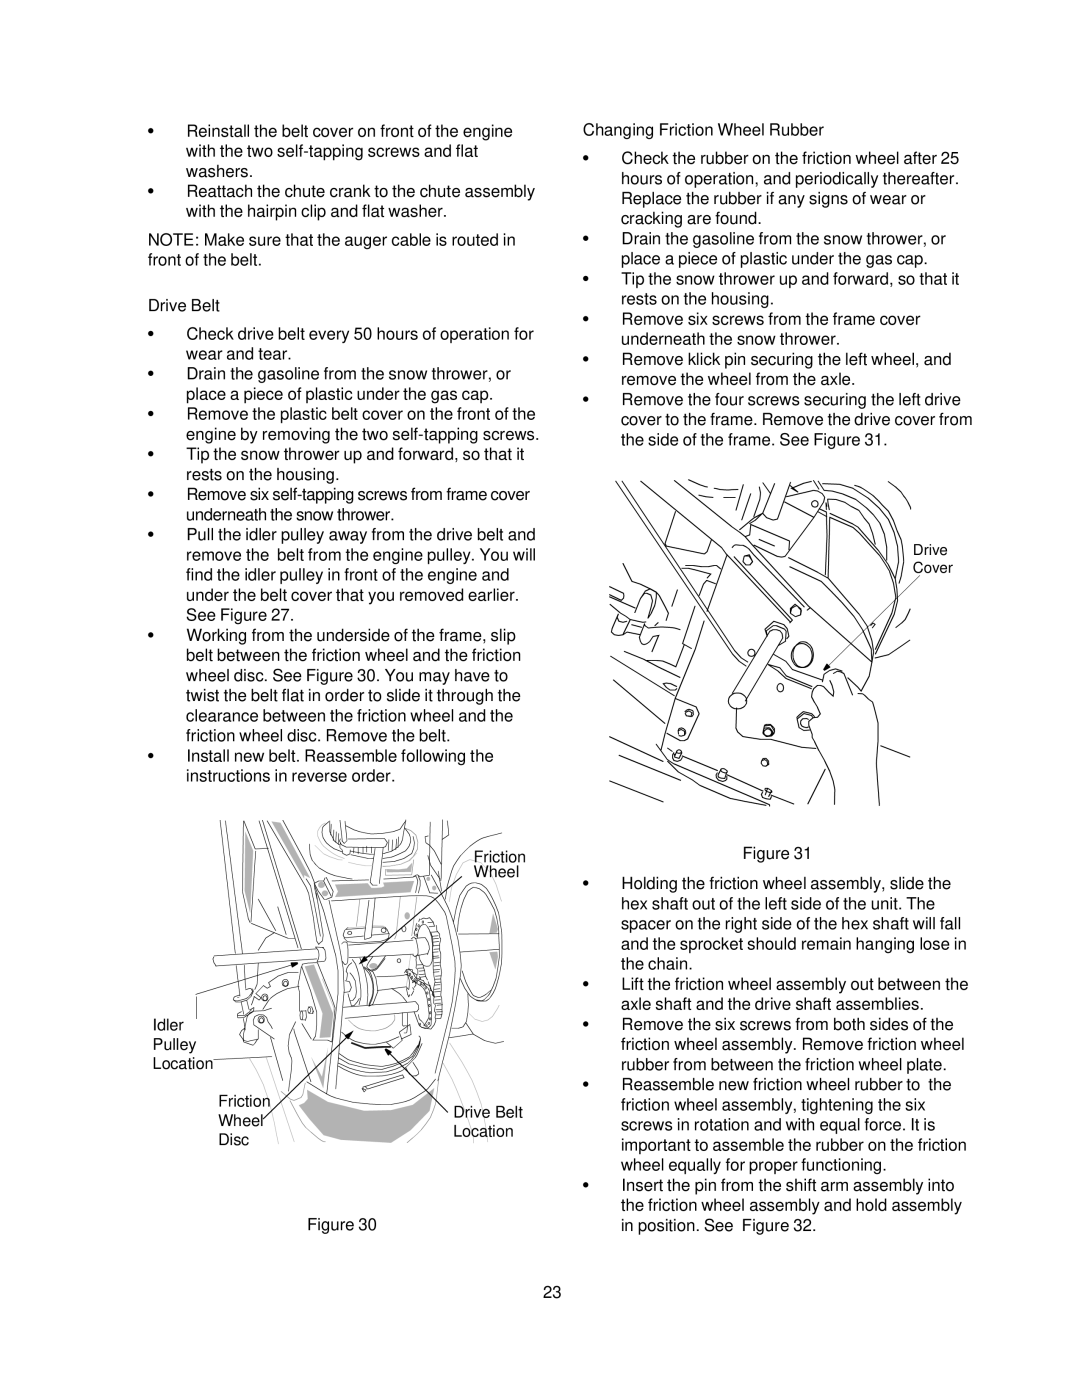
Pull the idler pulley away from the drive belt and remove the belt from the engine pulley. You will find the idler pulley in front of the engine and under the belt cover that you removed earlier. See Figure 27.

Working from the underside of the frame, slip belt between the friction wheel and the friction wheel disc. See Figure 30. You may have to twist the belt flat in order to slide it through the clearance between the friction wheel and the friction wheel disc. Remove the belt.

Install new belt. Reassemble following the instructions in reverse order.

Changing Friction Wheel Rubber

Check the rubber on the friction wheel after 25 hours of operation, and periodically thereafter. Replace the rubber if any signs of wear or cracking are found.

Drain the gasoline from the snow thrower, or place a piece of plastic under the gas cap.

Tip the snow thrower up and forward, so that it rests on the housing.

Remove six screws from the frame cover underneath the snow thrower.

Remove klick pin securing the left wheel, and remove the wheel from the axle.

Remove the four screws securing the left drive cover to the frame. Remove the drive cover from the side of the frame. See Figure 31.

Drive

Cover


Friction

Figure 31


Wheel

Holding the friction wheel assembly, slide the


hex shaft out of the left side of the unit. The


spacer on the right side of the hex shaft will fall


and the sprocket should remain hanging lose in


the chain.


Lift the friction wheel assembly out between the


axle shaft and the drive shaft assemblies.

Idler


Remove the six screws from both sides of the


Pulley


friction wheel assembly. Remove friction wheel


Location


rubber from between the friction wheel plate.


Friction


Reassemble new friction wheel rubber to the


Drive Belt

friction wheel assembly, tightening the six


Wheel


screws in rotation and with equal force. It is


Location


Disc


important to assemble the rubber on the friction


wheel equally for proper functioning.


Insert the pin from the shift arm assembly into


Figure 30

the friction wheel assembly and hold assembly


in position. See Figure 32.

23

Page 23
Image 23
Craftsman 247.88853 owner manual Drive Belt, Changing Friction Wheel Rubber

247.88853 specifications

The Craftsman 247.88853 is a renowned model in the realm of outdoor power equipment, particularly known for its robust design and high functionality. This versatile machine is primarily designed to provide users with an efficient lawn mowing experience while ensuring ease of use and maintenance.

One of the standout features of the Craftsman 247.88853 is its powerful engine. Equipped with a 24 HP V-twin gas engine, it delivers reliable performance for demanding mowing tasks. This powerful engine not only enhances cutting efficiency but also ensures that the mower can tackle tougher terrains with ease. Moreover, the engine operates smoothly, resulting in less vibration and noise, which makes for a more pleasant mowing experience.

The cutting system of the Craftsman 247.88853 is another significant characteristic that sets it apart. Featuring a 50-inch cutting deck, it provides a wide mowing path, significantly reducing the time spent on lawn maintenance. The deck is made of durable materials, ensuring longevity and resilience against the wear and tear of heavy use. Additionally, the height adjustment feature allows users to set the cutting height with precision, accommodating various grass types and desired lawn finishes.

In terms of user comfort and control, the Craftsman 247.88853 does not disappoint. It comes equipped with an ergonomic seat that provides ample support for long mowing sessions. Furthermore, the easy-to-use hydrostatic transmission enables smooth and effortless speed control, allowing users to navigate their lawns with agility.

The mower is designed with modern technologies that enhance its usability and efficiency. The inclusion of a built-in mulching capability is one such technology, which allows the grass to be finely chopped and returned to the lawn as natural fertilizer. This eco-friendly feature supports sustainability while promoting healthier lawn growth.

Lastly, maintenance and serviceability are made easier with the Craftsman 247.88853. The mower features a straightforward design that simplifies tasks such as oil changes, blade sharpening, and general upkeep. This focus on ease of maintenance ensures that users can keep their mower in optimal working condition with minimal effort.

Overall, the Craftsman 247.88853 stands out as a powerful, efficient, and user-friendly mowing solution, ideal for homeowners seeking to maintain their lawns with minimal hassle. With its combination of advanced features and reliable performance, it continues to be a favorite among lawn care enthusiasts.