Tighten all loose hardware on the handle assembly in the following order — first the four hex bolts at the bottom of the handle, then the carriage bolts and lastly the hex bolts on the rear of the handle panel.

Attaching Clutch Cables

The clutch control cables are attached to the snow thrower. For shipping purposes, if the cables are attached to the top of the engine with cable ties, cut the cable ties now. The Z ends of the clutch cables are hooked into the clutch grips on each handle.

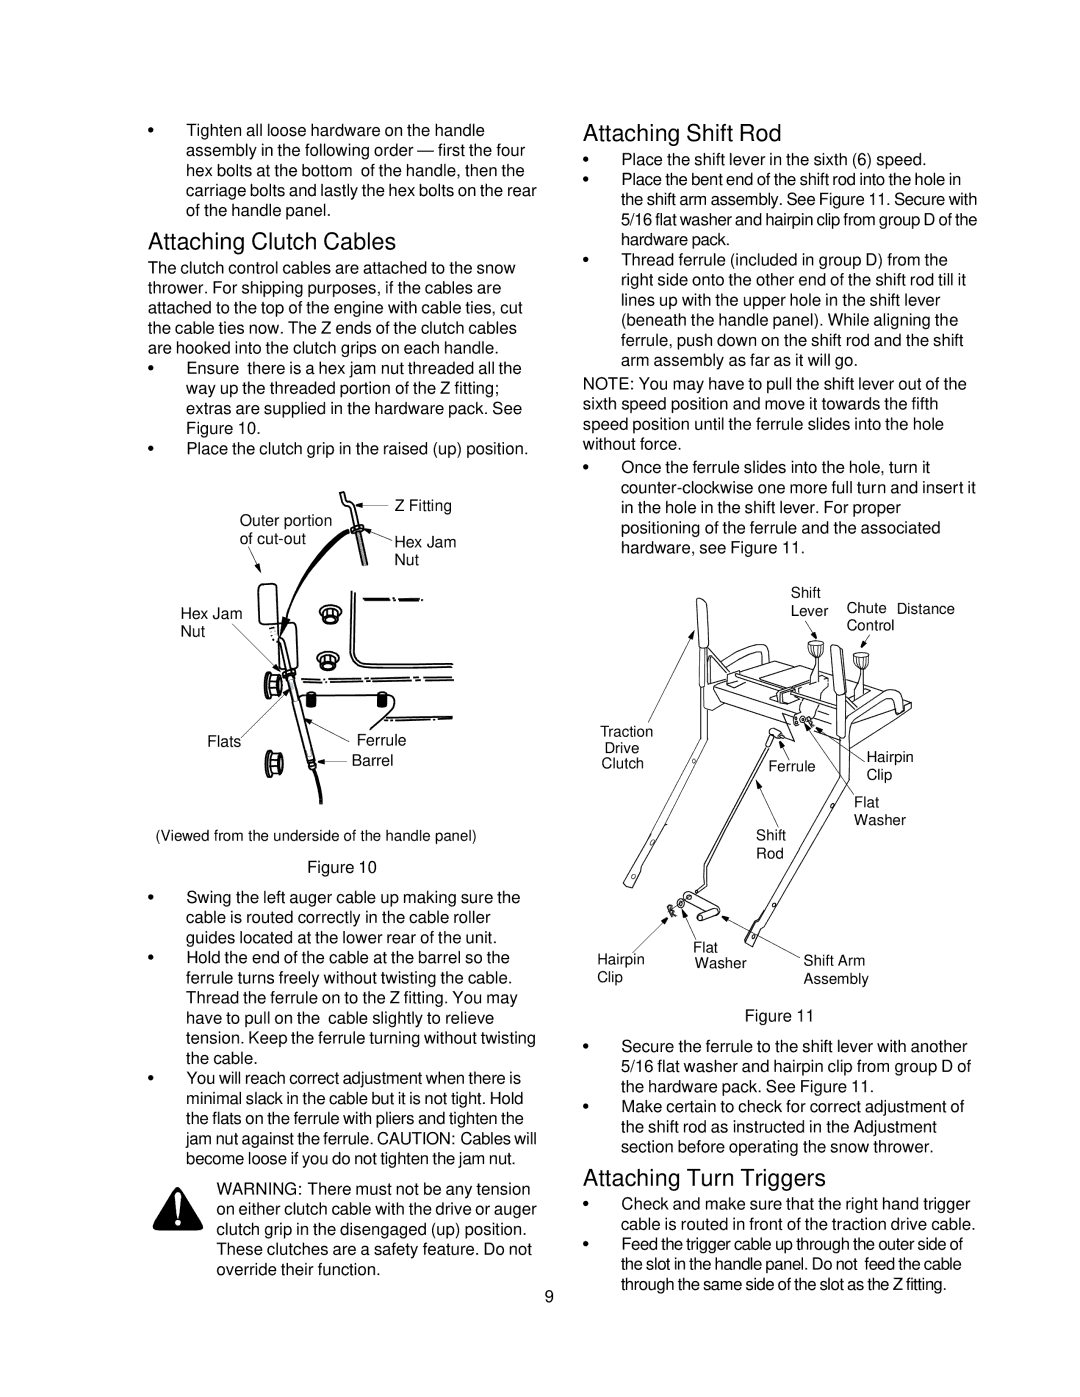
Ensure there is a hex jam nut threaded all the way up the threaded portion of the Z fitting; extras are supplied in the hardware pack. See Figure 10.

Place the clutch grip in the raised (up) position.

Outer portion

Z Fitting


of cut-out

Hex Jam


Nut

Hex Jam

Nut

Flats

Ferrule


Barrel

(Viewed from the underside of the handle panel)

Figure 10

Swing the left auger cable up making sure the cable is routed correctly in the cable roller guides located at the lower rear of the unit.

Hold the end of the cable at the barrel so the ferrule turns freely without twisting the cable. Thread the ferrule on to the Z fitting. You may have to pull on the cable slightly to relieve tension. Keep the ferrule turning without twisting the cable.

You will reach correct adjustment when there is minimal slack in the cable but it is not tight. Hold the flats on the ferrule with pliers and tighten the jam nut against the ferrule. CAUTION: Cables will become loose if you do not tighten the jam nut.

WARNING: There must not be any tension on either clutch cable with the drive or auger clutch grip in the disengaged (up) position.

These clutches are a safety feature. Do not override their function.

Attaching Shift Rod

Place the shift lever in the sixth (6) speed.

Place the bent end of the shift rod into the hole in the shift arm assembly. See Figure 11. Secure with 5/16 flat washer and hairpin clip from group D of the hardware pack.

Thread ferrule (included in group D) from the right side onto the other end of the shift rod till it lines up with the upper hole in the shift lever (beneath the handle panel). While aligning the ferrule, push down on the shift rod and the shift arm assembly as far as it will go.

NOTE: You may have to pull the shift lever out of the sixth speed position and move it towards the fifth speed position until the ferrule slides into the hole without force.

Once the ferrule slides into the hole, turn it counter-clockwise one more full turn and insert it in the hole in the shift lever. For proper positioning of the ferrule and the associated hardware, see Figure 11.

Shift

Lever Chute Distance

Control

Traction


Drive


Hairpin

Clutch


Ferrule


Clip


Flat


Shift

Washer


Rod


Hairpin

Flat

Shift Arm

Washer

Clip


Assembly

Figure 11

Secure the ferrule to the shift lever with another 5/16 flat washer and hairpin clip from group D of the hardware pack. See Figure 11.

Make certain to check for correct adjustment of the shift rod as instructed in the Adjustment section before operating the snow thrower.

Attaching Turn Triggers

Check and make sure that the right hand trigger cable is routed in front of the traction drive cable.

Feed the trigger cable up through the outer side of the slot in the handle panel. Do not feed the cable through the same side of the slot as the Z fitting.

9

Page 9
Image 9
Craftsman 247.88853 Attaching Clutch Cables, Attaching Shift Rod, Attaching Turn Triggers, Outer portion Fitting Cut-out

247.88853 specifications

The Craftsman 247.88853 is a renowned model in the realm of outdoor power equipment, particularly known for its robust design and high functionality. This versatile machine is primarily designed to provide users with an efficient lawn mowing experience while ensuring ease of use and maintenance.

One of the standout features of the Craftsman 247.88853 is its powerful engine. Equipped with a 24 HP V-twin gas engine, it delivers reliable performance for demanding mowing tasks. This powerful engine not only enhances cutting efficiency but also ensures that the mower can tackle tougher terrains with ease. Moreover, the engine operates smoothly, resulting in less vibration and noise, which makes for a more pleasant mowing experience.

The cutting system of the Craftsman 247.88853 is another significant characteristic that sets it apart. Featuring a 50-inch cutting deck, it provides a wide mowing path, significantly reducing the time spent on lawn maintenance. The deck is made of durable materials, ensuring longevity and resilience against the wear and tear of heavy use. Additionally, the height adjustment feature allows users to set the cutting height with precision, accommodating various grass types and desired lawn finishes.

In terms of user comfort and control, the Craftsman 247.88853 does not disappoint. It comes equipped with an ergonomic seat that provides ample support for long mowing sessions. Furthermore, the easy-to-use hydrostatic transmission enables smooth and effortless speed control, allowing users to navigate their lawns with agility.

The mower is designed with modern technologies that enhance its usability and efficiency. The inclusion of a built-in mulching capability is one such technology, which allows the grass to be finely chopped and returned to the lawn as natural fertilizer. This eco-friendly feature supports sustainability while promoting healthier lawn growth.

Lastly, maintenance and serviceability are made easier with the Craftsman 247.88853. The mower features a straightforward design that simplifies tasks such as oil changes, blade sharpening, and general upkeep. This focus on ease of maintenance ensures that users can keep their mower in optimal working condition with minimal effort.

Overall, the Craftsman 247.88853 stands out as a powerful, efficient, and user-friendly mowing solution, ideal for homeowners seeking to maintain their lawns with minimal hassle. With its combination of advanced features and reliable performance, it continues to be a favorite among lawn care enthusiasts.