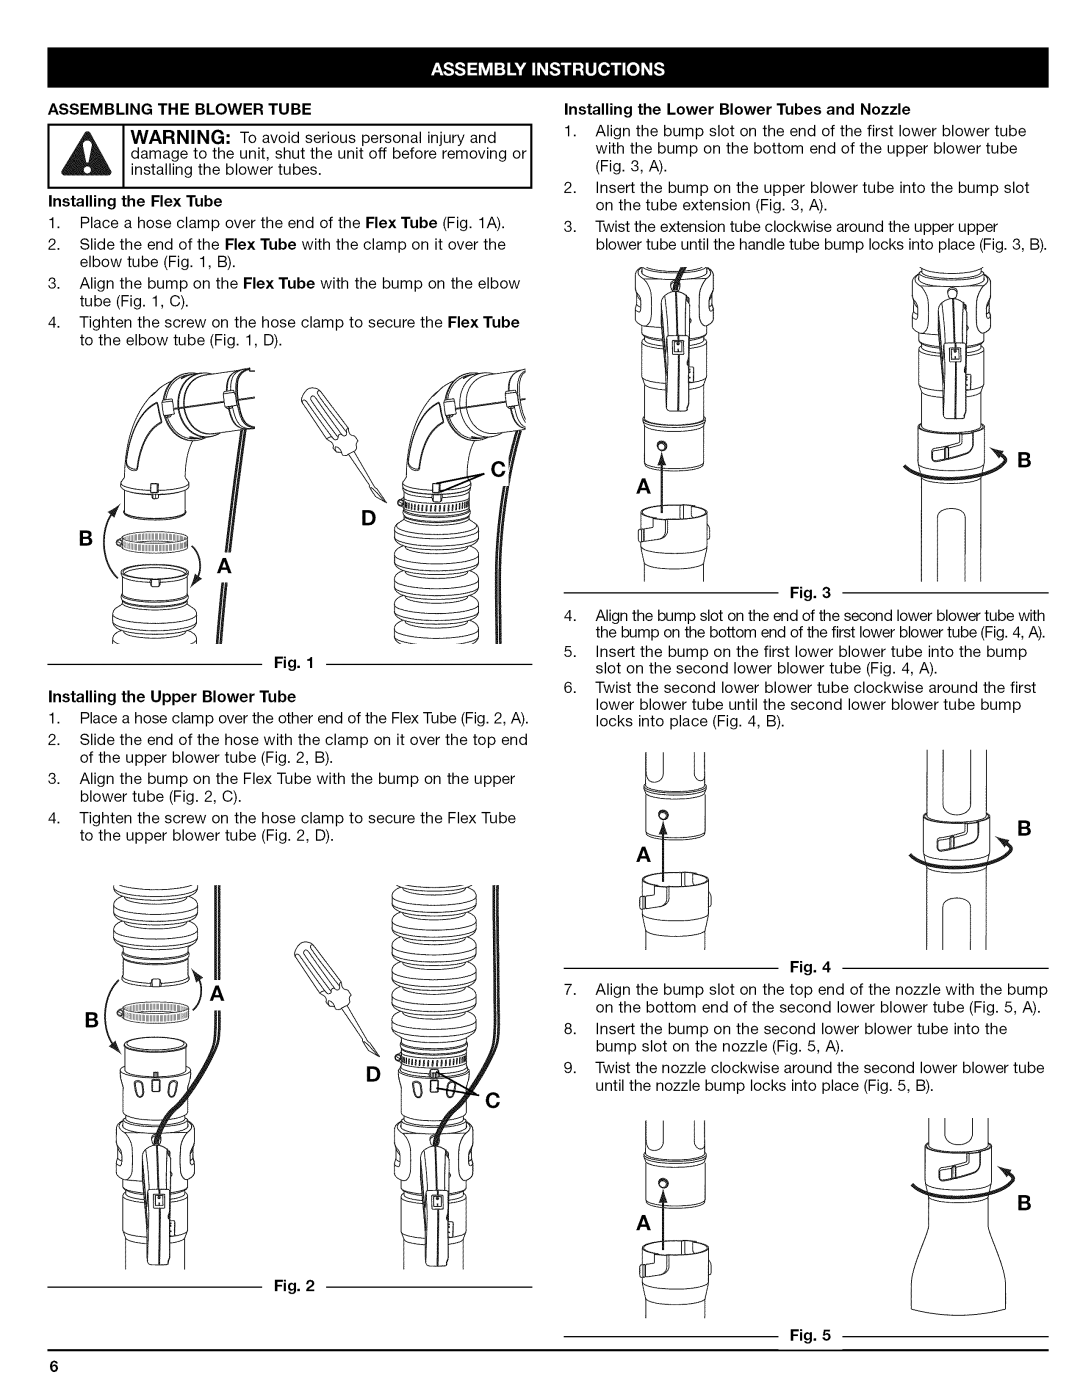
ASSEMBLINGTHEBLOWERTUBE


Installing the Lower Blower Tubes and Nozzle


WARNING:

To avoid serious

personal injury and

I

1.

Align the bump slot on the end of the first lower blower tube


damage to the unit, shut the unit off before removing or

I


with the bump on the bottom end of the upper blower tube


(Fig. 3, A).


installing the

blower tubes,


Installing

the Flex Tube


2.

Insert the bump on the upper blower tube into the

bump slot


on the tube extension (Fig. 3, A).


1.

Place

a hose

clamp

over the end of the

Flex Tube (Fig. 1A).


3.

Twist the extension tube clockwise around the upper

upper

2.

Slide

the end

of the

Flex Tube with the

clamp on it over the


blower tube until the handle tube bump locks into place (Fig. 3, B).


elbow tube (Fig. 1, B).


3.Align the bump on the Flex Tube with the bump on the elbow tube (Fig. 1, C).

4.Tighten the screw on the hose clamp to secure the Flex Tube to the elbow tube (Fig. 1, D).

B

Fig. 1

Installing the Upper Blower Tube

1.Place a hose clamp over the other end of the Flex Tube (Fig. 2, A).

2.Slide the end of the hose with the clamp on it over the top end of the upper blower tube (Fig. 2, B).

3.Align the bump on the Flex Tube with the bump on the upper blower tube (Fig. 2, C).

4.Tighten the screw on the hose clamp to secure the Flex Tube to the upper blower tube (Fig. 2, D).

vm_lv

_B

A

Fig. 3

4.Align the bump slot on the end of the second lower blower tube with the bump on the bottom end of the first lower blower tube (Fig. 4, A).

5.Insert the bump on the first lower blower tube into the bump slot on the second lower blower tube (Fig. 4, A).

6.Twist the second lower blower tube clockwise around the first

lower blower tube until the second lower blower tube bump locks into place (Fig. 4, B).

B

A)

Fig. 4

7, Align the bump slot on the top end of the nozzle with the bump on the bottom end of the second lower blower tube (Fig. 5, A).

8.Insert the bump on the second lower blower tube into the bump slot on the nozzle (Fig. 5, A).

Twist the nozzle clockwise around the second lower blower tube until the nozzle bump locks into place (Fig. 5, B).

LJ

B

Fig. 2

Fig. 5

6

Page 6
Image 6
Craftsman 79480 manual Installing the Lower Blower Tubes and Nozzle, Installing Flex Tube, Installing the Upper Blower Tube

79480 specifications

The Craftsman 79480 is a versatile and powerful tool designed to meet the needs of both DIY enthusiasts and professionals alike. Known for its robust performance, this tool combines innovative technologies with user-friendly features to enhance efficiency and convenience.

One of the key features of the Craftsman 79480 is its high-torque motor, which delivers exceptional power for various tasks. This makes it ideal for heavy-duty applications such as drilling, driving screws, and handling tough materials. The motor is designed to operate smoothly with reduced noise levels, allowing users to work in quieter environments without sacrificing performance.

Another significant aspect of the Craftsman 79480 is its variable speed control. This feature allows users to adjust the speed according to the specific requirements of their projects, providing greater control and precision. Whether you are working on delicate tasks or need to drive screws rapidly, the variable speed settings cater to a wide range of applications.

The tool is equipped with an ergonomic handle that enhances comfort during use. The soft-grip design provides better control and reduces fatigue, allowing users to work efficiently over extended periods. Additionally, the lightweight construction of the Craftsman 79480 makes it easy to maneuver and handle, enhancing overall usability.

Craftsman also emphasizes safety in the design of the 79480. It includes an integrated safety clutch that prevents damage to the tool and work materials by disengaging the motor when excessive force is applied. This not only prolongs the life of the tool but also ensures that users can work with confidence.

Furthermore, the Craftsman 79480 features a durable build, constructed from high-quality materials that withstand the rigors of daily use. Its robustness contributes to the longevity of the tool and makes it a reliable companion for any project.

In conclusion, the Craftsman 79480 stands out in the market with its powerful motor, variable speed control, ergonomic design, safety features, and durable construction. Whether you are a professional or a hobbyist, this tool offers the versatility and reliability needed to tackle a broad spectrum of tasks, making it a valuable addition to any toolkit.