SOUND BLASTER AUDIGY 2 ZS and AUDIGY 2 ZS PLATINUM SETUP
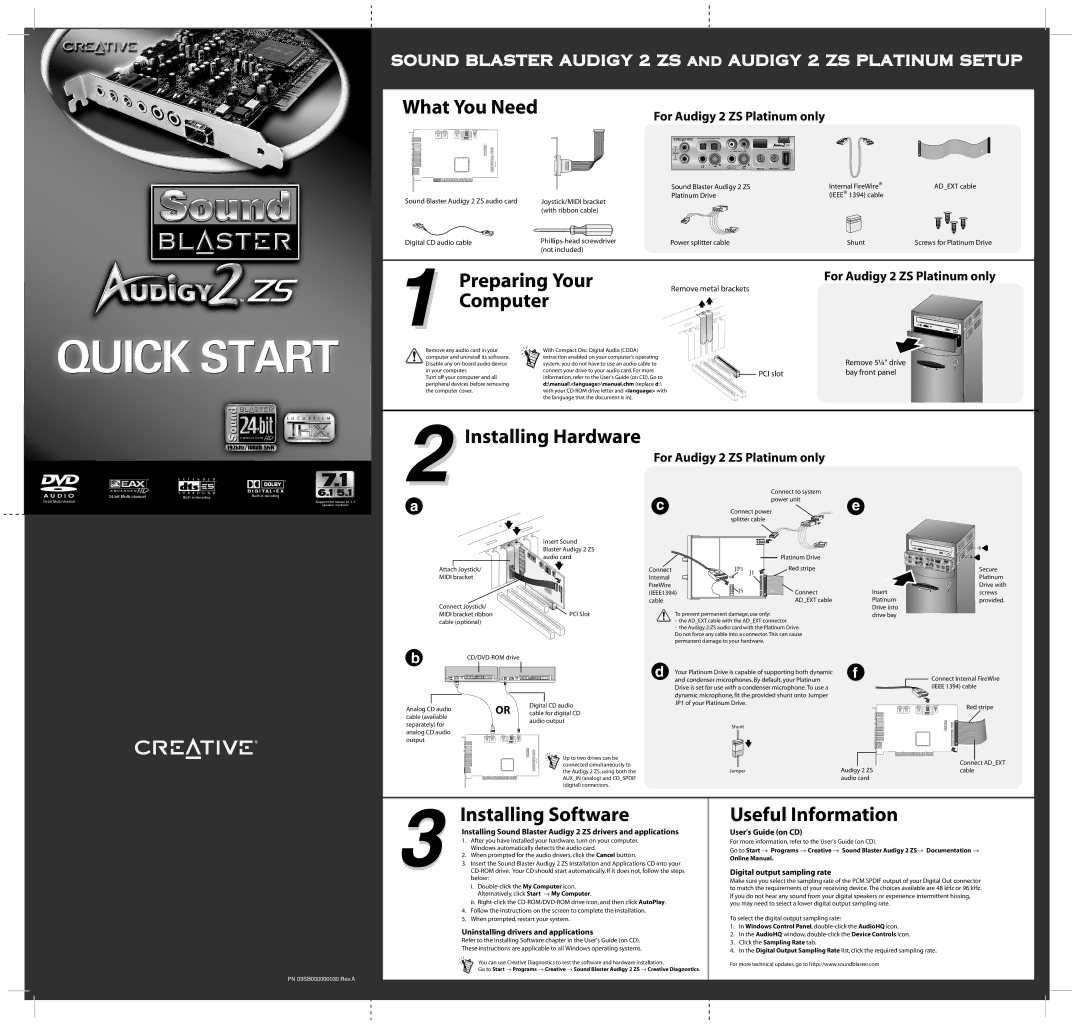
What You Need
For Audigy 2 ZS Platinum only
TAD CD_INAUX_IN SB1394 CD_SPDIF
JOYSTICK
AUD_EXT
|
|
|
|
|
| Sound Blaster Audigy 2 ZS | Internal FireWire® | AD_EXT cable |
Sound Blaster Audigy 2 ZS audio card | Joystick/MIDI bracket | Platinum Drive | (IEEE® 1394) cable |
| ||||
|
|
| ||||||
| (with ribbon cable) |
|
|
| ||||
|
|
|
|
|
|
|
| |
|
|
|
|
|
|
|
|
|
Digital CD audio cable | Power splitter cable | Shunt | Screws for Platinum Drive | |||||
| (not included) |
|
|
| ||||
|
|
|
|
|
|
|
|
|
Preparing Your | Remove metal brackets | |||||||
1 Computer |
|
|
|
|
|
|
| |
|
|
|
|
|
|
| ||
|
|
|
|
|
|
| ||
|
|
|
|
|
|
| ||
Remove any audio card in your | With Compact Disc Digital Audio (CDDA) |
|
|
|
|
|
|
|
computer and uninstall its software. | extraction enabled on your computer's operating |
|
|
|
|
|
|
|
Disable any | system, you do not have to use an audio cable to |
|
|
|
|
|
|
|
in your computer. | connect your drive to your audio card. For more |
|
|
|
|
|
| PCI slot |
Turn off your computer and all | information, refer to the User's Guide (on CD). Go to |
|
|
|
|
|
| |
|
|
|
|
|
|
| ||
peripheral devices before removing | d:\manual\<language>\manual.chm (replace d:\ |
|
|
|
|
|
|
|
the computer cover. | with your |
|
|
|
|
|
|
|
| the language that the document is in). |
|
|
|
|
|
|
|
For Audigy 2 ZS Platinum only
Remove 5¼" drive bay front panel
Installing Hardware
2 | For Audigy 2 ZS Platinum only |
| |
c | Connect to system | e | |
a | power unit | ||
Connect power | |||
splitter cable
Attach Joystick/ MIDI bracket
Connect Joystick/ MIDI bracket ribbon cable (optional)
TAD
CD_IN
P ORT 1
Insert Sound Blaster Audigy 2 ZS audio card
AUX_
IN
SB1394
CD_SPDIF
KJOYSTIC | EXTAUD |
![]() PCI Slot
PCI Slot
|
|
|
|
|
|
| Platinum Drive |
|
|
|
|
|
|
| |
|
|
|
|
|
|
| |
|
|
|
|
|
|
| |
|
|
|
|
|
|
| |
|
|
|
|
|
|
| |
Connect |
| JP1 | J1 |
| Red stripe | ||
Internal |
|
|
|
| |||
|
|
|
|
|
|
| |
FireWire |
| J5 |
|
|
|
|
|
(IEEE1394) |
|
|
|
|
| Connect | |
cable |
|
|
|
|
|
| AD_EXT cable |
To prevent permanent damage, use only:
- the AD_EXT cable with the AD_EXT connector
-the Audigy 2 ZS audio card with the Platinum Drive. Do not force any cable into a connector. This can cause permanent damage to your hardware.
| Secure |
| Platinum |
| Drive with |
Insert | screws |
Platinum | provided. |
Drive into |
|
drive bay |
|
b
Analog CD audio cable (available separately) for analog CD audio output
|
|
|
|
| |||||||||||
|
|
|
|
|
|
|
|
|
|
|
| d | Your Platinum Drive is capable of supporting both dynamic | f | |
|
|
|
|
|
|
|
|
|
|
|
| ||||
|
|
|
|
|
|
|
|
|
|
|
| and condenser microphones. By default, your Platinum | |||
|
|
|
|
|
|
|
|
|
|
|
|
|
| ||
|
|
|
|
|
|
|
|
|
|
|
|
|
| ||
|
|
|
|
|
|
|
|
|
|
|
|
| Drive is set for use with a condenser microphone. To use a |
| |
|
|
|
|
|
|
|
|
|
|
|
|
|
| ||
|
|
|
|
|
|
|
|
|
|
|
|
| dynamic microphone, fit the provided shunt onto Jumper |
| |
|
|
|
| OR |
|
|
| Digital CD audio | JP1 of your Platinum Drive. |
| |||||
|
|
|
|
|
|
|
|
|
| ||||||
|
|
|
|
|
|
| cable for digital CD |
|
|
| |||||
|
|
|
|
|
|
|
|
|
| audio output | Shunt |
| |||
|
|
| TAD CD_INAUX_IN SB1394 |
|
|
|
|
|
|
| |||||
|
|
|
|
|
|
|
|
|
| ||||||
|
|
|
|
|
|
|
|
|
|
|
| ||||
|
|
| CD_SPDIF |
|
|
|
|
| |||||||
|
|
|
|
|
|
|
|
|
| AUD EXT |
| Up to two drives can be |
|
|
|
|
|
|
|
|
|
|
|
|
|
|
|
|
| ||
|
|
|
|
|
|
|
|
|
|
|
|
|
| ||
|
|
|
|
|
|
|
|
|
|
| connected simultaneously to |
|
|
| |
|
|
|
|
|
|
|
|
|
|
|
|
|
| Audigy 2 ZS | |
|
|
|
|
|
|
|
|
|
|
|
| the Audigy 2 ZS, using both the | Jumper | ||
|
|
|
|
|
|
|
|
|
|
|
| ||||
|
|
|
|
|
|
|
|
|
|
|
| AUX_IN (analog) and CD_SPDIF |
|
| audio card |
|
|
|
|
|
|
|
|
|
|
|
| (digital) connectors. |
|
|
|
|
| Connect Internal FireWire | ||||
|
| (IEEE 1394) cable | ||||
TAD | CD_INAUX_IN SB1394 | CD_SPDIF |
|
| Red stripe | |
|
|
|
|
| ||
|
|
| JOYSTICK |
|
|
|
|
|
|
| AUD EXT |
|
|
|
|
|
|
|
|
|
|
|
|
|
|
|
|
|
|
|
|
|
|
|
Connect AD_EXT cable
3
PN 03SB000000030 Rev.A
Installing Software
Installing Sound Blaster Audigy 2 ZS drivers and applications
1.After you have installed your hardware, turn on your computer. Windows automatically detects the audio card.
2.When prompted for the audio drivers, click the Cancel button.
3.Insert the Sound Blaster Audigy 2 ZS Installation and Applications CD into your
i.
ii.
4.Follow the instructions on the screen to complete the installation.
5.When prompted, restart your system.
Uninstalling drivers and applications
Refer to the Installing Software chapter in the User's Guide (on CD).
These instructions are applicable to all Windows operating systems.
You can use Creative Diagnostics to test the software and hardware installation.
Go to Start → Programs → Creative → Sound Blaster Audigy 2 ZS → Creative Diagnostics.
Useful Information
User's Guide (on CD)
For more information, refer to the User's Guide (on CD).
Go to Start → Programs → Creative → Sound Blaster Audigy 2 ZS→ Documentation →
Online Manual.
Digital output sampling rate
Make sure you select the sampling rate of the PCM SPDIF output of your Digital Out connector to match the requirements of your receiving device. The choices available are 48 kHz or 96 kHz. If you do not hear any sound from your digital speakers or experience intermittent hissing, you may need to select a lower digital output sampling rate.
To select the digital output sampling rate:
1.In Windows Control Panel, double-click the AudioHQ icon.
2.In the AudioHQ window,
3.Click the Sampling Rate tab.
4.In the Digital Output Sampling Rate list, click the required sampling rate.
For more technical updates, go to http://www.soundblaster.com