DOOR REMOVAL / REVERSAL INSTRUCTIONS

NOTE

Some models have “pocket” handles, which are recessed into the sides of the door. On these models, only the hinges will need to be reversed.

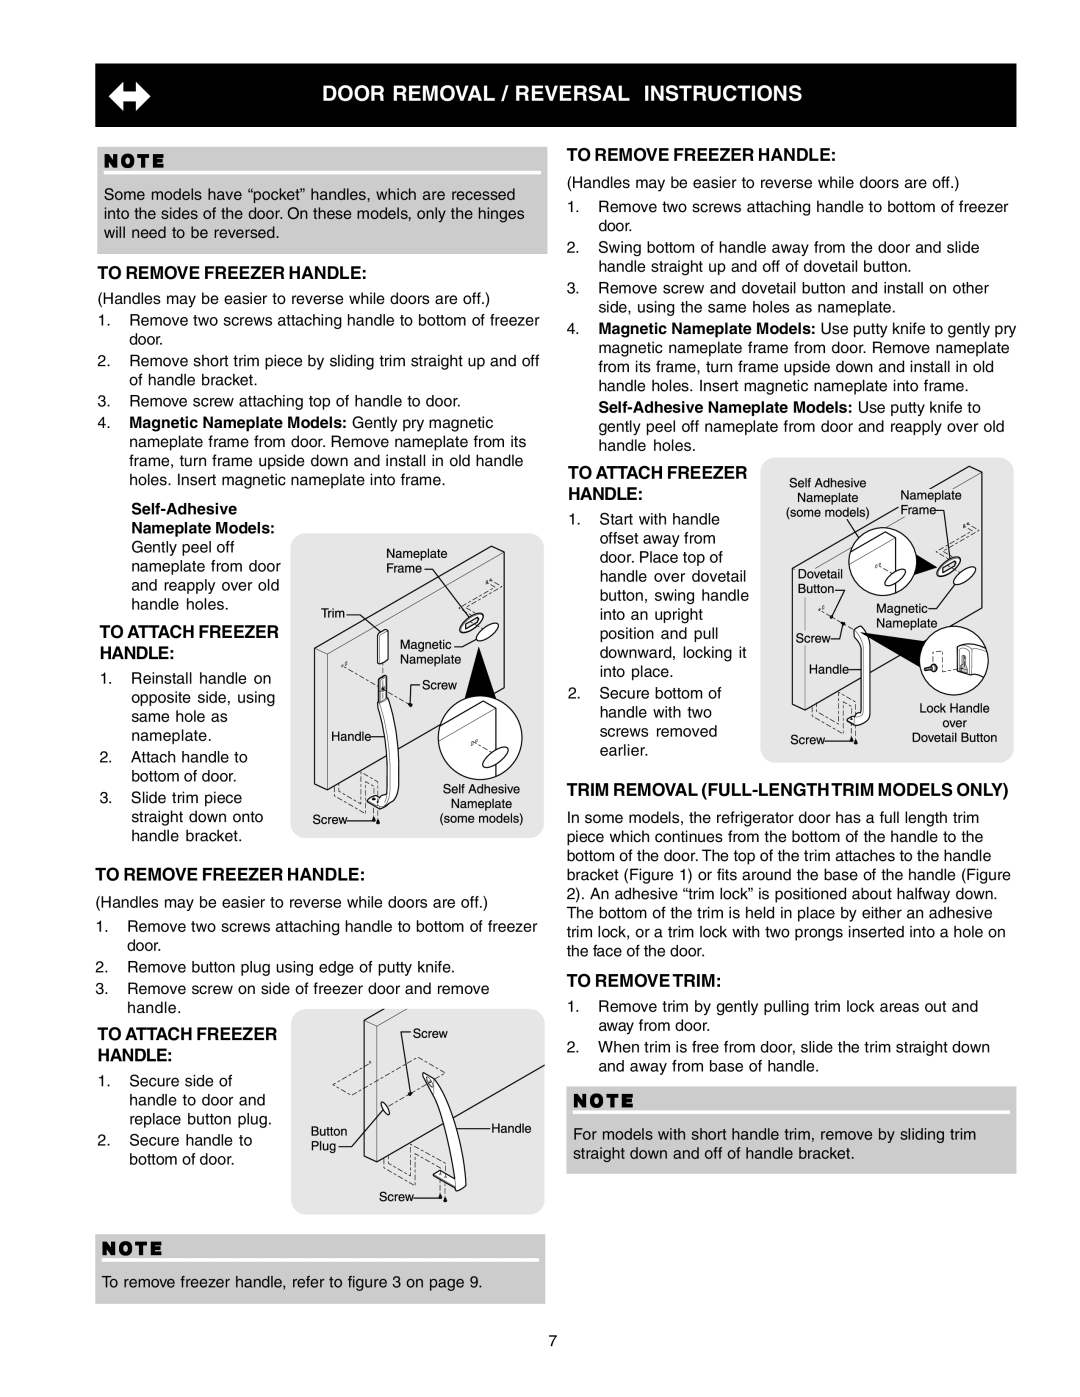
TO REMOVE FREEZER HANDLE:

(Handles may be easier to reverse while doors are off.)

1.Remove two screws attaching handle to bottom of freezer door.

2.Remove short trim piece by sliding trim straight up and off of handle bracket.

3.Remove screw attaching top of handle to door.

4.Magnetic Nameplate Models: Gently pry magnetic nameplate frame from door. Remove nameplate from its frame, turn frame upside down and install in old handle holes. Insert magnetic nameplate into frame.

Self-Adhesive Nameplate Models: Gently peel off nameplate from door and reapply over old handle holes.

TO ATTACH FREEZER

HANDLE:

1.Reinstall handle on opposite side, using

same hole as nameplate.

2. Attach handle to bottom of door.

3.Slide trim piece

straight down onto handle bracket.

TO REMOVE FREEZER HANDLE:

(Handles may be easier to reverse while doors are off.)

1.Remove two screws attaching handle to bottom of freezer door.

2.Remove button plug using edge of putty knife.

3.Remove screw on side of freezer door and remove handle.

TO ATTACH FREEZER

HANDLE:

1.Secure side of

handle to door and replace button plug.

2.Secure handle to bottom of door.

NOTE

To remove freezer handle, refer to figure 3 on page 9.

TO REMOVE FREEZER HANDLE:

(Handles may be easier to reverse while doors are off.)

1.Remove two screws attaching handle to bottom of freezer door.

2.Swing bottom of handle away from the door and slide handle straight up and off of dovetail button.

3.Remove screw and dovetail button and install on other side, using the same holes as nameplate.

4.Magnetic Nameplate Models: Use putty knife to gently pry magnetic nameplate frame from door. Remove nameplate from its frame, turn frame upside down and install in old handle holes. Insert magnetic nameplate into frame. Self-Adhesive Nameplate Models: Use putty knife to gently peel off nameplate from door and reapply over old handle holes.

TO ATTACH FREEZER

HANDLE:

1. Start with handle offset away from door. Place top of handle over dovetail button, swing handle into an upright position and pull downward, locking it into place.

2.Secure bottom of

handle with two screws removed earlier.

TRIM REMOVAL (FULL-LENGTHTRIM MODELS ONLY)

In some models, the refrigerator door has a full length trim piece which continues from the bottom of the handle to the bottom of the door. The top of the trim attaches to the handle bracket (Figure 1) or fits around the base of the handle (Figure 2). An adhesive “trim lock” is positioned about halfway down. The bottom of the trim is held in place by either an adhesive trim lock, or a trim lock with two prongs inserted into a hole on the face of the door.

TO REMOVE TRIM:

1.Remove trim by gently pulling trim lock areas out and away from door.

2.When trim is free from door, slide the trim straight down and away from base of handle.

NOTE

For models with short handle trim, remove by sliding trim straight down and off of handle bracket.

7

Page 7
Image 7
Crosley Refrigerator Top Mount manual To Remove Freezer Handle, To Attach Freezer Handle, To Remove Trim

Refrigerator Top Mount specifications

The Crosley Refrigerator Top Mount is a perfect blend of style, functionality, and technology, designed to meet the diverse needs of modern kitchens. With its timeless design, this top mount refrigerator not only provides ample storage but also enhances the aesthetic appeal of your kitchen space.

One of the standout features of the Crosley Top Mount Refrigerator is its generous storage capacity. With a spacious fresh food compartment and a dedicated freezer section, it provides enough room for all your groceries, meal prep items, and frozen treats. The adjustable shelving allows users to customize the interior layout, ensuring that taller items can fit with ease while smaller items remain accessible.

Energy efficiency is a critical consideration for today’s consumers, and the Crosley Top Mount Refrigerator addresses this with its advanced energy-saving technologies. Designed to operate with minimal energy consumption, it helps reduce electricity bills while contributing to a more sustainable household. The ENERGY STAR certification is a testament to its high-efficiency performance, making it an environmentally friendly choice.

The cooling system in the Crosley Top Mount Refrigerator employs multi-air flow technology, which ensures consistent temperatures throughout the unit. This is vital for preserving the freshness of your food and reducing the chances of spoilage. The frost-free freezer option is another excellent feature, eliminating the need for manual defrosting and providing hassle-free ice production.

Additionally, the refrigerator is equipped with exceptional convenience features. The crispers designed for fruits and vegetables help maintain ideal humidity levels, which keeps your produce fresh and crisp for longer. The door bins are spacious and easily adjustable, allowing for quick access to frequently used items like condiments and beverages.

Another characteristic that sets the Crosley Top Mount Refrigerator apart is its durability and reliability. Built with high-quality materials, it is designed to withstand the rigors of daily use. The sleek stainless steel finish not only adds a modern touch but also resists fingerprints and smudges, making it easy to maintain.

In summary, the Crosley Refrigerator Top Mount combines practicality with style, making it a superb choice for homeowners. With its impressive storage solutions, energy-efficient operation, and innovative cooling technologies, it stands out as a reliable addition to any kitchen, ensuring that food stays fresher for longer and kitchen organization is effortless.