Commercial Audio Series Mixer-Amplifiers

2Setup

2.10Remote Volume Control

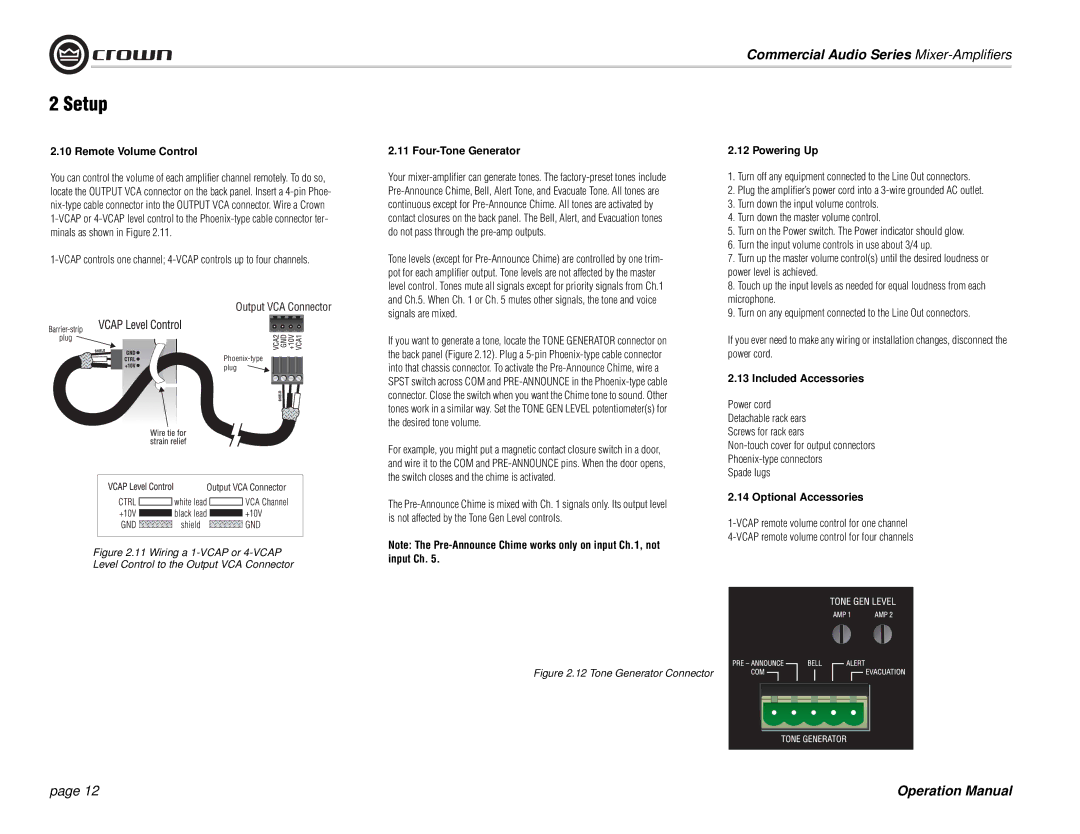
You can control the volume of each amplifier channel remotely. To do so, locate the OUTPUT VCA connector on the back panel. Insert a 4-pin Phoe- nix-type cable connector into the OUTPUT VCA connector. Wire a Crown

1-VCAP or 4-VCAP level control to the Phoenix-type cable connector ter- minals as shown in Figure 2.11.

1-VCAP controls one channel; 4-VCAP controls up to four channels.

Output VCA Connector

Phoenix-type plug

Output VCA Connector

Figure 2.11 Wiring a 1-VCAP or 4-VCAP

Level Control to the Output VCA Connector

2.11 Four-Tone Generator

Your mixer-amplifier can generate tones. The factory-preset tones include Pre-Announce Chime, Bell, Alert Tone, and Evacuate Tone. All tones are continuous except for Pre-Announce Chime. All tones are activated by contact closures on the back panel. The Bell, Alert, and Evacuation tones do not pass through the pre-amp outputs.

Tone levels (except for Pre-Announce Chime) are controlled by one trim- pot for each amplifier output. Tone levels are not affected by the master level control. Tones mute all signals except for priority signals from Ch.1 and Ch.5. When Ch. 1 or Ch. 5 mutes other signals, the tone and voice signals are mixed.

If you want to generate a tone, locate the TONE GENERATOR connector on the back panel (Figure 2.12). Plug a 5-pin Phoenix-type cable connector into that chassis connector. To activate the Pre-Announce Chime, wire a SPST switch across COM and PRE-ANNOUNCE in the Phoenix-type cable connector. Close the switch when you want the Chime tone to sound. Other tones work in a similar way. Set the TONE GEN LEVEL potentiometer(s) for the desired tone volume.

For example, you might put a magnetic contact closure switch in a door, and wire it to the COM and PRE-ANNOUNCE pins. When the door opens, the switch closes and the chime is activated.

The Pre-Announce Chime is mixed with Ch. 1 signals only. Its output level is not affected by the Tone Gen Level controls.

Note: The Pre-Announce Chime works only on input Ch.1, not input Ch. 5.

2.12 Powering Up

1.Turn off any equipment connected to the Line Out connectors.

2.Plug the amplifier’s power cord into a 3-wire grounded AC outlet.

3.Turn down the input volume controls.

4.Turn down the master volume control.

5.Turn on the Power switch. The Power indicator should glow.

6.Turn the input volume controls in use about 3/4 up.

7.Turn up the master volume control(s) until the desired loudness or power level is achieved.

8.Touch up the input levels as needed for equal loudness from each microphone.

9.Turn on any equipment connected to the Line Out connectors.

If you ever need to make any wiring or installation changes, disconnect the power cord.

2.13 Included Accessories

Power cord

Detachable rack ears

Screws for rack ears

Non-touch cover for output connectors

Phoenix-type connectors

Spade lugs

2.14 Optional Accessories

1-VCAP remote volume control for one channel

4-VCAP remote volume control for four channels

Figure 2.12 Tone Generator Connector

page 12

Operation Manual

Page 12
Image 12
Crown Audio 280MA Remote Volume Control, Four-Tone Generator, Powering Up, Included Accessories, Optional Accessories

180MA, 280MA specifications

Crown Audio has established itself as a leader in the professional audio industry, and its 280MA and 180MA models epitomize its commitment to high-quality sound reinforcement. These amplifiers are designed for a range of applications, including commercial audio, live sound, and installation, providing unmatched performance and reliability.

The Crown 280MA is a robust two-channel amplifier that delivers an impressive power output of 280 watts per channel at 4 ohms. Its engineering focuses on efficiency and clarity, making it an excellent choice for any scenario where quality audio is essential. One of its standout features is the built-in mixer, which allows users to connect multiple audio sources seamlessly. This mixing capability is especially beneficial in environments such as restaurants, schools, and places of worship, where different audio sources may need to be balanced and controlled easily.

On the other hand, the Crown 180MA offers a more compact design but does not compromise on performance. With a power output of 180 watts per channel at 4 ohms, this model is perfect for smaller venues or setups. Like the 280MA, the 180MA also includes a built-in mixer, ensuring versatile audio management. Both models feature a streamlined user interface, enabling intuitive operation and quick adjustments.

Both amplifiers incorporate advanced technology such as Crown's proprietary DriveCore technology, which enhances power efficiency while reducing distortion. This technology allows the amplifiers to deliver clean, transparent power without the weight typically associated with traditional designs. The lightweight nature of both models makes installation and transport straightforward, adding to their practicality for sound engineers and event organizers.

The overall construction of the 280MA and 180MA is rugged, built to withstand the rigors of professional use. Features such as short-circuit protection, thermal protection, and overload protection ensure long-term reliability, even in demanding environments. Furthermore, the amplifiers offer flexible input options, including line-level and microphone inputs, allowing users to connect various audio sources without hassle.

In conclusion, the Crown 280MA and 180MA amplifiers represent a perfect blend of power, efficiency, and advanced technology. Their built-in mixers, robust protection features, and lightweight designs make them highly versatile for a wide array of applications. Whether used in commercial settings or live sound environments, these amplifiers ensure that the audio experience remains top-notch, reinforcing Crown Audio's reputation as an industry leader.