Auger Control Test

IMPORTANT: Perform the following test before operating your snow thrower for the first time and at the start of each winter season.

Check the adjustment of the auger control as follows:

When the auger control is released and in the disengaged “up” position, the cable should have very little slack. It should NOT be tight.

In a well-ventilated area, start the snow thrower engine as instructed earlier in this section under the heading Starting the Engine. Make sure the throttle is set in the FAST position.

While standing in the operator’s position (behind the snow thrower), engage the auger.

Allow the auger to remain engaged for approximately ten (10) seconds before releasing the auger control. Repeat this several times.

With the throttle control in the FAST (rabbit) position and the auger control in the disengaged “up” position, walk to the front of the machine.

Confirm that the auger has completely stopped rotating and shows NO signs of motion.

IMPORTANT: If the auger shows ANY signs of rotating, immediately return to the operator’s position and shut off the engine. Wait for ALL moving parts to stop before re-adjusting the auger control.

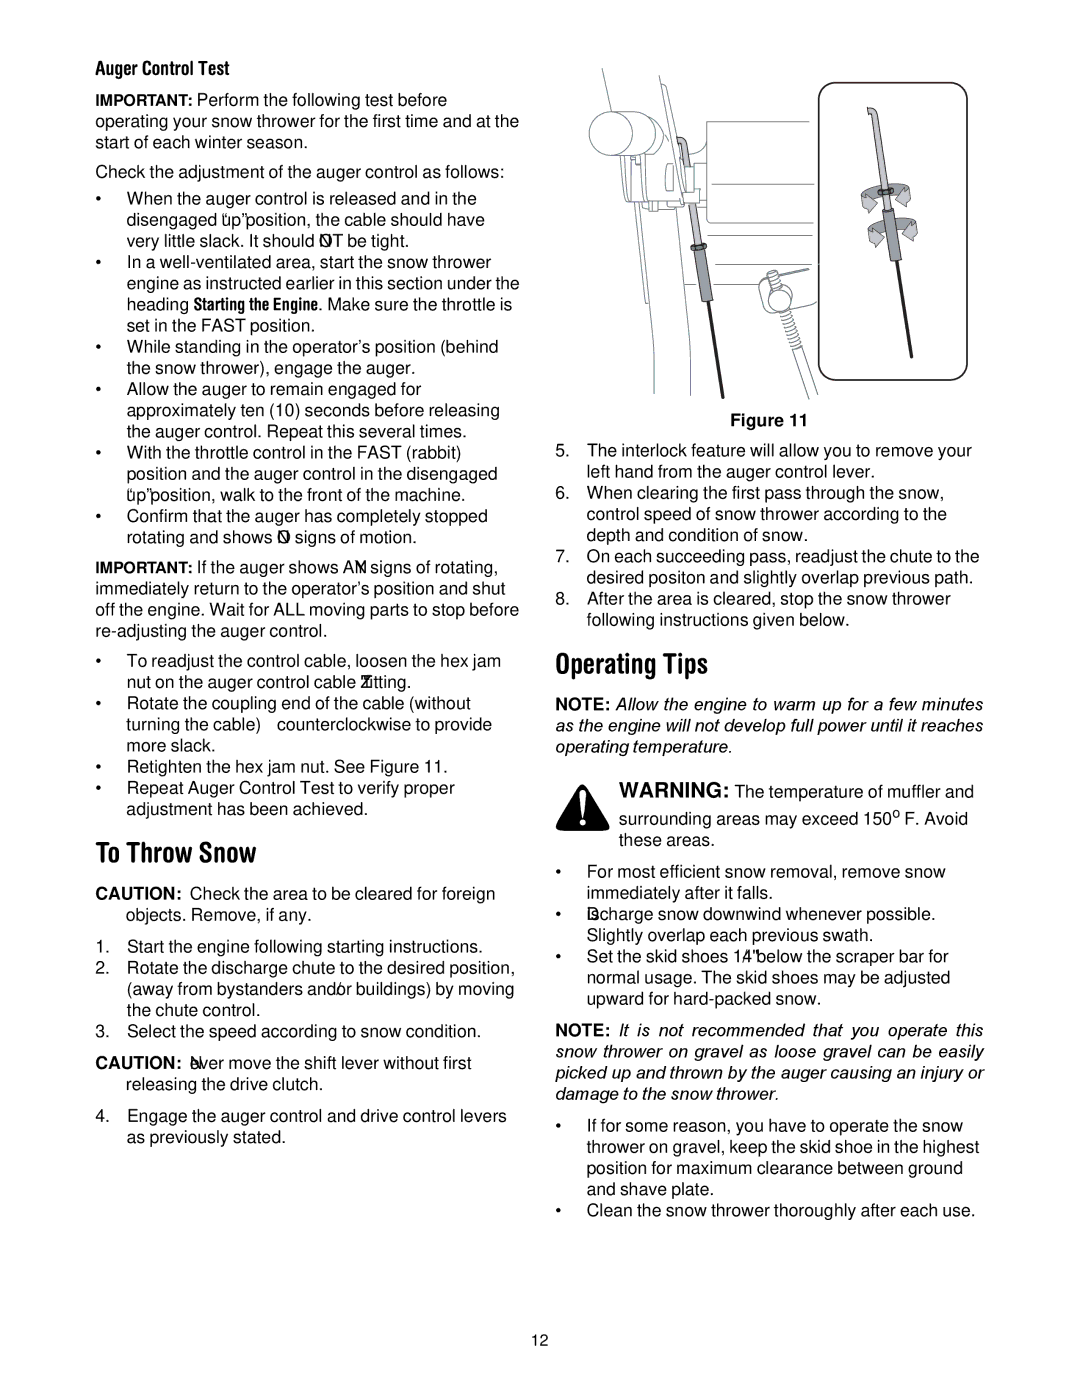
To readjust the control cable, loosen the hex jam nut on the auger control cable “Z” fitting.

Rotate the coupling end of the cable (without turning the cable) counterclockwise to provide more slack.

Retighten the hex jam nut. See Figure 11.

Repeat Auger Control Test to verify proper adjustment has been achieved.

To Throw Snow

CAUTION: Check the area to be cleared for foreign objects. Remove, if any.

1.Start the engine following starting instructions.

2.Rotate the discharge chute to the desired position, (away from bystanders and/or buildings) by moving the chute control.

3.Select the speed according to snow condition.

CAUTION: Never move the shift lever without first releasing the drive clutch.

4.Engage the auger control and drive control levers as previously stated.

Z Fitting

Hex Nut

Cable Should

Be Straight

Figure 11

5.The interlock feature will allow you to remove your left hand from the auger control lever.

6.When clearing the first pass through the snow, control speed of snow thrower according to the depth and condition of snow.

7.On each succeeding pass, readjust the chute to the desired positon and slightly overlap previous path.

8.After the area is cleared, stop the snow thrower following instructions given below.

Operating Tips

NOTE: Allow the engine to warm up for a few minutes as the engine will not develop full power until it reaches operating temperature.

WARNING: The temperature of muffler and

surrounding areas may exceed 150o F. Avoid these areas.

For most efficient snow removal, remove snow immediately after it falls.

Discharge snow downwind whenever possible. Slightly overlap each previous swath.

Set the skid shoes 1/4" below the scraper bar for normal usage. The skid shoes may be adjusted upward for hard-packed snow.

NOTE: It is not recommended that you operate this snow thrower on gravel as loose gravel can be easily picked up and thrown by the auger causing an injury or damage to the snow thrower.

If for some reason, you have to operate the snow thrower on gravel, keep the skid shoe in the highest position for maximum clearance between ground and shave plate.

Clean the snow thrower thoroughly after each use.

12

Page 12
Image 12
Cub Cadet 600 manual To Throw Snow, Operating Tips

600 specifications

The Cub Cadet 600 series represents a significant innovation in the realm of lawn care and gardening, catering to homeowners and professional landscapers alike. This standout line of riding lawn mowers combines powerful performance with advanced technology, rendering it a top choice for those aiming for beautifully manicured lawns.

At the heart of the Cub Cadet 600 is a robust engine that delivers exceptional power and reliability. Featuring a range of engine options, users can select the horsepower that best suits their mowing needs. The efficient fuel system optimizes performance and minimizes emissions, adhering to modern environmental standards.

One of the major highlights of the Cub Cadet 600 is its cutting system. Equipped with a precision-engineered deck, it allows for a clean, even cut on various types of terrain. The adjustable cutting height features multiple positions, giving users the flexibility to tackle different grass lengths and types seamlessly. The stamped steel construction of the deck ensures durability and longevity, making it resistant to wear and tear over time.

The 600 series also boasts advanced technology such as the Cub Cadet Smart Jet cleaning system, which simplifies maintenance by ensuring the mower deck is free of grass clippings and debris. This system promotes optimum performance and extends the life of the mower.

Ergonomics play a vital role in the design of the Cub Cadet 600. The operator's station is crafted for comfort, featuring an adjustable seat with ample cushioning. The intuitive control layout allows for easy operation, making it accessible for users of all experience levels. Additionally, the steering wheel is designed for enhanced maneuverability, especially in tight spaces.

To enhance productivity, the Cub Cadet 600 includes a tight turning radius, allowing for excellent maneuvering around obstacles. Users can navigate gardens, flower beds, and trees with ease, minimizing the need for additional trimming.

The series also supports a range of accessories such as baggers, mulch kits, and towing attachments, further increasing its versatility. This adaptability makes the Cub Cadet 600 not just a mower, but a comprehensive landscaping tool.

In summary, the Cub Cadet 600 combines power, precision, and user-friendly features, making it an exceptional choice for anyone looking to maintain their lawn with professionalism. With its advanced technologies and rugged construction, the 600 series stands out as a leader in modern lawn care solutions.