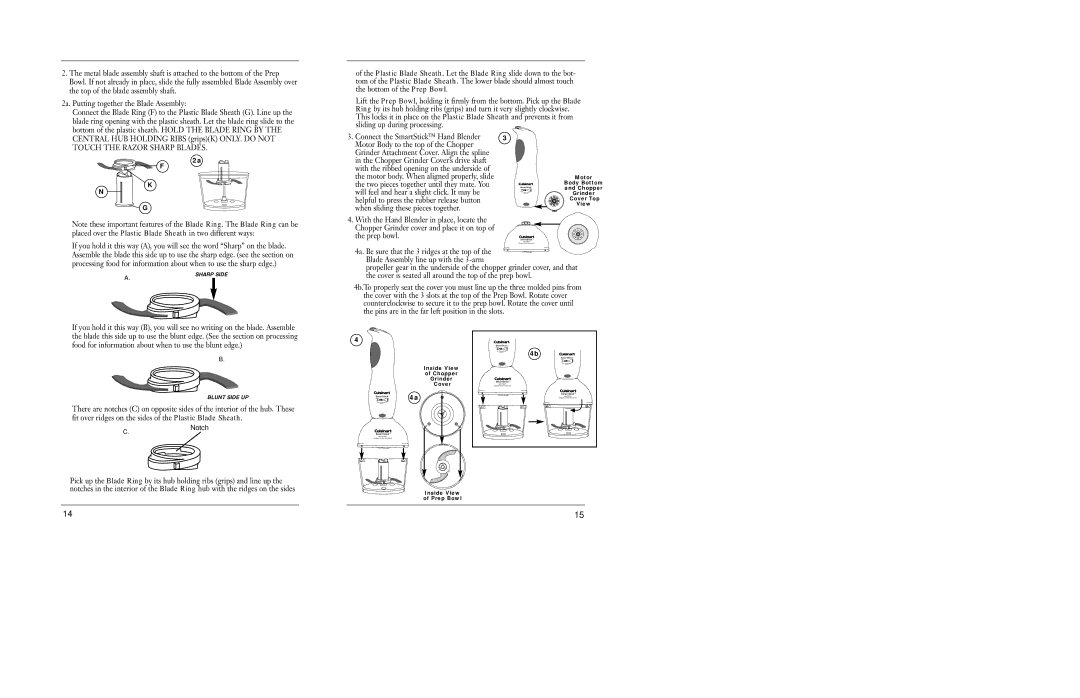
2.The metal blade assembly shaft is attached to the bottom of the Prep Bowl. If not already in place, slide the fully assembled Blade Assembly over the top of the blade assembly shaft.

2a. Putting together the Blade Assembly:

Connect the Blade Ring (F) to the Plastic Blade Sheath (G). Line up the blade ring opening with the plastic sheath. Let the blade ring slide to the bottom of the plastic sheath. HOLD THE BLADE RING BY THE

of the Plastic Blade Sheath. Let the Blade Ring slide down to the bot- tom of the Plastic Blade Sheath. The lower blade should almost touch the bottom of the Prep Bowl.

Lift the Prep Bowl, holding it firmly from the bottom. Pick up the Blade Ring by its hub holding ribs (grips) and turn it very slightly clockwise. This locks it in place on the Plastic Blade Sheath and prevents it from sliding up during processing.

CENTRAL HUB HOLDING RIBS (grips)(K) ONLY. DO NOT TOUCH THE RAZOR SHARP BLADES.

2a

F

K

N

G

Note these important features of the Blade Ring. The Blade Ring can be placed over the Plastic Blade Sheath in two different ways:

If you hold it this way (A), you will see the word “Sharp” on the blade.

3. Connect the SmartStick™ Hand Blender

3

Motor Body to the top of the Chopper Grinder Attachment Cover. Align the spline in the Chopper Grinder Cover’s drive shaft with the ribbed opening on the underside of the motor body. When aligned properly, slide the two pieces together until they mate. You will feel and hear a slight click. It may be helpful to press the rubber release button when sliding these pieces together.

4.With the Hand Blender in place, locate the Chopper Grinder cover and place it on top of the prep bowl.

SmartStick

EXTENDABLE

SHAFT

SmartStick

MINI PREP

Chopper Grinder Attachment

Motor

Body Bottom

and Chopper

Grinder

Cover Top

View

Assemble the blade this side up to use the sharp edge. (see the section on processing food for information about when to use the sharp edge.)

4a. Be sure that the 3 ridges at the top of the Blade Assembly line up with the 3-arm

propeller gear in the underside of the chopper grinder cover, and that

A.

SHARP SIDE

the cover is seated all around the top of the prep bowl.

4b.To properly seat the cover you must line up the three molded pins from the cover with the 3 slots at the top of the Prep Bowl. Rotate cover counterclockwise to secure it to the prep bowl. Rotate the cover until the pins are in the far left position in the slots.

If you hold it this way (B), you will see no writing on the blade. Assemble the blade this side up to use the blunt edge. (See the section on processing food for information about when to use the blunt edge.)

B.

BLUNT SIDE UP

There are notches (C) on opposite sides of the interior of the hub. These fit over ridges on the sides of the Plastic Blade Sheath.

4

Inside View

of Chopper

Grinder

Cover

SmartStick4a

EXTENDABLE

SHAFT

SmartStick

EXTENDABLE

SHAFT4b

SmartStick

EXTENDABLE

SHAFT

SmartStick

MINI PREP

Chopper Grinder Attachment

SmartStick

MINI PREP

Chopper Grinder Attachment

C.

Notch

SmartStick

MINI PREP

Chopper Grinder Attachment

Pick up the Blade Ring by its hub holding ribs (grips) and line up the notches in the interior of the Blade Ring hub with the ridges on the sides

Inside View

of Prep Bowl

14

15

Page 8
Image 8
Cuisinart CSB-55 manual Notch

CSB-55 specifications

The Cuisinart CSB-55 Smart Stick Hand Blender is a versatile kitchen tool designed to simplify food preparation while delivering outstanding results. Combining power with ease of use, this immersion blender is ideal for those who love to cook and entertain.

One of the standout features of the CSB-55 is its powerful 200-watt motor, which effortlessly blends, purees, and emulsifies a variety of ingredients. Whether you are making soups, sauces, or smoothies, the robust motor ensures consistent results every time. This immersion blender also boasts a patented ergonomic grip that makes it comfortable to hold, allowing for extended use without fatigue.

The CSB-55 is equipped with a 2-speed slide control, providing you with the flexibility to adapt your blending speed based on your specific needs. The low speed is perfect for gentle blending, while the high speed is great for achieving a smooth and creamy texture. This level of control is particularly beneficial when working with delicate ingredients or when you want to avoid over-processing.

Another key feature of the Cuisinart CSB-55 is its stainless steel blending shaft, which not only adds durability but also ensures that the blender can easily handle hot liquids. The blending shaft is removable, making it easy to clean and maintain after use. The dishwasher-safe parts are an added bonus, simplifying the cleaning process significantly.

The blender also includes a blending cup, which is ideal for small batches or individual servings. With measurement marks on the cup, users can conveniently prepare ingredients without needing extra measuring tools.

Additionally, the CSB-55 is designed with safety in mind. It features a locking mechanism that ensures the metal blend shaft is securely attached during use, preventing accidental detachment.

In terms of design, the Cuisinart CSB-55 is sleek and modern, available in various colors to match your kitchen decor. Its compact size makes it easy to store, saving valuable counter space.

In summary, the Cuisinart CSB-55 Smart Stick Hand Blender combines power, versatility, and convenience, making it a must-have for any home chef. With its powerful motor, ergonomic design, and easy-to-clean features, this immersion blender is perfect for anyone looking to enhance their cooking experience. Whether for everyday meals or special occasions, the CSB-55 stands out as a reliable and efficient kitchen companion.