FEATURES AND BENEFITS |
|
|
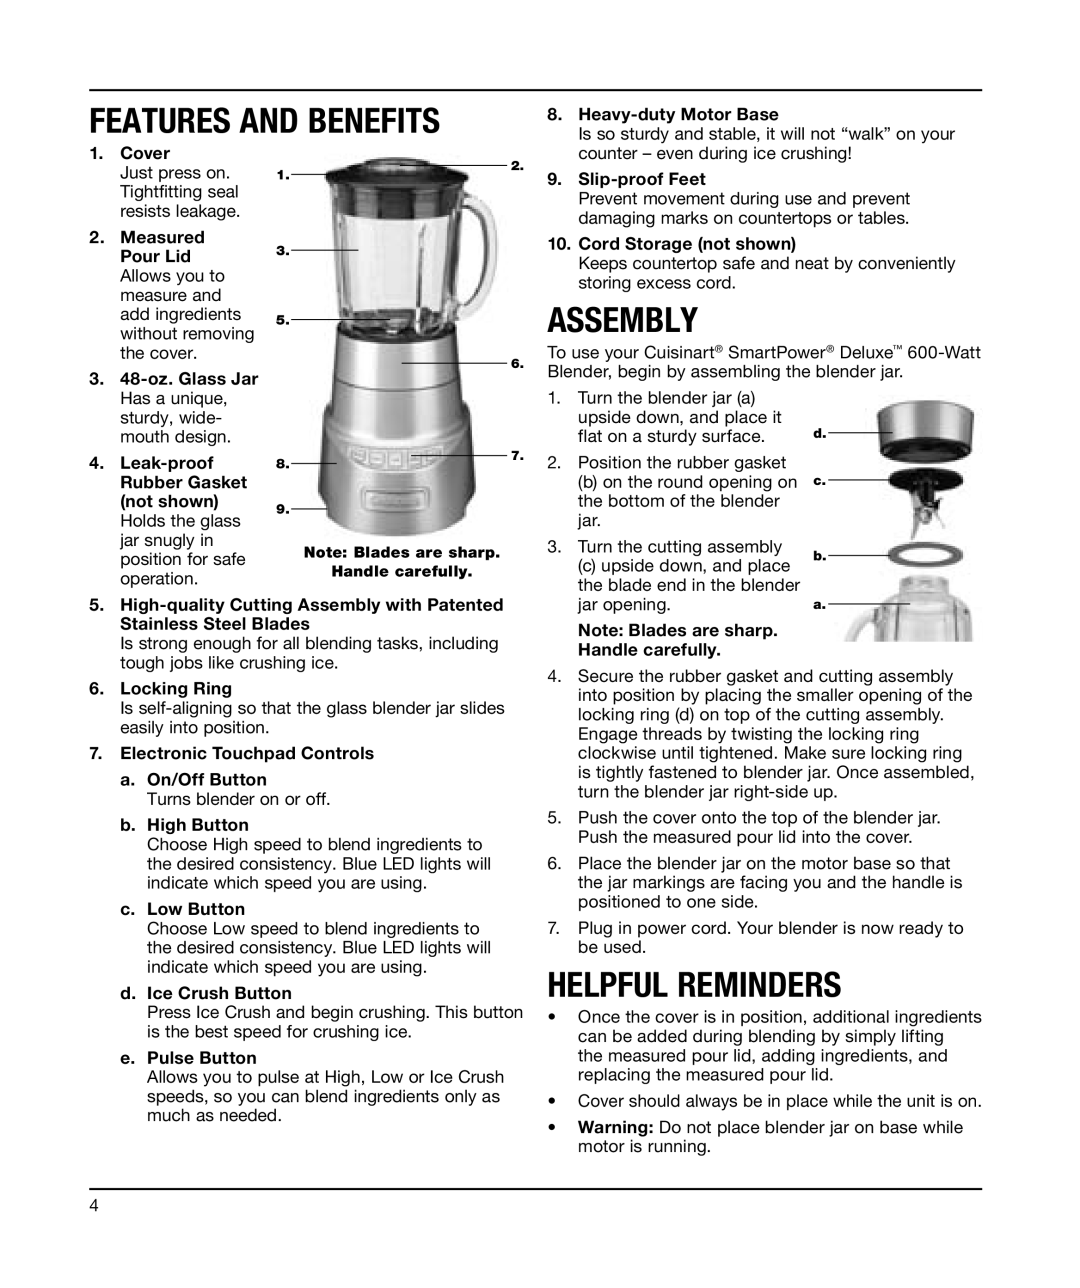
| 8. | Is so sturdy and stable, it will not “walk” on your | ||||||||||||||
|
|
|
|
|
|
|
|
|
|
|
|
|
|
|
|
|
| ||
1. | Cover |
|
|
|
|
|
|
|
| 2. |
| counter – even during ice crushing! | |||||||
| Just press on. | 1. |
|
|
|
|
|
|
| 9. |
|
|
|
|
|
| |||
|
|
|
|
|
|
|
|
|
|
|
|
|
|
|
| ||||
| Tightfitting seal |
|
|
|
|
|
|
|
|
|
|
|
|
|
|
|
| ||
|
|
|
|
|
|
|
|
|
|
|
|
| Prevent movement during use and prevent | ||||||
| resists leakage. |
|
|
|
|
|
|
|
|
|
|
|
| ||||||
|
|
|
|
|
|
|
|
|
|
|
|
| damaging marks on countertops or tables. | ||||||
2. | Measured |
|
|
|
|
|
|
|
|
|
|
|
| ||||||
3. |
|
|
|
|
|
|
|
|
|
| 10. | Cord Storage (not shown) |
|
|
|
|
| ||
| Pour Lid |
|
|
|
|
|
|
|
|
|
|
|
|
|
|
| |||
|
|
|
|
|
|
|
|
|
|
|
| Keeps countertop safe and neat by conveniently | |||||||
| Allows you to |
|
|
|
|
|
|
|
|
|
|
|
| ||||||
|
|
|
|
|
|
|
|
|
|
|
|
| storing excess cord. |
|
|
|
|
| |
| measure and |
|
|
|
|
|
|
|
|
|
|
|
|
|
|
|
|
| |
|
|
|
|
|
|
|
|
|
|
|
| ASSEMBLY |
|
|
|
|
| ||
| without removing |
|
|
|
|
|
|
|
|
|
|
|
|
|
|
|
| ||
| add ingredients | 5. |
|
|
|
|
|
|
|
|
|
| To use your Cuisinart® SmartPower® Deluxe™ | ||||||
| the cover. |
|
|
|
|
|
|
|
|
| 6. | ||||||||
3. |
|
|
|
|
|
|
|
|
|
| Blender, begin by assembling the blender jar. | ||||||||
|
|
|
|
|
|
|
|
|
|
| |||||||||
|
|
|
|
|
|
|
|
|
|
| 1. | Turn the blender jar (a) |
|
|
|
|
| ||
| Has a unique, |
|
|
|
|
|
|
|
|
|
|
|
|
|
|
|
| ||
| sturdy, wide- |
|
|
|
|
|
|
|
|
|
|
|
| upside down, and place it | d. |
|
|
|
|
| mouth design. |
|
|
|
|
|
|
|
|
|
| 7. |
| flat on a sturdy surface. |
|
|
|
| |
|
|
|
|
|
|
|
|
|
|
|
|
|
| ||||||
4. | 8. |
|
|
|
|
|
|
|
| 2. | Position the rubber gasket |
|
|
|
|
| |||
|
|
|
|
|
|
|
|
|
|
|
|
| |||||||
|
|
|
|
|
|
|
|
|
|
|
|
|
|
| |||||
| Rubber Gasket |
|
|
|
|
|
|
|
|
|
|
|
| (b) on the round opening on | c. |
|
|
| |
|
|
|
|
|
|
|
|
|
|
|
|
|
| ||||||
| (not shown) | 9. |
|
|
|
|
|
|
|
|
|
|
| the bottom of the blender |
|
|
|
|
|
| Holds the glass |
|
|
|
|
|
|
|
|
|
|
| jar. |
|
|
|
|
| |
|
|
|
|
|
|
|
|
|
|
|
|
|
|
|
|
|
| ||
| jar snugly in |
| Note: Blades are sharp. |
|
|
| 3. | Turn the cutting assembly |
|
|
|
|
| ||||||
|
|
|
|
|
|
|
|
|
|
| |||||||||
| position for safe |
|
|
|
|
| (c) upside down, and place | b. | |||||||||||
|
|
| Handle carefully. |
|
|
|
| ||||||||||||
| operation. |
|
|
|
|
|
|
|
|
|
|
| |||||||
|
|
|
|
|
|
| the blade end in the blender |
|
|
|
|
| |||||||
|
|
|
|
|
|
|
|
|
|
|
|
|
|
|
|
|
| ||
5. |
|
|
|
|
|
|
|
|
| ||||||||||
|
|
|
| jar opening. | a. |
|
| ||||||||||||
|
|
|
|
| |||||||||||||||
| Stainless Steel Blades |
|
|
|
| Note: Blades are sharp. |
|
|
|
|
| ||||||||
| Is strong enough for all blending tasks, including |
|
|
|
|
|
|
|
|
| |||||||||
|
|
|
|
| Handle carefully. |
|
|
|
|
| |||||||||
| tough jobs like crushing ice. |
|
|
|
|
|
|
|
|
| |||||||||
|
|
|
| 4. | Secure the rubber gasket and cutting assembly | ||||||||||||||
6. | Locking Ring |
|
|
|
|
|
|
|
|
|
|
| |||||||
|
|
|
|
|
|
|
|
|
|
|
| into position by placing the smaller opening of the | |||||||
| Is |
|
|
|
| ||||||||||||||
|
|
|
|
| locking ring (d) on top of the cutting assembly. | ||||||||||||||
| easily into position. |
|
|
|
|
|
|
|
|
|
|
|
| ||||||
|
|
|
|
|
|
|
|
|
|
|
|
| Engage threads by twisting the locking ring | ||||||
7. | Electronic Touchpad Controls |
|
|
|
| ||||||||||||||
|
|
|
| clockwise until tightened. Make sure locking ring | |||||||||||||||
| a. On/Off Button |
|
|
|
|
|
|
|
|
|
|
|
| is tightly fastened to blender jar. Once assembled, | |||||
|
|
|
|
|
|
|
|
|
|
|
|
| turn the blender jar | ||||||
| Turns blender on or off. |
|
|
|
| ||||||||||||||
|
|
|
| 5. | Push the cover onto the top of the blender jar. | ||||||||||||||
| b. High Button |
|
|
|
|
|
|
|
|
|
|
| |||||||
|
|
|
|
|
|
|
|
|
|
|
|
| Push the measured pour lid into the cover. | ||||||
| Choose High speed to blend ingredients to |
|
|
|
| ||||||||||||||
|
|
|
| 6. | Place the blender jar on the motor base so that | ||||||||||||||
| the desired consistency. Blue LED lights will |
|
|
| |||||||||||||||
| indicate which speed you are using. |
|
|
|
| the jar markings are facing you and the handle is | |||||||||||||
| c. Low Button |
|
|
|
|
|
|
|
|
|
|
|
| positioned to one side. |
|
|
|
|
|
|
|
|
|
|
|
|
|
|
|
|
| 7. | Plug in power cord. Your blender is now ready to | ||||||
| Choose Low speed to blend ingredients to |
|
|
| |||||||||||||||
| the desired consistency. Blue LED lights will |
|
|
|
| be used. |
|
|
|
|
| ||||||||
| indicate which speed you are using. |
|
|
| HELPFUL REMINDERS | ||||||||||||||
| d. Ice Crush Button |
|
|
| |||||||||||||||
| Press Ice Crush and begin crushing. This button | • | Once the cover is in position, additional ingredients | ||||||||||||||||
| is the best speed for crushing ice. |
|
|
|
| can be added during blending by simply lifting | |||||||||||||
| e. Pulse Button |
|
|
|
|
|
|
|
|
|
|
|
| the measured pour lid, adding ingredients, and | |||||
| Allows you to pulse at High, Low or Ice Crush |
|
|
|
| replacing the measured pour lid. | |||||||||||||
| speeds, so you can blend ingredients only as |
|
|
| • | Cover should always be in place while the unit is on. | |||||||||||||
| much as needed. |
|
|
| • | Warning: Do not place blender jar on base while | |||||||||||||
|
|
|
|
|
|
|
|
|
|
|
|
| |||||||
motor is running.
4