PORTABLE COMPACT DISC PLAYER

MODEL: CD145

INSTRUCTION MANUAL

ENGLISH

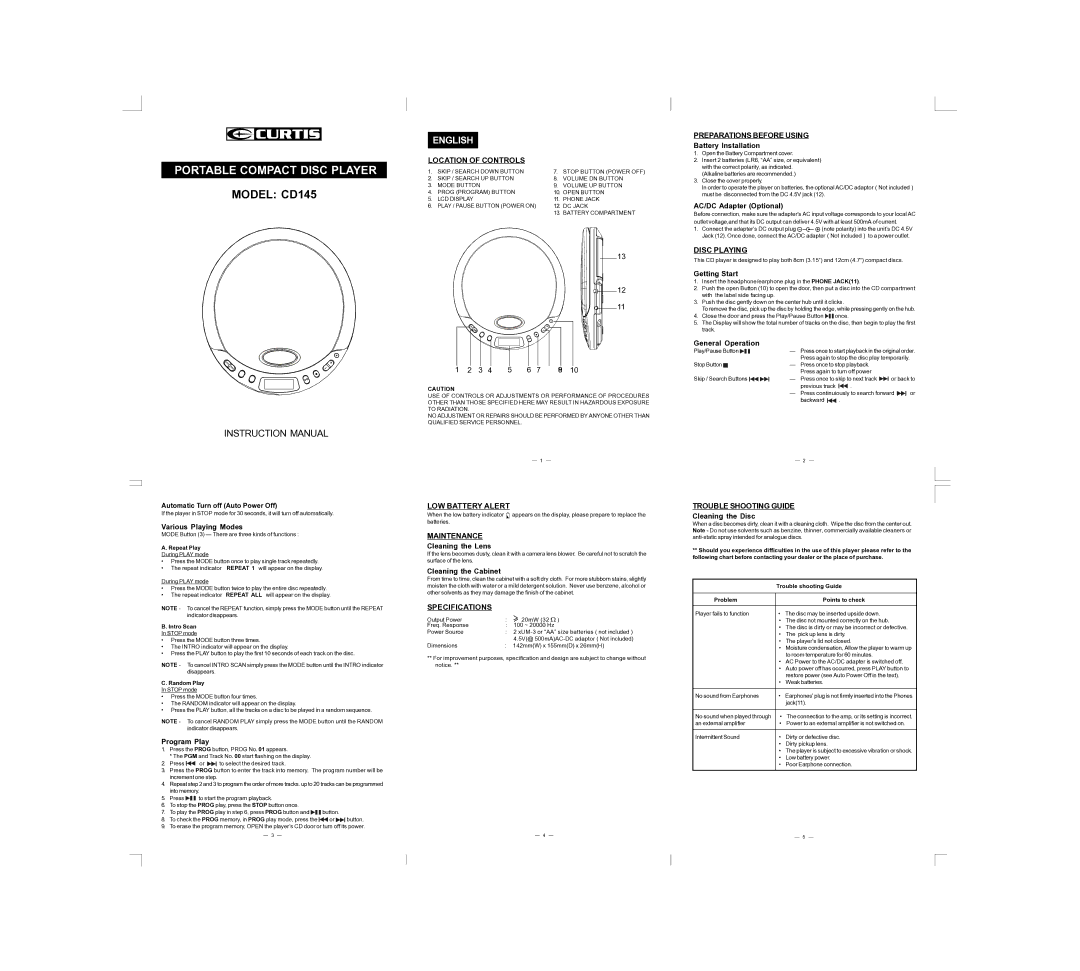
LOCATION OF CONTROLS

1.

SKIP / SEARCH DOWN BUTTON

7.

STOP BUTTON (POWER OFF)

2.

SKIP / SEARCH UP BUTTON

8.

VOLUME DN BUTTON

3.

MODE BUTTON

9.

VOLUME UP BUTTON

4.

PROG (PROGRAM) BUTTON

10.

OPEN BUTTON

5.

LCD DISPLAY

11.

PHONE JACK

6.

PLAY / PAUSE BUTTON (POWER ON)

12.

DC JACK


13.

BATTERY COMPARTMENT

13

12

11

1

2

3

4

5

6

7

89

10

CAUTION

USE OF CONTROLS OR ADJUSTMENTS OR PERFORMANCE OF PROCEDURES OTHER THAN THOSE SPECIFIED HERE MAY RESULT IN HAZARDOUS EXPOSURE TO RADIATION.

NO ADJUSTMENT OR REPAIRS SHOULD BE PERFORMED BY ANYONE OTHER THAN QUALIFIED SERVICE PERSONNEL.

— 1 —

PREPARATIONS BEFORE USING

Battery Installation

1.Open the Battery Compartment cover.

2.Insert 2 batteries (LR6, “AA” size, or equivalent) with the correct polarity, as indicated.

(Alkaline batteries are recommended.)

3.Close the cover properly.

In order to operate the player on batteries, the optional AC/DC adaptor ( Not included ) must be disconnected from the DC 4.5V jack (12).

AC/DC Adapter (Optional)

Before connection, make sure the adapter’s AC input voltage corresponds to your local AC outlet voltage,and that its DC output can deliver 4.5V with at least 500mA of current.

1.Connect the adapter’s DC output plug (note polarity) into the unit’s DC 4.5V Jack (12). Once done, connect the AC/DC adapter ( Not included ) to a power outlet.

DISC PLAYING

This CD player is designed to play both 8cm (3.15”) and 12cm (4.7”) compact discs.

Getting Start

1.Insert the headphone/earphone plug in the PHONE JACK(11).

2.Push the open Button (10) to open the door, then put a disc into the CD compartment with the label side facing up.

3.Push the disc gently down on the center hub until it clicks.

To remove the disc, pick up the disc by holding the edge, while pressing gently on the hub.

4.Close the door and press the Play/Pause Button once.

5.The Display will show the total number of tracks on the disc, then begin to play the first track.

General Operation

Play/Pause Button

— Press once to start playback in the original order.


Press again to stop the disc play temporarily.

Stop Button

— Press once to stop playback.


Press again to turn off power


Skip / Search Buttons

— Press once to skip to next track

or back to


previous track

.


Press continuiously to search forward or

backward .

— 2 —

Automatic Turn off (Auto Power Off)

If the player in STOP mode for 30 seconds, it will turn off automatically.

Various Playing Modes

MODE Button (3) — There are three kinds of functions :

A. Repeat Play

During PLAY mode

Press the MODE button once to play single track repeatedly.

• The repeat indicator REPEAT 1 will appear on the display.

During PLAY mode

Press the MODE button twice to play the entire disc repeatedly.

The repeat indicator REPEAT ALL will appear on the display.

NOTE - To cancel the REPEAT function, simply press the MODE button until the REPEAT indicator disappears.

B. Intro Scan

In STOP mode

Press the MODE button three times.

The INTRO indicator will appear on the display.

Press the PLAY button to play the first 10 seconds of each track on the disc.

NOTE - To cancel INTRO SCAN simply press the MODE button until the INTRO indicator disappears.

C. Random Play

In STOP mode

Press the MODE button four times.

The RANDOM indicator will appear on the display.

Press the PLAY button, all the tracks on a disc to be played in a random sequence.

NOTE - To cancel RANDOM PLAY simply press the MODE button until the RANDOM indicator disappears.

Program Play

1.Press the PROG button, PROG No. 01 appears.

* The PGM and Track No. 00 start flashing on the display.

2.Press or to select the desired track.

3.Press the PROG button to enter the track into memory. The program number will be increment one step.

4.Repeat step 2 and 3 to program the order of more tracks. up to 20 tracks can be programmed into memory.

5.Press to start the program playback.

6.To stop the PROG play, press the STOP button once.

7.To play the PROG play in step 6, press PROG button and button.

8.To check the PROG memory, in PROG play mode, press the or button.

9.To erase the program memory, OPEN the player’s CD door or turn off its power.

3 —

LOW BATTERY ALERT

When the low battery indicator appears on the display, please prepare to replace the batteries.

MAINTENANCE

Cleaning the Lens

If the lens becomes dusty, clean it with a camera lens blower. Be careful not to scratch the surface of the lens.

Cleaning the Cabinet

From time to time, clean the cabinet with a soft dry cloth. For more stubborn stains, slightly moisten the cloth with water or a mild detergent solution. Never use benzene, alcohol or other solvents as they may damage the finish of the cabinet.

SPECIFICATIONS

Output Power

:

20mW (32 )

Freq. Response

: 100 ~ 20000 Hz

Power Source

: 2 xUM-3 or “AA” size batteries ( not included )


4.5V(@ 500mA)AC-DC adaptor ( Not included)

Dimensions

:

142mm(W) x 155mm(D) x 26mm(H)

**For improvement purposes, specification and design are subject to change without notice. **

— 4 —

TROUBLE SHOOTING GUIDE

Cleaning the Disc

When a disc becomes dirty, clean it with a cleaning cloth. Wipe the disc from the center out. Note - Do not use solvents such as benzine, thinner, commercially available cleaners or anti-static spray intended for analogue discs.

**Should you experience difficulties in the use of this player please refer to the following chart before contacting your dealer or the place of purchase.


Trouble shooting Guide

Problem


Points to check

Player fails to function

The disc may be inserted upside down.


• The disc not mounted correctly on the hub.


• The disc is dirty or may be incorrect or defective.


The pick up lens is dirty.


• The player’s lid not closed.


• Moisture condensation, Allow the player to warm up


to room temperature for 60 minutes.


• AC Power to the AC/DC adapter is switched off.


• Auto power off has occurred, press PLAY button to


restore power (see Auto Power Off in the text).


Weak batteries.

No sound from Earphones

Earphones' plug is not firmly inserted into the Phones


jack(11).

No sound when played through

The connection to the amp, or its setting is incorrect.

an external amplifier

Power to an external amplifier is not switched on.

Intermittent Sound

Dirty or defective disc.


Dirty pickup lens.


• The player is subject to excessive vibration or shock.


Low battery power.


Poor Earphone connection.

— 5 —

Page 1
Image 1
Curtis CD145 instruction manual Location of Controls, Preparations Before Using, Disc Playing, LOW Battery Alert

CD145 specifications

The Curtis CD145 is a state-of-the-art electric vehicle (EV) controller designed for a variety of applications, ranging from golf carts and low-speed vehicles to electric motorcycles and other electric-powered transport. Engineered with a focus on efficiency and reliability, the CD145 is well-regarded in the electric mobility industry.

One of the main features of the Curtis CD145 is its high current handling capability. With a continuous current rating of up to 145 Amps, the controller can easily manage the power needs of mid-sized EVs, delivering robust performance under varying load conditions. This allows for smooth acceleration and deceleration, contributing to an overall enhanced driving experience.

The CD145 utilizes advanced MOSFET technology for optimal thermal performance and efficiency. By employing this technology, the controller minimizes heat generation during operation, thus prolonging the lifespan of both the controller and the electric motor. This efficient energy management leads to longer battery life, making it an attractive option for users concerned about range and longevity.

Another notable characteristic of the Curtis CD145 is its programmability. The controller features a built-in software platform that allows users to customize parameters such as speed limits, acceleration profiles, and regenerative braking settings. This flexibility enables manufacturers and end-users to tailor the vehicle's performance to specific applications or preferences, ensuring a more personalized driving experience.

Furthermore, the CD145 is designed with several protective features that enhance its reliability. These include over-temperature protection, over-voltage protection, and short-circuit protection. Such safety features are crucial, especially in electric vehicles, where any malfunction could potentially lead to significant risks.

In terms of connectivity, the Curtis CD145 is equipped with CAN bus communication capabilities, allowing for seamless integration with other vehicle systems. This connectivity is essential for modern electric vehicle designs, as it enables efficient communication between various components, such as the battery management system, display interfaces, and even advanced driver-assistance systems.

The Curtis CD145's robust build quality and weather-resistant design further enhance its suitability for a wide range of environments, whether urban or off-road. The controller is fully encapsulated to withstand harsh conditions, making it ideal for outdoor use.

Overall, the Curtis CD145 stands out as a versatile and reliable electric vehicle controller, equipped with innovative features and technologies that cater to the growing demand for efficient electric mobility solutions. With its emphasis on performance, safety, and user customization, the CD145 continues to play a pivotal role in the advancement of electric vehicle technology.