Operating Your Outdoor Grill
Rotisserie Cooking
![]() warning
warning
•To avoid an explosion or fire hazard, do not use the rotisserie burner during high wind conditions.
•To avoid an electric shock and burn hazard, keep all body parts away from the rotisserie burner during lighting and use.
•The rotisserie burner flame may be difficult to see in bright sunny conditions.
•To avoid damage and an electric shock hazard due to moisture damage, unplug and remove the rotisserie motor when not in use. Store it in a clean, dry place.
Rotisserie cooking utilizes the intense searing heat of an infrared (IR) burner to cook many different types of meat. As the motor slowly rotates the rotisserie rod, the meat sears and cooks evenly on all sides, producing flavorful,
Things to Know About the Rotisserie
•The rotisserie burner can be used in conjunction with the standard burners and the smoker box.
•The rotisserie burner does not need to be preheated before using it. In fact, it is easier to insert the rotis- serie rod before lighting.
•The maximum amount of weight that the rotisserie can hold is 17 pounds.
Preparing to Use the Rotisserie
![]() warning
warning
If the outdoor grill is hot, use hot pads to handle the rotisserie rod and motor. Keep hands away from the rotisserie burner by handling the rotisserie rod near the ends.
1.Open the canopy.
2.If the warming rack is in place inside the grill com- partment, remove it.
![]() caution
caution
Always use cotton string to truss meats. Do not use nylon or plastic string, because it will melt.
3.Put one of the rotisserie forks on the blunt end of the rotisserie rod with the points toward the center.
4.Push the food onto the pointed end of the rotisserie rod and center it.
5.Slide the second rotisserie fork onto the rod with the points toward the meat.
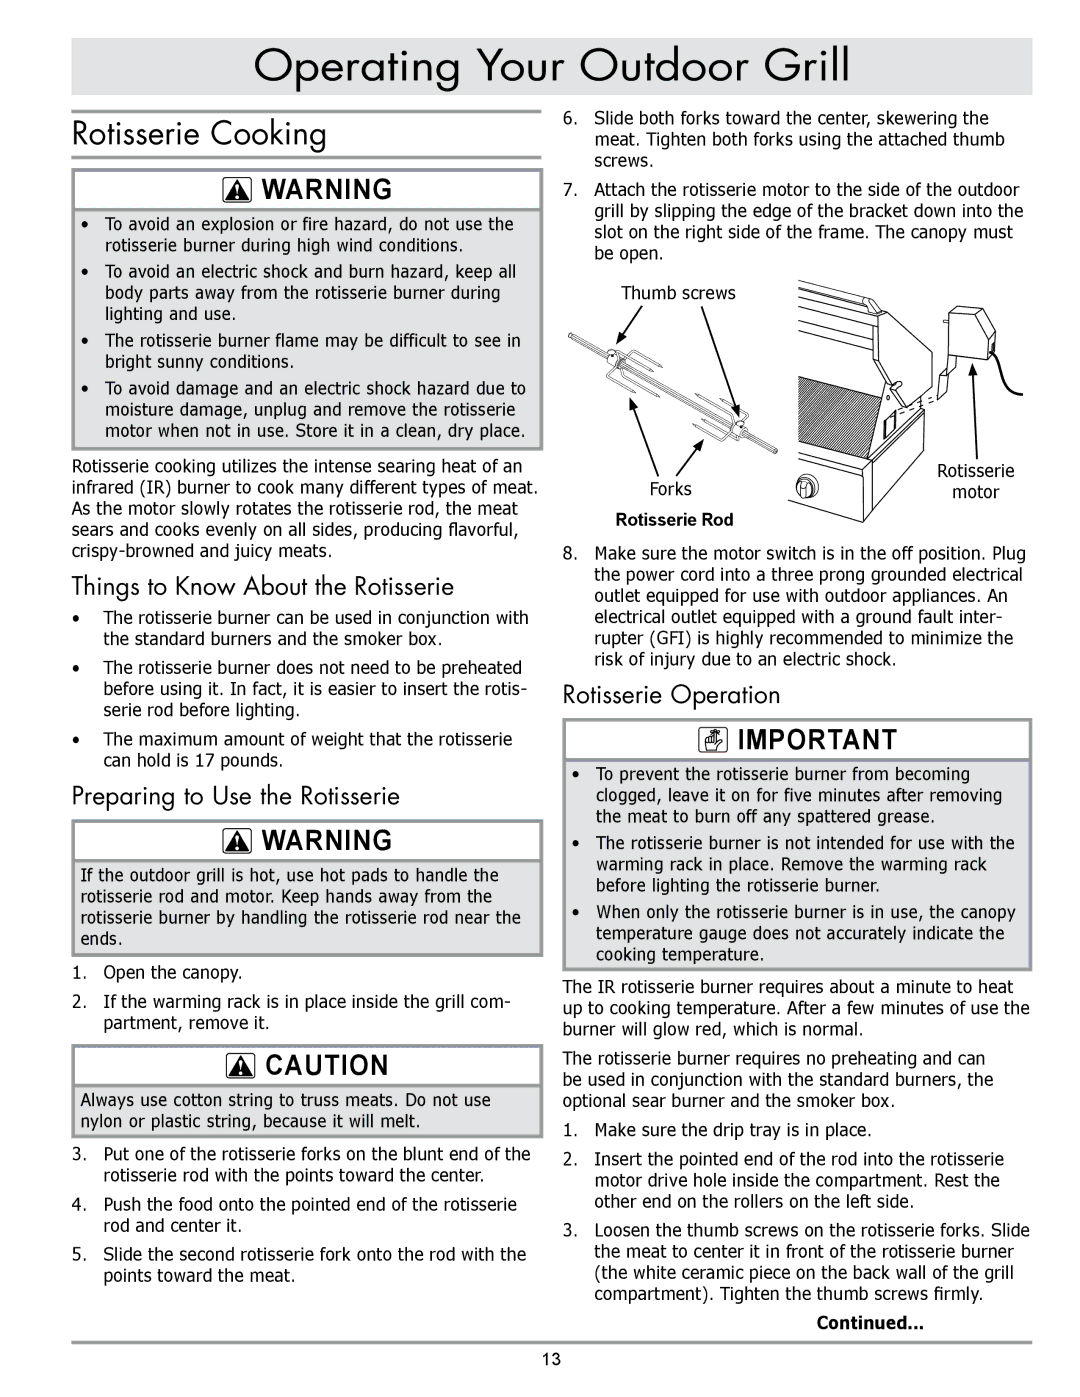
6.Slide both forks toward the center, skewering the meat. Tighten both forks using the attached thumb screws.
7.Attach the rotisserie motor to the side of the outdoor grill by slipping the edge of the bracket down into the slot on the right side of the frame. The canopy must be open.
Thumb screws
Forks | Rotisserie |
motor | |
Rotisserie Rod |
|
8.Make sure the motor switch is in the off position. Plug the power cord into a three prong grounded electrical outlet equipped for use with outdoor appliances. An electrical outlet equipped with a ground fault inter- rupter (GFI) is highly recommended to minimize the risk of injury due to an electric shock.
Rotisserie Operation
![]() important
important
•To prevent the rotisserie burner from becoming clogged, leave it on for five minutes after removing the meat to burn off any spattered grease.
•The rotisserie burner is not intended for use with the warming rack in place. Remove the warming rack before lighting the rotisserie burner.
•When only the rotisserie burner is in use, the canopy temperature gauge does not accurately indicate the cooking temperature.
The IR rotisserie burner requires about a minute to heat up to cooking temperature. After a few minutes of use the burner will glow red, which is normal.
The rotisserie burner requires no preheating and can be used in conjunction with the standard burners, the optional sear burner and the smoker box.
1.Make sure the drip tray is in place.
2.Insert the pointed end of the rod into the rotisserie motor drive hole inside the compartment. Rest the other end on the rollers on the left side.
3.Loosen the thumb screws on the rotisserie forks. Slide the meat to center it in front of the rotisserie burner (the white ceramic piece on the back wall of the grill compartment). Tighten the thumb screws firmly.
Continued...
13
