DVD-VIDEO Player
Avoid direct exposure to beam
Important Safeguards
All operating and use instructions should be followed
Cleaning
Outdoor Antenna Grounding
Power Lines
Wall or Ceiling Mounting
Advantages of This Product Are
For Pan and Scan, 43 for Letter Box, and 169 for Wide
Selective Play DVD/VCD/CD
Please read carefully before using a DVD-Video player
Read Carefully before Using
Copyright
Contents
Setup
DVD Operation
Others
Main body front panel
Identification of Controls
Operation Display Window
$ Component OUT Jack
Main body Rear Panel
@ Digital Output COAXIAL, Optical Jack
# S-VIDEO OUT Jack
Remote Control
Accessories
Instructions in Using Remote
Warranty
Batteries RF cable
How to Connect with RF cable
Connecting with TV
Check UP
How to Connect with Audio/Video jack
Connecting with Cable Box
How to connect
You should install a distributor additionally
How to watch general broadcasting with recording Catv
How to Connect with Jack in Rear Panel
How to Connect with Jack in Front Panel
How to Playback Chapter Photographed by Camcorder
How to CopyEdit Tape with Other VCR or Camcorder
How to Connect with Stereo Unit such as Audio
Connecting with Audio
68p
Select Video Out type in DVD SETsee 62P in advance
Select Time and Date Set with buttonin CLOCKSETscreen
Clock Set
ButtonorNUMBERbutton
Return button
Output Select
Timer Program Setting
To Select DVD
To Select VCR
DVD Playback
Button to power on
Press OPEN/CLOSE button to open the disc tray
Button
VCR Playback
Press button to power on
Insert the desired
Tape
Various Playback Methods
To Adjust Display
To Record With VCR
Recording
Insert a recordable tape
Broadcastingchannelorexternalinputunittorecord
To Copy From DVD To Videotape
To Enjoy Another TV Channel or DVD during recording
Press TV/VCR button
Disc
First, follow the steps 1 to 4 in Recording With VCR
One Touch timer Recording OTR
Press REC button as much as you want
Operational Status
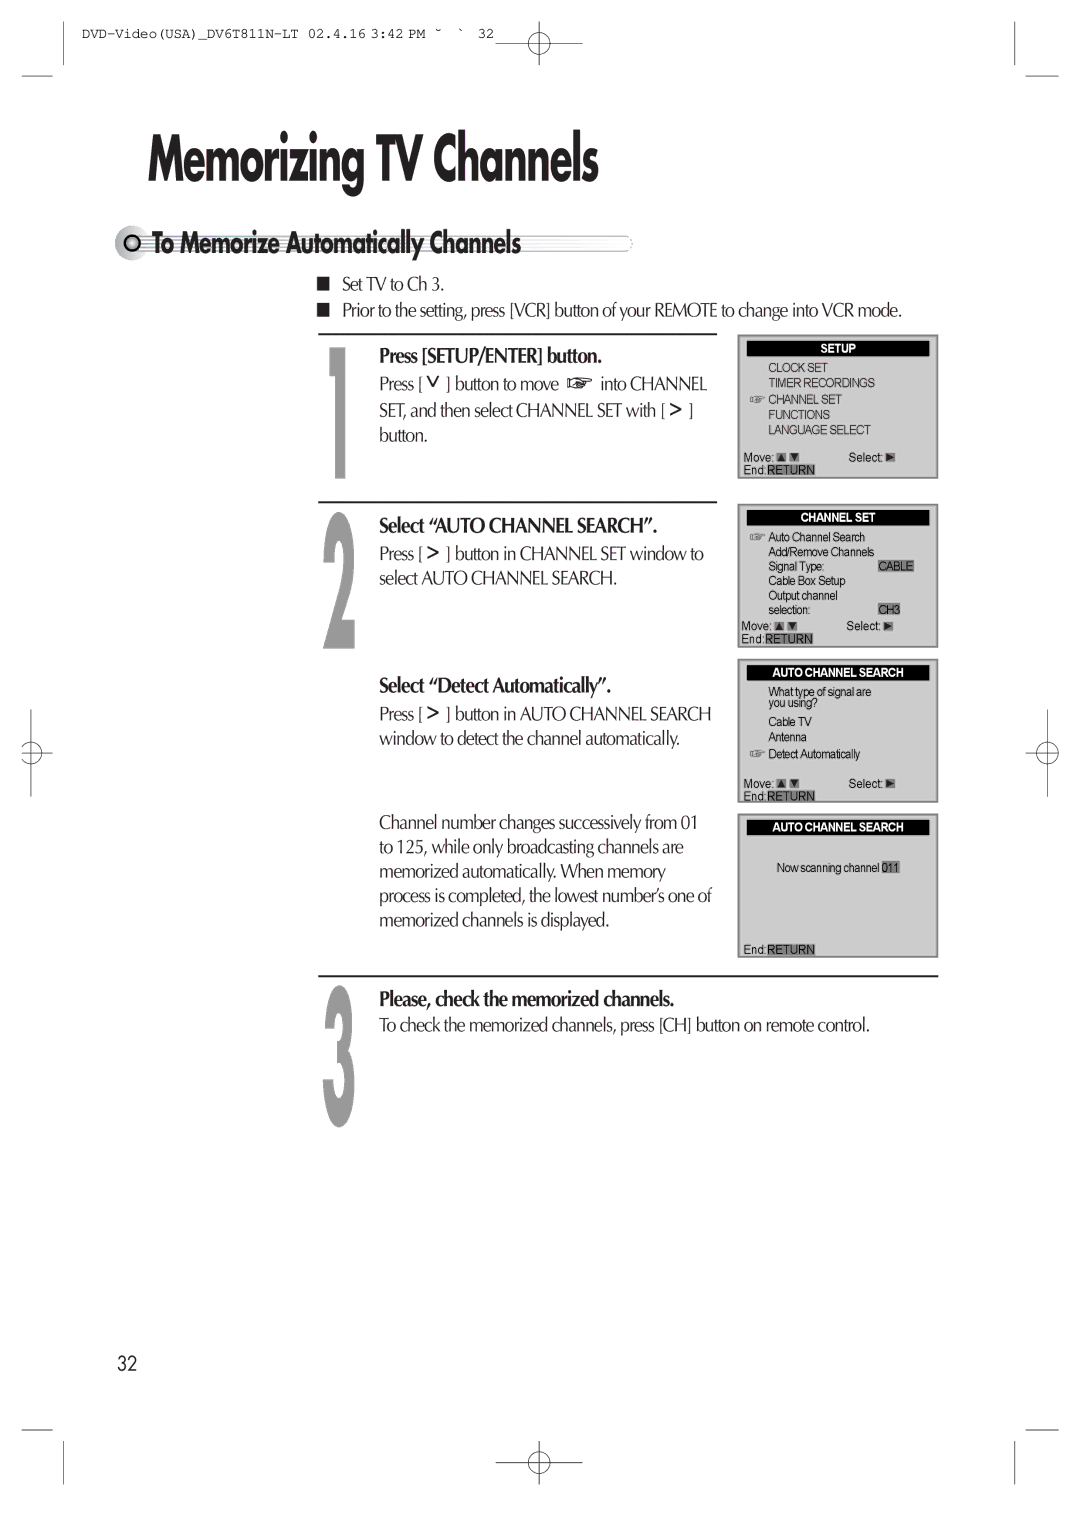
Memorizing TV Channels
Press SETUP/ENTER button
To Memorize Automatically Channels
Select Detect Automatically
To Memorize Channels Manually
After pressing SETUP/ENTER button, select Channel SET
Select Add/Remove Channels
Check the memorized channel
To Delete Channels Manually
Selecting cable or antenna viewing
Check the deleted channel
To Set Cable Box
Select Cable Box Setup
To Set Output Channel
Select Cable Box Channel
Timer Recordings
Timer Recordings
Select Timer REC method
Select Make a New Program
To Confirm or Cancel Timer Recordings
Setting
Set proper Recording Speed
One Time Timer Recordings
Various Timer Recordings
Daily Timer Recordings
Weekday Timer Recordings
Protecting video cassettes from accidental erasure
Using video cassettes
Inserting video cassettes
Removing video cassettes
To Watch and Record Promptly Cable TV
Timer Recordings of Cable TV
Using advanced features
Press SETUP/ENTER button and select Functions
Play the tape automatically
Channel 3 of your TV
Switch the VCR to TV or VCR mode automatically
Searching Viss Signals
Indexing Viss Signals
Press button until
Viss
Memorizing a desired scene
Counter 0 Stop
Searching a memorized scene
Stop by pressing button
Press CLK/CNT button
Displaying Clock/Counter
Clock is displayed
Real-time Counter is displayed
Select the language among English, Spanish or French
Changing the on-screen menu language
Playing a tape in Hi Fi high quality
Hi-Fi Stereo Playback
Recording Stereo Broadcast
Forced Mono
To play it fast
To skip chapter in a DVD
Prev button
Press
Press Button to reverse-play it slow in Pause
To play it slow
For the case of Svcd or VCD, Slow playback is available
Orders
Random Play
Playing a programmed order
Repeat button
Number
Repeating a defined period DVD
Press SETUP/ENTER button in the position to repeat
PressREPEATbuttonagain
PressREPEATbuttononemoretime
Repeating a defined period VCD, CD
OFF mode
Button Then, the current track is repeated
Button Then, the current disc is repeated
Search DVD with a Title, Chapter number
SETUP/ENTER button
Search DVD with time
Twice
Search VCD and CD with time
Search VCD and CD with a track number
Confirming the current disc mode
Elapsed and Repeat mode
While in playing, press Display button
Selecting a subtitle language
Selecting an audio language
Selecting 3D Audio
Please press CLEAR/3D button
Multi Angle
Using a zoom function
Keep pressing Zoom button till the preferred zoom appears
Keep pressing Angle button till the preferred
To memorize a scene
Memorizing a scene
Playing a memorized scene
Scene, press button
To display menus in a disc
Displaying menus in a disc
DVD Press Menu or TITLE/PBC button
VCD2.0 Press TITLE/PBC button
To Video, Audio and Others
Basic Setup mode
To display submenus
For the movement
Selecting a OSD language
Language Setup
Selecting Audio language
Selecting Subtitle language
Selecting TV type
Video Setup
Selecting Video Out
Selecting Brightness
While Stop or Resume STOP, press SETUP/ENTER button
Audio Setup
Select a digital output
Select Dual Mono
Select a Dynamic Range
Watching environment. High-density
Raise the sound level
Others Setup
Entering a password
Resettling a user’s Parental
Settling a user’s Parental
Playable Disc
About DVD
Terms related with DVD
Dts
Dolby Pro-Logic
Cleaning Disc
Handling Disc
Lt/Rt
Safety tab
What is dew condensation symptom?
Terms related with VCR
If dew condensation occurs
How to use a head cleaner
What is a record tab of a videotape?
Noise
Auto detect the contamination of VCR heads
Recorder does not play
Symptom Checks
Sound is irregular
Remote does not work
DVD is playing
While a DVD is playing
Black and white. or Subtitle
Shakes
Symptom Checks Power
Input and ejection
Screen and noise
Recording
Play
Recording a TV program is
Clean and distorted
Impossible
Is ejected automatically
Symptom Checks Others
Selected
Cable broadcasting can not be
Specifications
DVD Audio output standards
Output
Region Code
Warranty
Over-the-counter exchange of initially defective units
Months


 To
To
 Memorize
 Automatically
 Channels


 Detect Automatically