
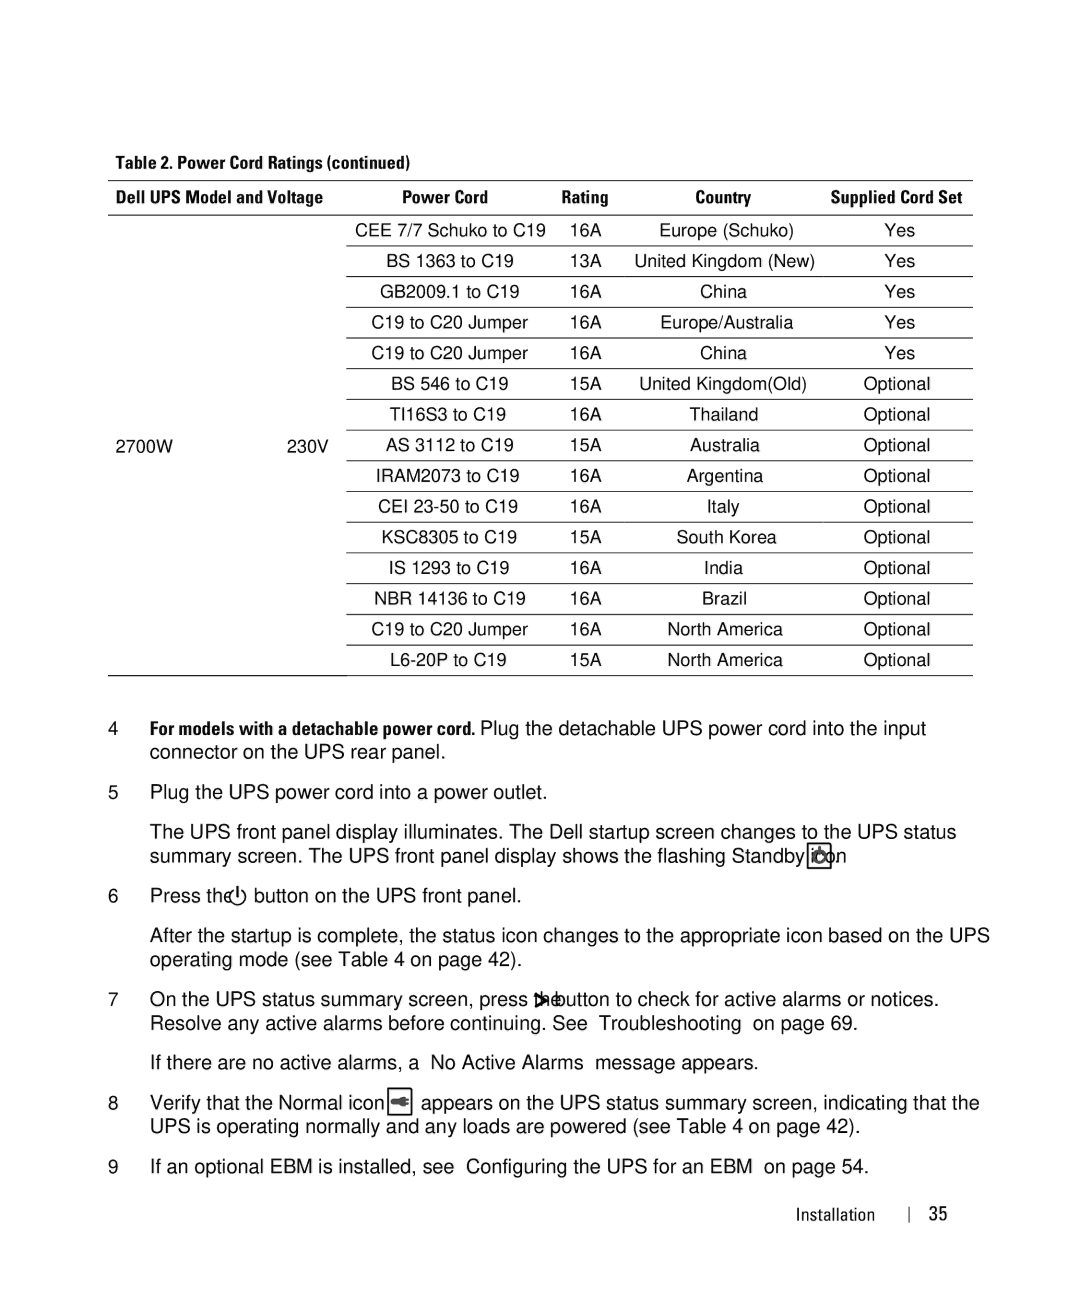
H928N, K811N, H919N, 1000W, 2700W specifications
Dell's power supply units (PSUs) are essential components for Dell servers and workstations, providing reliable power solutions tailored to meet different demands. Among these, the 500W, 1000W, and 1920W/1500W power supplies stand out for their efficiency, performance, and advanced features tailored to various IT environments.Starting with the 500W power supply, this unit is designed for entry-level servers and workstations. It boasts a compact design that facilitates easy installation in space-constrained scenarios. The 500W PSU operates with a high efficiency rating, contributing to lower energy costs and reduced heat output. It supports the latest energy standards, including 80 PLUS certification, ensuring that customers can rely on it for consistent performance and reliability. This unit is particularly suitable for small to medium businesses looking for cost-effective power solutions for basic applications.
The 1000W power supply represents a step up, featuring dual 12V outputs that provide stable power for more demanding tasks. Designed for mid-range servers and advanced workstations, it balances performance and efficiency, making it ideal for enterprises that require additional processing power for virtualization, data analysis, and high-performance computing tasks. The 1000W PSU includes built-in protections against over-voltage, short circuits, and over-temperature conditions, adding an extra layer of reliability that is crucial for mission-critical operations.
For environments with higher power demands, Dell offers the 1920W/1500W power supply. This robust unit is engineered for high-performance servers and large-scale data centers, where maximum uptime and performance are paramount. The modular design of the 1920W/1500W power supply allows for enhanced cable management, reducing clutter and improving airflow within racks. With an efficiency rating that adheres to 80 PLUS Platinum standards, this PSU not only minimizes energy consumption but also maximizes operational efficiency, making it ideal for organizations looking to optimize their data center environments.
In summary, Dell's 500W, 1000W, and 1920W/1500W power supplies cater to a wide range of computing needs. From entry-level solutions to high-capacity units for demanding environments, Dell ensures that its power supplies provide reliability, efficiency, and performance. As organizations continue to evolve their IT infrastructure, these power supplies remain pivotal in supporting their growth and operational goals.