M5200 | |
Quick Reference | |
| CAUTION: Before you set up and operate your Dell |
| printer, read and follow the safety instructions in your |
| Owner’s Manual. |
Operator Panel | |
| 1 |
| 7 |
| 2 |
| 6 |
| 3 |
| 5 |
| 4 |
1 | LCD display |
2 | Select button |
| • | Selects the item on the second line of the display |
| • | Saves the selection as the new default setting |
3 | Return button | |
| • | Returns to the previous menu |
4 | Stop button | |
5 | Go button | |
| • | Exits the menus and returns to Ready |
| • | Clears messages |
6 | Power Indicator Light (flashes when busy) | |
7 | Menu button | |
| • | Enters and scrolls through the menus |
| • | Takes the printer offline |
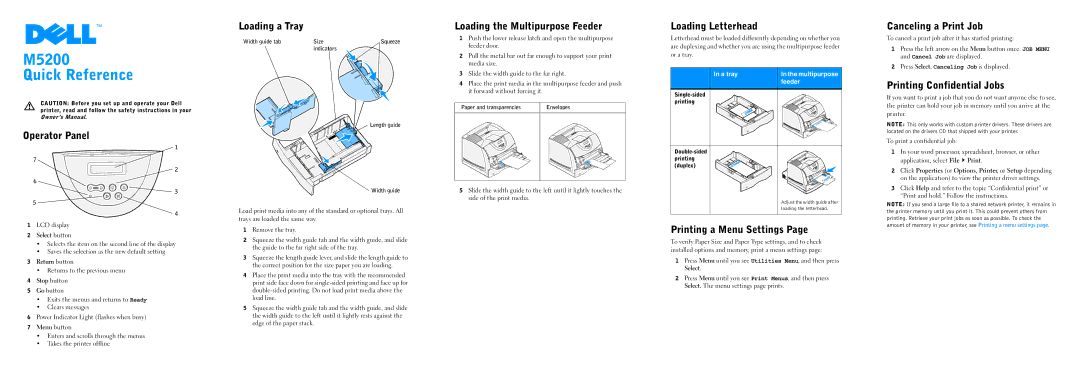
Loading a Tray |
|
|
Width guide tab | Size | Squeeze |
| indicators |
|
![]() Length guide
Length guide
| Width guide |
Load print media into any of the standard or optional trays. All | |
trays are loaded the same way. | |
1 | Remove the tray. |
2 | Squeeze the width guide tab and the width guide, and slide |
| the guide to the far right side of the tray. |
3 | Squeeze the length guide lever, and slide the length guide to |
| the correct position for the size paper you are loading. |
4 | Place the print media into the tray with the recommended |
| print side face down for |
| |
| load line. |
5 | Squeeze the width guide tab and the width guide, and slide |
| the width guide to the left until it lightly rests against the |
| edge of the paper stack. |
Loading the Multipurpose Feeder | |
1 | Push the lower release latch and open the multipurpose |
| feeder door. |
2 | Pull the metal bar out far enough to support your print |
| media size. |
3 | Slide the width guide to the far right. |
4 | Place the print media in the multipurpose feeder and push |
| it forward without forcing it. |
Paper and transparencies | Envelopes |
5 | Slide the width guide to the left until it lightly touches the |
| side of the print media. |
Loading Letterhead |
|
Letterhead must be loaded differently depending on whether you | |
are duplexing and whether you are using the multipurpose feeder | |
or a tray. |
|
In a tray | In the multipurpose |
| feeder |
| |
printing |
|
| |
printing |
|
(duplex) |
|
| Adjust the width guide after |
| loading the letterhead. |
Printing a Menu Settings Page | |
To verify Paper Size and Paper Type settings, and to check | |
installed options and memory, print a menu settings page: | |
1 | Press Menu until you see Utilities Menu, and then press |
| Select. |
2 | Press Menu until you see Print Menus, and then press |
| Select. The menu settings page prints. |
Canceling a Print Job | |
To cancel a print job after it has started printing: | |
1 | Press the left arrow on the Menu button once. JOB MENU |
| and Cancel Job are displayed. |
2 | Press Select. Canceling Job is displayed. |
Printing Confidential Jobs | |
If you want to print a job that you do not want anyone else to see, | |
the printer can hold your job in memory until you arrive at the | |
printer. | |
NOTE: This only works with custom printer drivers. These drivers are | |
located on the drivers CD that shipped with your printer. | |
To print a confidential job: | |
1 | In your word processor, spreadsheet, browser, or other |
| application, select File Print. |
2 | Click Properties (or Options, Printer, or Setup depending |
| on the application) to view the printer driver settings. |
3 | Click Help and refer to the topic “Confidential print” or |
| “Print and hold.” Follow the instructions. |
NOTE: If you send a large file to a shared network printer, it remains in | |
the printer memory until you print it. This could prevent others from | |
printing. Retrieve your print jobs as soon as possible. To check the | |
amount of memory in your printer, see Printing a menu settings page. | |