Dell S300w Projector
User’s Guide
January 2010 Rev. A00
Notes, Notices, and Cautions
Connecting a DVD Player Using a Composite
Contents
2 Connecting Your Projector
Monitor Loop-Through Connection Using VGA
Installing the Remote Control Batteries
Adjusting the Projected Image
Adjusting the Projector Focus
Adjusting Projection Image Size
Contents
4 Troubleshooting Your Projector
Configuring the Network Setting
Accessing Web Management
USB cable
Your Dell Projector
Package Contents
Your Dell Projector
Bottom View
About Your Projector
CAUTION Safety Instructions
Top View
11 Do not use the wireless projector near microwave ovens
Connecting Your Projector
Installing the Antenna
NOTE The Mini USB cable is not provided with your projector
Connecting to a Computer
Connecting a Computer Using a VGA Cable
Connecting Your Projector
Monitor Loop-Through Connection Using VGA Cables
Power cord VGA to VGA cable
Connecting Your Projector
Connecting a Computer Using an RS232 cable
Power cord RS232 cable
Connecting Your Projector
Connecting a Computer Using Wireless
Connecting Your Projector
Connecting a DVD Player
Connecting a DVD Player Using an S-video Cable
Connecting Your Projector
Connecting a DVD Player Using a Composite Video Cable
Power cord Composite video cable
Connecting Your Projector
Connecting a DVD Player Using a Component Video Cable
Power cord VGA to Component Video cable
NOTE The HDMI cable is not shipped with your projector
Connecting a DVD Player Using an HDMI Cable
1 Power cord 2 HDMI cable
Connecting Your Projector
NOTE The RJ45 cable is not shipped with your projector
Connecting to Local Area Network
Local Area Network LAN 1 Power cord 2 RJ45 cable
Connecting Your Projector
12V DC Plug
Power cord 12V DC Plug Automatic Screen
Connecting Your Projector
Connection With Commercial RS232 Control Box
Power cord RS232 cable Commercial RS232 control box
Turning Your Projector Off
Using Your Projector
Turning Your Projector On
Lowering the Projector Height
Adjusting the Projected Image
Raising the Projector Height
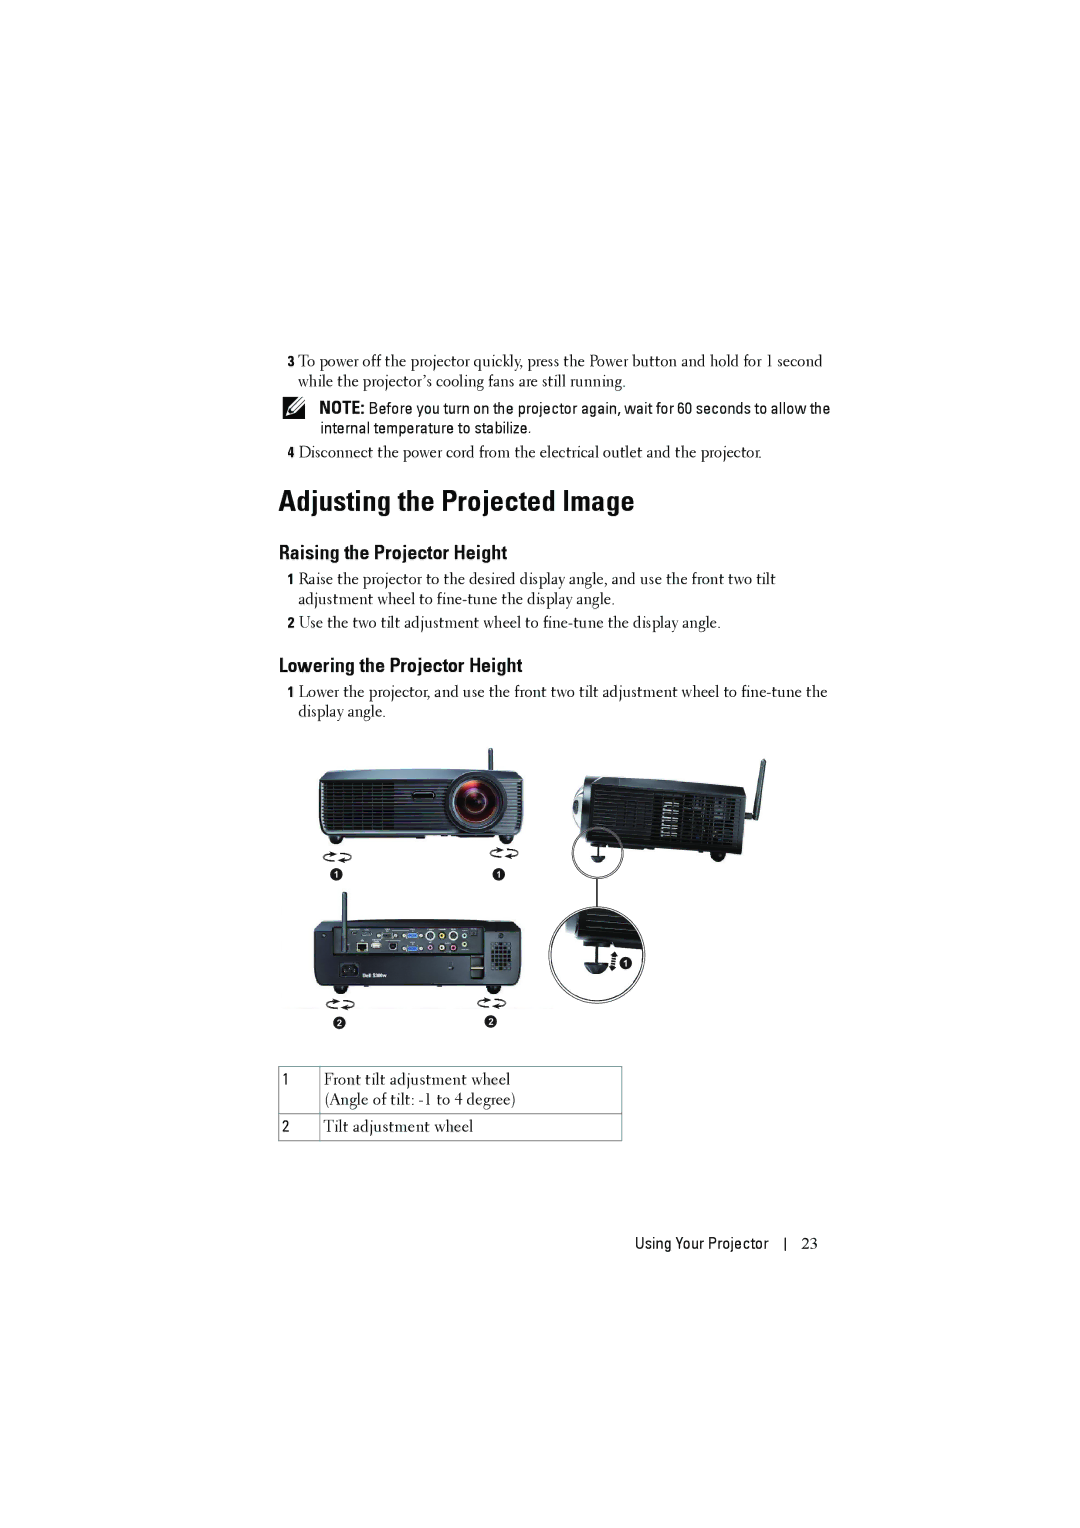
Using Your Projector
Adjusting the Projector Focus
294746.76cm
Adjusting Projection Image Size
Using Your Projector
Projector to screen distance
This graph is for user reference only
Using Your Projector
Diagonal
Using the Control Panel
on-screen display OSD is displayed
Using Your Projector
NOTE Auto Adjust does not operate if the
Using Your Projector
Using the Remote Control
light on your eyes
Presentation mode, Bright mode, Movie mode
sRGB, or Custom mode
Using Your Projector
4 Slip the battery cover back
Installing the Remote Control Batteries
Angle ±20 Distance 7m/22.97feet
Operating Range With Remote Control
Using Your Projector
Operating range
Main Menu AUTO-ADJUST
Using the On-Screen Display
Input Select Multiple Display
INPUT SELECT
INPUT SELECT ADVANCED
PICTURE in PC Mode
PICTURE in Video Mode
PICTURE ADVANCED
DISPLAY in PC Mode
43 - The input source scales to fit the screen and projects a 43 image
Using Your Projector
DISPLAY in Video Mode
LAMP
SET UP
Front Projection-Desktop - This is the default option
WIRELESS / NETWORK
INFORMATION
OTHERS
SCREEN SETTINGS-Select and press to activate screen settings. The screen settings menu consists of the following options
POWER SETTINGS-Select and press to activate power settings. The power settings menu consists of the following options
1 First time password input request
Using Your Projector
4 To delete the password, select Delete
CHANGE PASSWORD-Key in the original password, then enter the new password and confirm the new password again
TEST PATTERN-Test Pattern is used to test focus and resolution
Wireless Networking Installation
1 Install the wireless antenna. See Installing the Antenna on page
Your computer must have wireless network function to detect the connection
8 Select the appropriate operating system, then click Download
9 Click Run to proceed with the one-time installation of the software
Login
S300w Wireless Application Software
Status Bar
Understanding the Buttons
Projecting the Presentation
Description
Estimated frame per second
Using the Menu
Screen Variation %
INFO-Click to display system information
Using Your Projector
Home Page
Configuring the Network Setting
Accessing Web Management
Managing the Projector From Web Management
Using Your Projector
Download the Wireless Application Software
See also Wireless Networking Installation on page
Conference Control
Using Your Projector
Admin
Managing Properties
Using Your Projector
System Status
Wireless Setup
Network Status
IP Setup
DHCP Server Setup
Set Security For SNMP
RADIUS Server Setup
GateKeeper
Projector Setup
Projection Setup
Projection Setup
Confirm New Password Enter the password again and click Apply
Change Passwords
This page allows you to change the administrator password
Enter New Password Enter the new password
Using Your Projector
Reset to Default
1 Press Browse to select the file to update
Firmware Update
Use the Firmware Update page to update your projector’s firmware
To start firmware update, do the following steps
Projector Information
Projector Control Panel
Audio Control
Image Control
Alert Condition
Alert Setting
SMTP Setting
E-mail Alert
Using Your Projector
Reboot System
Crestron
Click Reboot to reboot the system
TIPS
Why am I unable to access the SMTP server?
McAfee Security
Firewall Configuration and FAQ
Configuration
Firewall Protection
Windows Firewall
Configuration
Zone Alarm
Firewall Protection
2 The following screen appears. Click Next
Make Application Token
Using Your Projector
1 From the application software, click Make Application Token
Use Test Pattern in the Others menu
Troubleshooting Your Projector
Problem
Possible Solution
Use Test Pattern in the Others menu
Problem continued
Possible Solution continued
Properties and then select Settings tab
The image is stretched when
Problem continued
Possible Solution continued
TEMP light is blinking amber
Problem continued
Possible Solution continued
Troubleshooting Your Projector
Guiding Signals
Troubleshooting Your Projector
Changing the Lamp
CAUTION Lamp Disposal for the US only
Troubleshooting Your Projector
Specifications
Specifications
3.999mm
12306mm
USB port One USB slave Mini USB for remote
Command types
RS232 Pin Assignment RS232 Protocol
Specifications
Connection settings
Resolution
Compatibility Modes Analog/Digital
Specifications
1 Visit support.dell.com
Contacting Dell
Glossary
Appendix Glossary
Hz Hertz - Unit of frequency
Minimum Distance - The closest position that a projector can focus an image onto a screen
Index