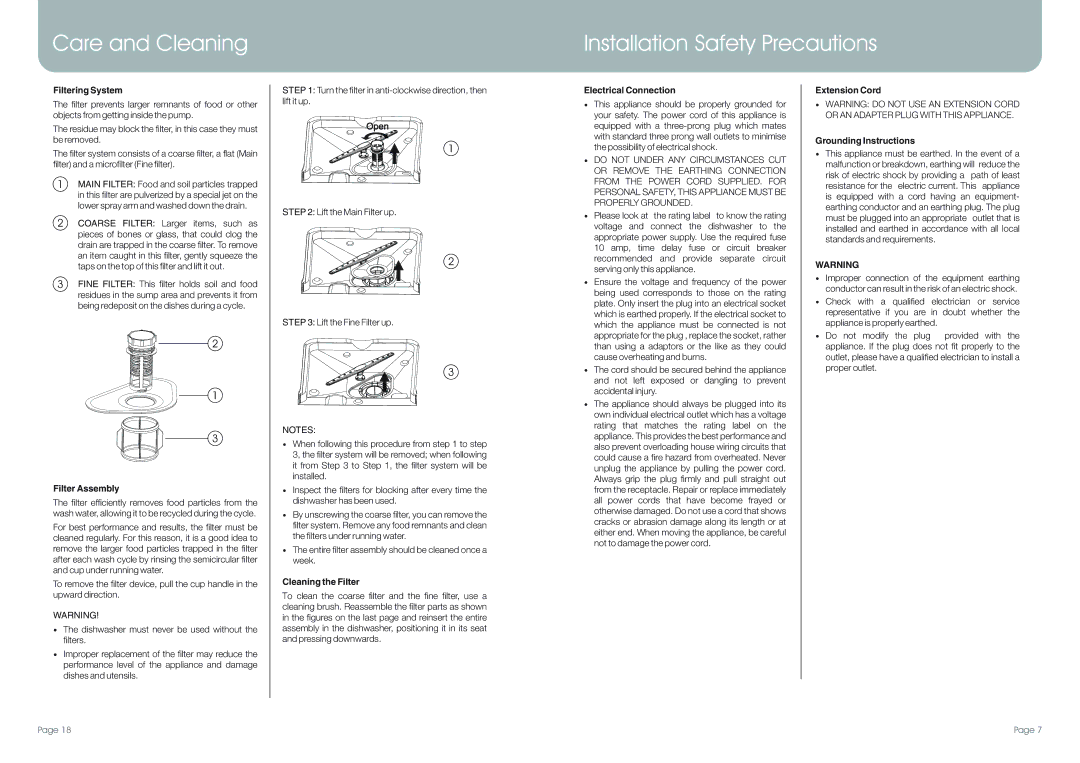
Care and Cleaning

Installation Safety Precautions

Filtering System

The filter prevents larger remnants of food or other objects from getting inside the pump.

The residue may block the filter, in this case they must be removed.

The filter system consists of a coarse filter, a flat (Main filter) and a microfilter (Fine filter).

1MAIN FILTER: Food and soil particles trapped in this filter are pulverized by a special jet on the lower spray arm and washed down the drain.

2COARSE FILTER: Larger items, such as pieces of bones or glass, that could clog the drain are trapped in the coarse filter. To remove an item caught in this filter, gently squeeze the taps on the top of this filter and lift it out.

3FINE FILTER: This filter holds soil and food residues in the sump area and prevents it from being redeposit on the dishes during a cycle.

2

1

3

Filter Assembly

The filter efficiently removes food particles from the wash water, allowing it to be recycled during the cycle.

For best performance and results, the filter must be cleaned regularly. For this reason, it is a good idea to remove the larger food particles trapped in the filter after each wash cycle by rinsing the semicircular filter and cup under running water.

To remove the filter device, pull the cup handle in the upward direction.

WARNING!

ŸThe dishwasher must never be used without the filters.

ŸImproper replacement of the filter may reduce the performance level of the appliance and damage dishes and utensils.

STEP 1: Turn the filter in anti-clockwise direction, then lift it up.

Open

1

STEP 2: Lift the Main Filter up.

2

STEP 3: Lift the Fine Filter up.

3

NOTES:

ŸWhen following this procedure from step 1 to step 3, the filter system will be removed; when following it from Step 3 to Step 1, the filter system will be installed.

ŸInspect the filters for blocking after every time the dishwasher has been used.

ŸBy unscrewing the coarse filter, you can remove the filter system. Remove any food remnants and clean the filters under running water.

ŸThe entire filter assembly should be cleaned once a week.

Cleaning the Filter

To clean the coarse filter and the fine filter, use a cleaning brush. Reassemble the filter parts as shown in the figures on the last page and reinsert the entire assembly in the dishwasher, positioning it in its seat and pressing downwards.

Electrical Connection

ŸThis appliance should be properly grounded for your safety. The power cord of this appliance is equipped with a three-prong plug which mates with standard three prong wall outlets to minimise the possibility of electrical shock.

ŸDO NOT UNDER ANY CIRCUMSTANCES CUT OR REMOVE THE EARTHING CONNECTION FROM THE POWER CORD SUPPLIED. FOR PERSONAL SAFETY, THIS APPLIANCE MUST BE PROPERLY GROUNDED.

ŸPlease look at the rating label to know the rating voltage and connect the dishwasher to the appropriate power supply. Use the required fuse 10 amp, time delay fuse or circuit breaker recommended and provide separate circuit serving only this appliance.

ŸEnsure the voltage and frequency of the power being used corresponds to those on the rating plate. Only insert the plug into an electrical socket which is earthed properly. If the electrical socket to which the appliance must be connected is not appropriate for the plug , replace the socket, rather than using a adaptors or the like as they could cause overheating and burns.

ŸThe cord should be secured behind the appliance and not left exposed or dangling to prevent accidental injury.

ŸThe appliance should always be plugged into its own individual electrical outlet which has a voltage rating that matches the rating label on the appliance. This provides the best performance and also prevent overloading house wiring circuits that could cause a fire hazard from overheated. Never unplug the appliance by pulling the power cord. Always grip the plug firmly and pull straight out from the receptacle. Repair or replace immediately all power cords that have become frayed or otherwise damaged. Do not use a cord that shows cracks or abrasion damage along its length or at either end. When moving the appliance, be careful not to damage the power cord.

Extension Cord

ŸWARNING: DO NOT USE AN EXTENSION CORD OR AN ADAPTER PLUG WITH THIS APPLIANCE.

Grounding Instructions

ŸThis appliance must be earthed. In the event of a malfunction or breakdown, earthing will reduce the risk of electric shock by providing a path of least resistance for the electric current. This appliance is equipped with a cord having an equipment- earthing conductor and an earthing plug. The plug must be plugged into an appropriate outlet that is installed and earthed in accordance with all local standards and requirements.

WARNING

ŸImproper connection of the equipment earthing conductor can result in the risk of an electric shock.

ŸCheck with a qualified electrician or service representative if you are in doubt whether the appliance is properly earthed.

Ÿ Do not modify the plug provided with the appliance. If the plug does not fit properly to the outlet, please have a qualified electrician to install a proper outlet.

Page 18

Page 7

Page 7
Image 7
DeLonghi DEDW87S, DEDW875 manual Care and Cleaning Installation Safety Precautions

DEDW87S, DEDW875 specifications

The DeLonghi DEDW875 and DEDW87S are advanced coffee machines that embody the brand's commitment to quality and innovation in home brewing. Designed for coffee lovers who appreciate convenience without compromising on flavor, these machines deliver an exceptional brewing experience that caters to various preferences.

One of the standout features of the DEDW875 and DEDW87S is their user-friendly interface, which makes it easy for anyone to create their perfect cup of coffee. The intuitive control panel allows users to navigate through various options seamlessly. With adjustable coffee strength settings, users can customize their brew to suit their mood, whether they desire a light espresso or a rich, full-bodied coffee.

Another significant technology employed in these machines is the built-in grinding system. Both models feature a high-performance burr grinder that ensures consistent coffee grounds for optimal extraction. This technology not only enhances the flavor profile of the coffee but also provides the convenience of grinding whole beans directly before brewing, delivering maximum freshness in every cup.

The DEDW875 and DEDW87S also boast advanced heating systems that optimize water temperature for brewing. The patented Thermoblock technology ensures that water reaches the ideal temperature quickly and maintains it throughout the brewing process. This attention to temperature control ultimately results in a more flavorful and aromatic cup of coffee.

In terms of design, both coffee machines feature a sleek and modern aesthetic that fits well in any kitchen setting. The stainless steel finish not only gives them a contemporary look but also ensures durability and easy cleaning. Their compact size allows them to occupy minimal counter space while still housing a host of features.

Another notable characteristic of these models is their versatility. They are not limited to just brewing coffee; users can explore a variety of beverages such as cappuccinos, lattes, and even hot chocolate. The adjustable milk frother enables the creation of creamy, frothy milk, enhancing the overall coffee experience.

Additionally, maintenance is made simple with removable components for easy cleaning and descaling. This ensures that the machine remains in optimal working condition, prolonging its lifespan and maintaining the quality of the beverages prepared.

In conclusion, the DeLonghi DEDW875 and DEDW87S are exemplary coffee machines that combine cutting-edge technology with user-friendly functionality. With their advanced features, durable design, and ability to produce a wide range of beverages, both models stand out as top choices for coffee enthusiasts looking to elevate their home brewing experience.