Desa 107714-02 Assembly, On saw backwards. If chain is, Backwards, saw will vibrate badly

Models: 107714-02 100089-06 099039J 099178H 100089-04 098031J 100089-08 100089-05

1 24
Download 24 pages 59.31 Kb
Page 6
Image 6

®

ELECTRIC CHAIN SAW

ASSEMBLY

Note: Some models are pre assembled. As- sembly is not needed on these models.

See Saw Chain Tension Adjustment, page 7.

WARNING: Cutting edges on chain are sharp. Use protective gloves when handling chain.

IMPORTANT: Do not clamp chain saw in vise during assembly.

The plastic hardware bag should include:

two guide bar bolts

two guide bar nuts

one Phillips-head tapping screw

automatic chain sharpener (Fast Sharp models only)

1.Lay chain out flat.

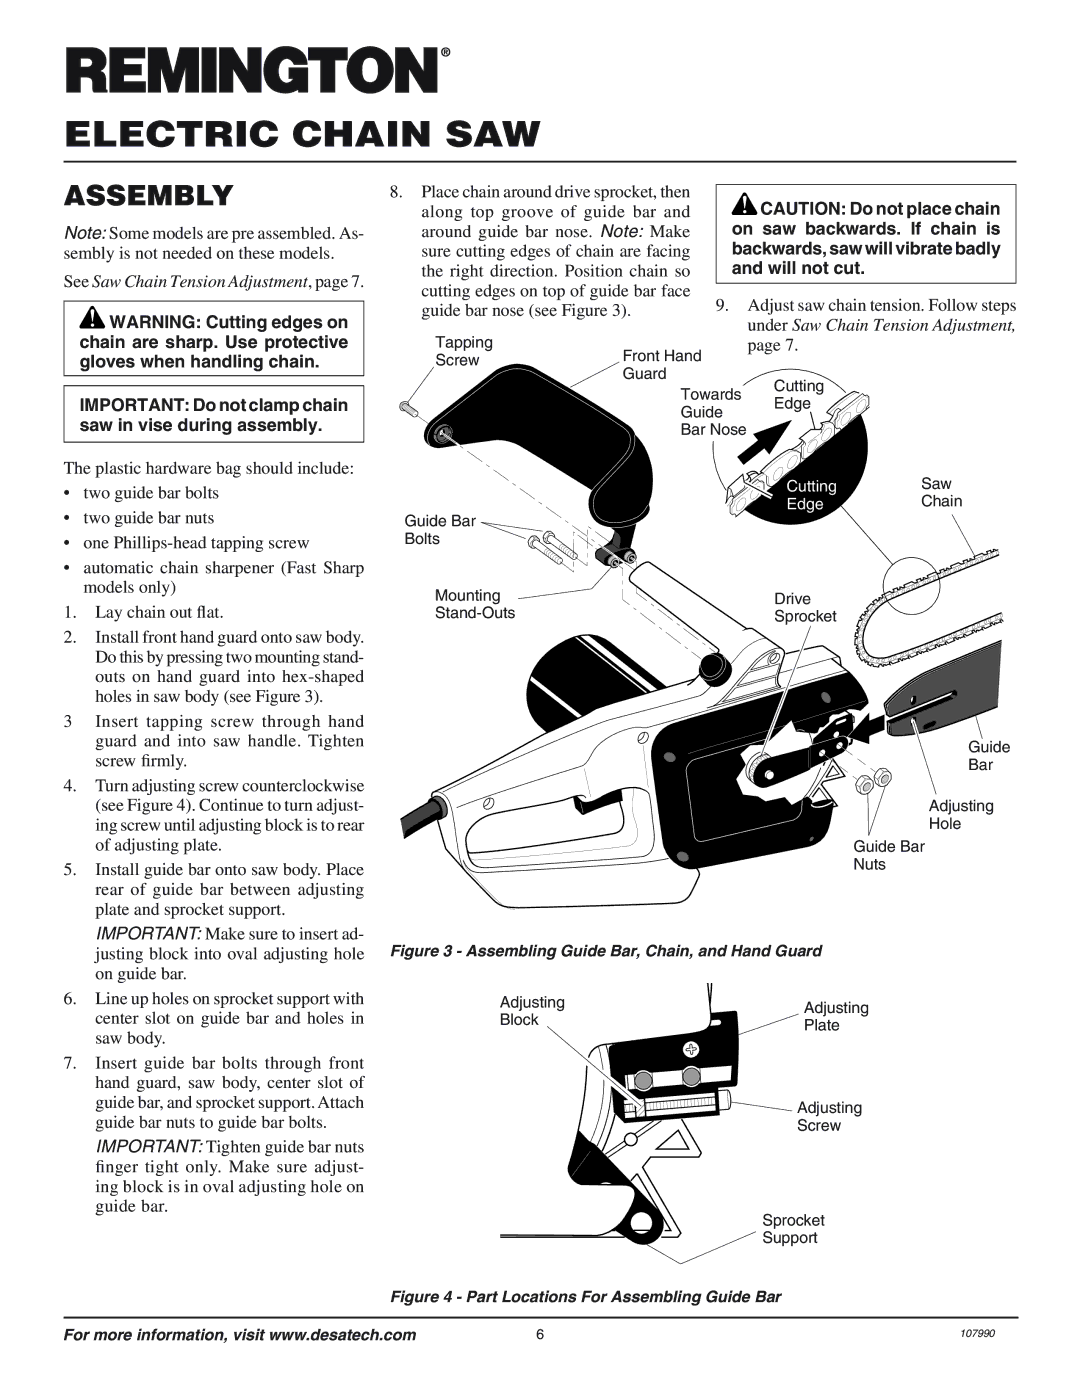
2.Install front hand guard onto saw body. Do this by pressing two mounting stand- outs on hand guard into hex-shaped holes in saw body (see Figure 3).

3Insert tapping screw through hand guard and into saw handle. Tighten screw firmly.

4.Turn adjusting screw counterclockwise (see Figure 4). Continue to turn adjust- ing screw until adjusting block is to rear of adjusting plate.

5.Install guide bar onto saw body. Place rear of guide bar between adjusting plate and sprocket support.

IMPORTANT: Make sure to insert ad- justing block into oval adjusting hole on guide bar.

6.Line up holes on sprocket support with center slot on guide bar and holes in saw body.

7.Insert guide bar bolts through front hand guard, saw body, center slot of guide bar, and sprocket support. Attach guide bar nuts to guide bar bolts.

IMPORTANT: Tighten guide bar nuts finger tight only. Make sure adjust- ing block is in oval adjusting hole on guide bar.

8. Place chain around drive sprocket, then


CAUTION: Do not place chain

along top groove of guide bar and


around guide bar nose. Note: Make


on saw backwards. If chain is

sure cutting edges of chain are facing


backwards, saw will vibrate badly

the right direction. Position chain so


and will not cut.


cutting edges on top of guide bar face

9.


Adjust saw chain tension. Follow steps

guide bar nose (see Figure 3).


under Saw Chain Tension Adjustment,

Tapping


Front Hand


page 7.


Screw


Guard


Cutting


Towards


Edge


Guide


Bar Nose


Cutting

Saw

Guide Bar


Edge

Chain


Bolts


Mounting


Drive


Stand-Outs


Sprocket


Guide

Bar

Adjusting

Hole

Guide Bar

Nuts

Figure 3 - Assembling Guide Bar, Chain, and Hand Guard

Adjusting

Adjusting

Block

Plate


Adjusting

Screw

Sprocket

Support

Figure 4 - Part Locations For Assembling Guide Bar

For more information, visit www.desatech.com

6

107990

Page 6
Image 6
Desa 107714-02, 100089-04, 098031J Assembly, On saw backwards. If chain is, Backwards, saw will vibrate badly, Will not cut

107714-02, 100089-06, 099039J, 099178H, 100089-04 specifications

Desa 100089-05, 100089-08, 098031J, 100089-04, and 099178H represent a series of advanced heating technologies utilized primarily in residential and commercial applications. Each model is designed to effectively provide warmth while optimizing energy usage and enhancing user comfort.

The Desa 100089-05 is characterized by its energy-efficient design, which allows for significant reductions in heating costs. This model features a powerful heater core that quickly generates heat, ensuring spaces are efficiently warmed in a short amount of time. An intuitive control system allows users to set desired temperatures easily, providing a perfect balance between comfort and energy conservation.

Moving on to the Desa 100089-08, this model integrates advanced safety features, such as automatic shut-off mechanisms and overheat protection. These innovations are essential for peace of mind, especially in homes with children or pets. The 100089-08 also boasts a sleek design, making it an aesthetically pleasing addition to any room. Its quiet operation is another advantage, enabling it to function without disrupting daily activities or sleep.

The Desa 098031J offers versatility, suitable for both indoor and outdoor use. It leverages advanced radiant heating technology for an even distribution of warmth, making it ideal for patios or garages. Users appreciate its portability, allowing for easy transfer from one location to another. This model also features adjustable settings, accommodating various heating needs, from a cozy evening outdoors to a quick warm-up in a chilly garage.

Desa 100089-04 embraces efficiency through its innovative insulation technologies. This model minimizes heat loss and maximizes performance, allowing for longer operating times without the need for frequent refueling. It also includes programmable timer functions, enabling users to schedule heating according to their lifestyle, thus enhancing convenience and energy savings.

Lastly, the Desa 099178H stands out for its eco-friendly design. With a focus on renewable energy sources, this model incorporates solar heating technology, targeting a reduction in fossil fuel reliance. The 099178H offers users the opportunity to lower their carbon footprint while enjoying consistent heating. Its user-friendly interface includes real-time monitoring of energy consumption, empowering users to make informed decisions about their heating needs.

In summary, the Desa models 100089-05, 100089-08, 098031J, 100089-04, and 099178H each bring unique features and technologies designed to enhance heating efficiency, safety, and environmental sustainability. These innovations not only cater to diverse heating requirements but also prioritize user comfort and convenience.