Manuals
/
Desa
/
Household Appliance
/
Indoor Fireplace
Desa
103426-01 Checking Gas Connections, Pressure Testing Gas Supply Piping System, Installation
Models:
103426-01
1
11
32
32
Download
32 pages
31.72 Kb
8
9
10
11
12
13
14
15
Troubleshooting
Specifications
Install
Parts list
Connecting To Gas Supply
Warranty
Maintenance
Observed Problem
Accessories
Manual Lighting Procedure
Page 11
Image 11
Page 10
Page 12
Page 11
Image 11
Page 10
Page 12
Contents
—WHAT TO DO IF YOU SMELL GAS
OWNER’S OPERATION AND INSTALLATION MANUAL
where not prohibited by state or local codes
DESA INTERNATIONAL
WARNINGS
SAFETY INFORMATION
UNVENTED NATURAL GAS LOG HEATER
LOCAL CODES
PRODUCT FEATURES
Safety Device
PRODUCT IDENTIFICATION
Unusually Tight Construction
AIR FOR COMBUSTION AND VENTILATION
PROVIDING ADEQUATE VENTILATION
DETERMINING AIR FLOW FOR HEATER LOCATION
Ventilation Air From Outdoors
Continued
VENTILATION AIR
Ventilation Air From Inside Building
CHECK GAS TYPE
INSTALLATION
INSTALLATION AND CLEARANCES
If Not Using Mantel
INSTALLATION
If Using Mantel
Mantel Clearances
Determining Minimum Mantel Clearance
Continued
Floor Clearances
INSTALLATION
UNVENTED NATURAL GAS LOG HEATER
Continued
INSTALLING HEATER BASE ASSEMBLY
Installation Items Needed
INSTALLATION
UNVENTED NATURAL GAS LOG HEATER
CONNECTING TO GAS SUPPLY
INSTALLATION
Installation Items Needed
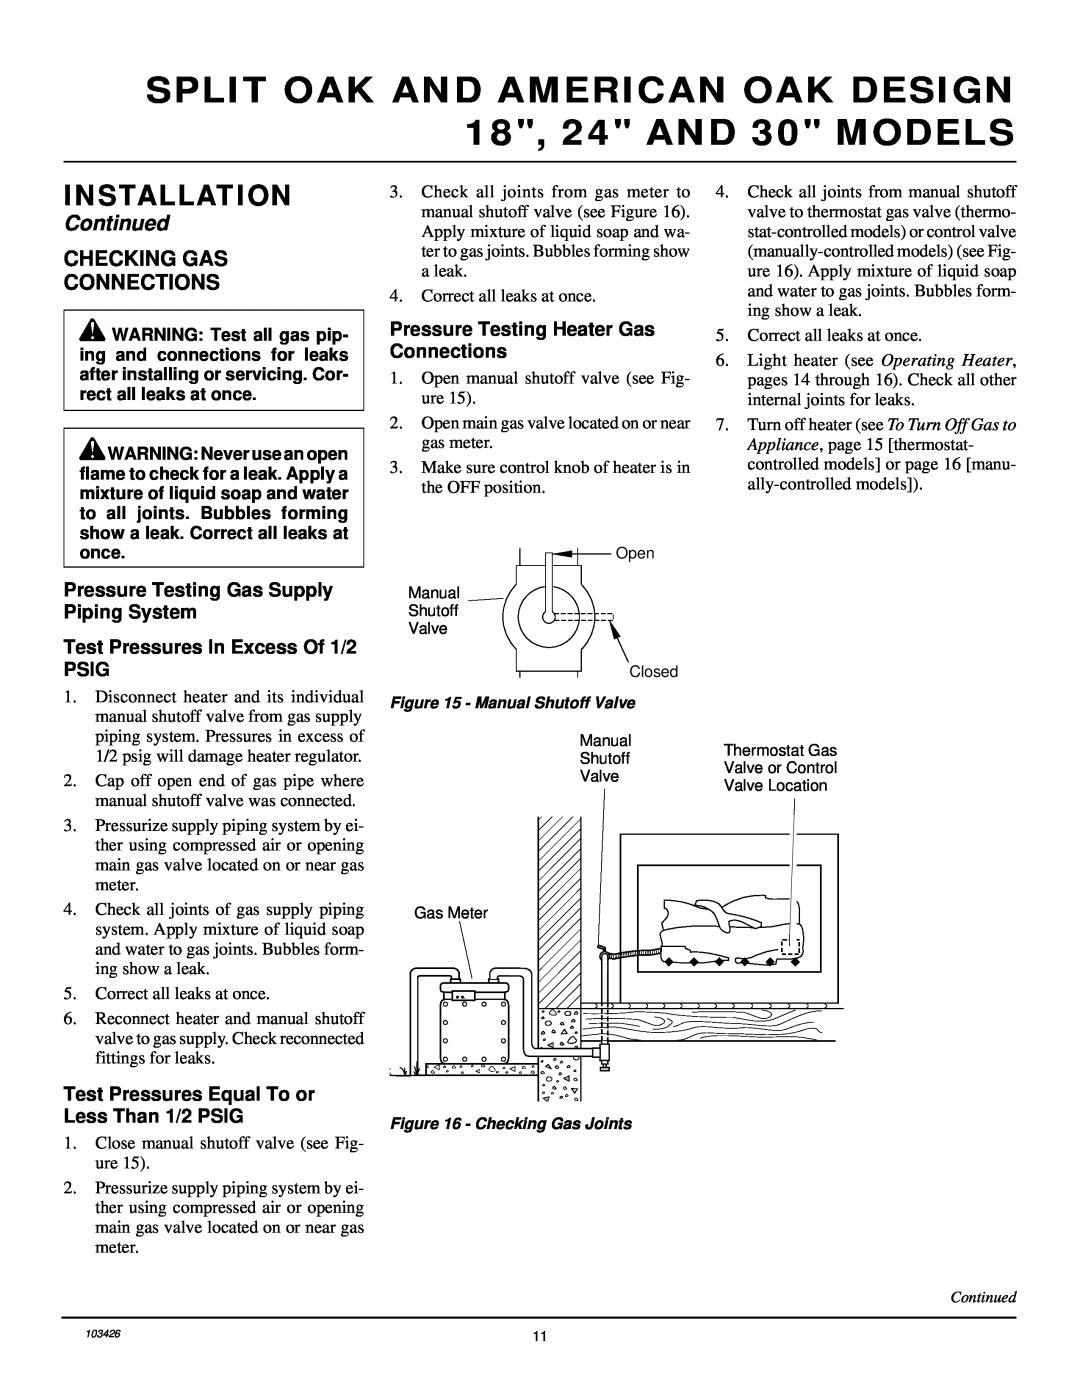
Test Pressures In Excess Of 1/2 PSIG
Pressure Testing Gas Supply Piping System
Pressure Testing Heater Gas Connections
CHECKING GAS CONNECTIONS
Continued
INSTALLING LOGS American Oak Design Models
INSTALLATION
UNVENTED NATURAL GAS LOG HEATER
Figure 24 - Installing Top Log #4
INSTALLING LOGS Split Oak Design Models
INSTALLATION
Figure 22 - Installing Bottom Middle Log
LIGHTING INSTRUCTIONS
Thermostat-ControlledModels FOR YOUR SAFETY
OPERATING HEATER
READ BEFORE LIGHTING
TO TURN OFF GAS TO APPLIANCE
MANUAL LIGHTING PROCEDURE
Manually-ControlledModels FOR YOUR SAFETY
Thermostat Controlled Models
PILOT FLAME PATTERN
INSPECTING BURNERS
Manually-ControlledModels
VARIABLE CONTROL OPERATION
LOGS
CLEANING AND MAINTENANCE
FRONT BURNER FLAME PATTERN
ODS/PILOT AND BURNERS
REMEDY
TROUBLESHOOTING
OBSERVED PROBLEM
POSSIBLE CAUSE
Continued
TROUBLESHOOTING
OBSERVED PROBLEM
Maintenance, page
UNVENTED NATURAL GAS LOG HEATER
TROUBLESHOOTING
OBSERVED PROBLEM
Maintenance, page
For Masonry and Factory- built Metal Fireplace
OPTIONAL POSITIONING OF THERMOSTAT SENSING BULB
TECHNICAL SERVICE
SPECIFICATIONS
REPLACEMENT PARTS
SERVICE HINTS
BRASS FIREPLACE HOOD - GA6052
ACCESSORIES
MANUAL SHUTOFF VALVE - GA5010
BLACK FIREPLACE HOOD - GA6050
UNVENTED NATURAL GAS LOG HEATER
ILLUSTRATED PARTS BREAKDOWN4
Variable Manually Controlled Models VS18NVB
CFS18NVB VS24NVB CFS24NVB VS30NVB CFS30NVB
VS18NVB/CFS18NVB
PARTS LIST
Variable Manually-ControlledSplit Oak Models
PART NUMBER FOR
UNVENTED NATURAL GAS LOG HEATER
ILLUSTRATED PARTS BREAKDOWN
VS18NTA
Thermostat-ControlledSplit Oak Models
PARTS LIST
PART NUMBER FOR
UNVENTED NATURAL GAS LOG HEATER
ILLUSTRATED PARTS3 BREAKDOWN
Variable Manually-Controlled Models VL18NV VL24NV
VL30NV
VL18NV
Variable Manually-ControlledAmerican Oak Models
PARTS LIST
PART NUMBER FOR
UNVENTED NATURAL GAS LOG HEATER
Page
NOT A UPC
LIMITED WARRANTY VENT-FREENATURAL GAS LOG HEATERS
WARRANTY INFORMATION
Top
Page
Image
Contents