Desa CF26PT installation manual Installing Blower Assembly GA3450T, AttachingBrassTrimtoFireplace

Models: CF26PT

1 30
Download 30 pages 7.01 Kb
Page 10
Image 10

CF26PT

VENT-FREE PROPANE/LP BAY FRONT FIREPLACE

INSTALLATION

Continued

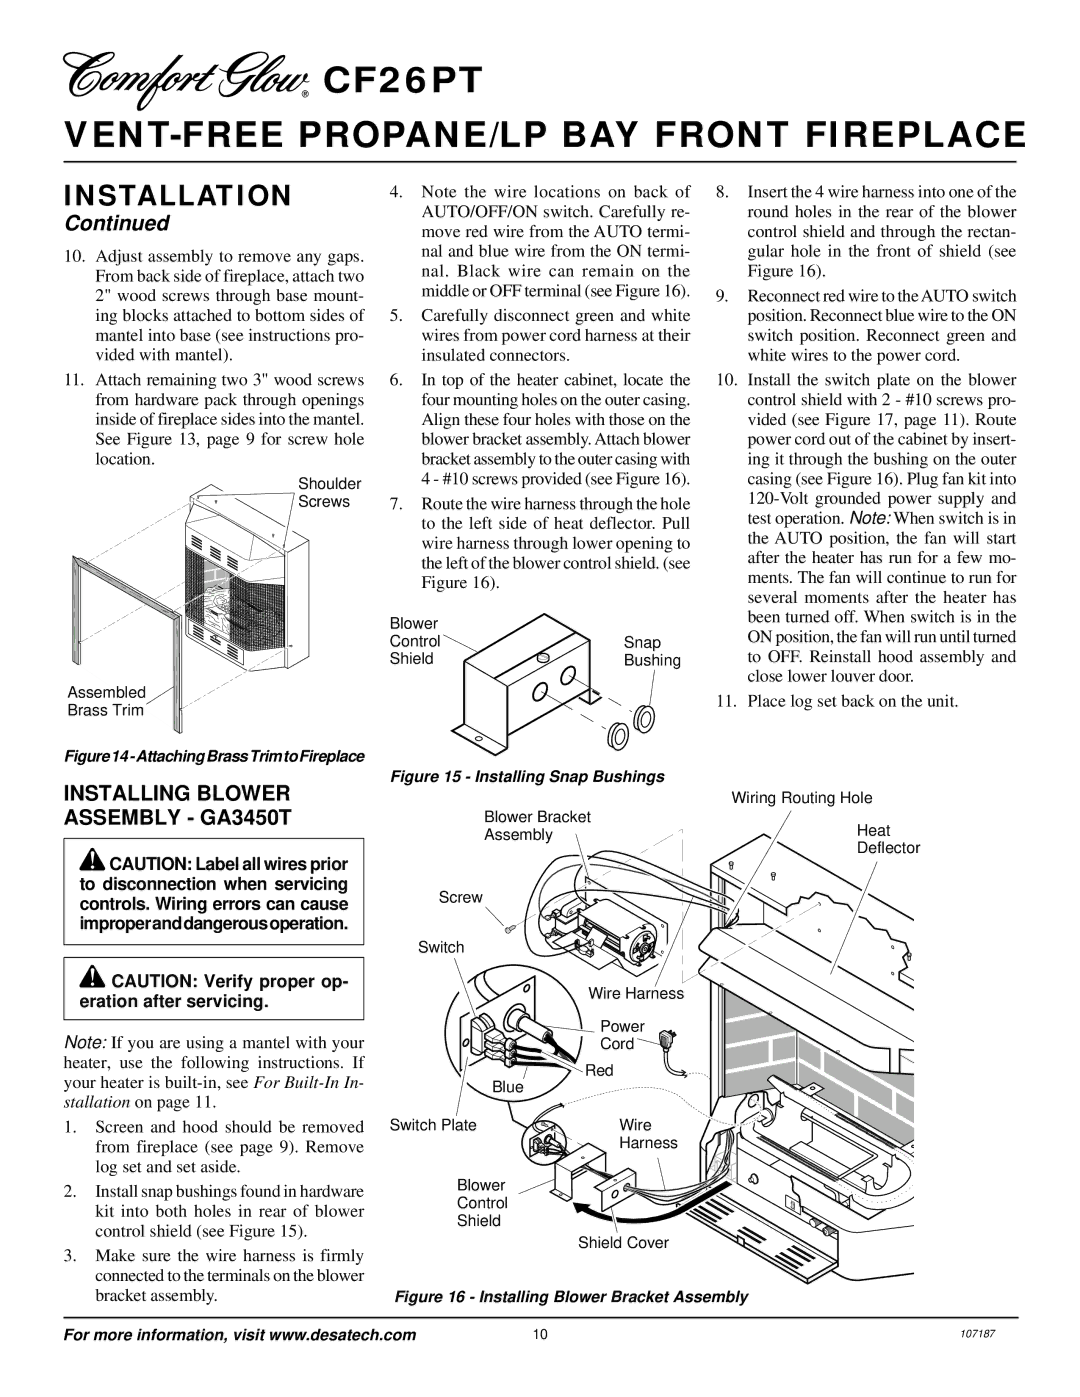
10.Adjust assembly to remove any gaps. From back side of fireplace, attach two 2" wood screws through base mount- ing blocks attached to bottom sides of mantel into base (see instructions pro- vided with mantel).

11.Attach remaining two 3" wood screws from hardware pack through openings inside of fireplace sides into the mantel. See Figure 13, page 9 for screw hole location.

Shoulder

Screws

Assembled

Brass Trim

Figure14-AttachingBrassTrimtoFireplace

4.Note the wire locations on back of AUTO/OFF/ON switch. Carefully re- move red wire from the AUTO termi- nal and blue wire from the ON termi- nal. Black wire can remain on the middle or OFF terminal (see Figure 16).

5.Carefully disconnect green and white wires from power cord harness at their insulated connectors.

6.In top of the heater cabinet, locate the four mounting holes on the outer casing. Align these four holes with those on the blower bracket assembly. Attach blower bracket assembly to the outer casing with 4 - #10 screws provided (see Figure 16).

7.Route the wire harness through the hole to the left side of heat deflector. Pull wire harness through lower opening to the left of the blower control shield. (see Figure 16).

Blower


Control

Snap

Shield

Bushing

8.Insert the 4 wire harness into one of the round holes in the rear of the blower control shield and through the rectan- gular hole in the front of shield (see Figure 16).

9.Reconnect red wire to the AUTO switch position. Reconnect blue wire to the ON switch position. Reconnect green and white wires to the power cord.

10.Install the switch plate on the blower control shield with 2 - #10 screws pro- vided (see Figure 17, page 11). Route power cord out of the cabinet by insert- ing it through the bushing on the outer casing (see Figure 16). Plug fan kit into 120-Volt grounded power supply and test operation. Note: When switch is in the AUTO position, the fan will start after the heater has run for a few mo- ments. The fan will continue to run for several moments after the heater has been turned off. When switch is in the ON position, the fan will run until turned to OFF. Reinstall hood assembly and close lower louver door.

11.Place log set back on the unit.

INSTALLING BLOWER ASSEMBLY - GA3450T

CAUTION: Label all wires prior to disconnection when servicing controls. Wiring errors can cause improperanddangerousoperation.

CAUTION: Verify proper op- eration after servicing.

Note: If you are using a mantel with your heater, use the following instructions. If your heater is built-in, see For Built-In In- stallation on page 11.

1.Screen and hood should be removed from fireplace (see page 9). Remove log set and set aside.

2.Install snap bushings found in hardware kit into both holes in rear of blower control shield (see Figure 15).

3.Make sure the wire harness is firmly connected to the terminals on the blower bracket assembly.

Figure 15 - Installing Snap Bushings

Wiring Routing Hole

Blower Bracket

AssemblyHeat

Deflector

Screw


Switch


Wire Harness


Power


Cord


Red


Blue

Switch Plate

Wire


Harness

Blower

Control

Shield

Shield Cover

Figure 16 - Installing Blower Bracket Assembly

For more information, visit www.desatech.com

10

107187

Page 10
Image 10
Desa CF26PT installation manual Installing Blower Assembly GA3450T, AttachingBrassTrimtoFireplace

CF26PT specifications

Desa CF26PT is a modern and efficient heating solution designed for residential and commercial spaces, providing comfort and convenience in various environments. This appliance stands out with its remarkable features that cater to diverse user needs.

One of the main features of the Desa CF26PT is its powerful heating capacity. With an output of up to 26,000 BTUs, it is capable of warming large areas quickly and effectively. This makes it an ideal choice for homes with open floor plans or larger spaces that require consistent warmth during colder months.

The technology integrated into the Desa CF26PT is another defining characteristic. The unit employs advanced heating technology, ensuring that it operates efficiently and reliably. This not only maximizes performance but also minimizes energy consumption, making it a cost-effective option for consumers. The inclusion of a multi-directional vent ensures that heat is distributed evenly throughout the space, eliminating cold spots and providing a comfortable environment.

In terms of design, the Desa CF26PT is compact and versatile, allowing it to fit seamlessly into various room styles. Its aesthetic appeal ensures that it complements existing décor while offering practical functionality. The unit is also designed for easy installation, with straightforward guidelines that allow users to set it up quickly without needing professional assistance.

Safety features are paramount in the design of the Desa CF26PT. It comes equipped with an automatic shut-off feature that activates in the event of overheating, ensuring peace of mind for users. Additionally, the unit incorporates a sturdy construction, making it durable and capable of withstanding the rigors of daily use.

User-friendly controls are another highlight of the Desa CF26PT. The intuitive interface allows users to adjust settings easily, ensuring personalized comfort. Whether it's choosing the desired temperature or setting up a timer, the functionality enhances the user experience, making it accessible for individuals of all ages.

In summary, the Desa CF26PT stands out as a reliable heating solution, offering power, efficiency, and safety in a stylish, compact design. Its advanced technology, user-friendly operation, and robust safety features make it a prominent choice for those seeking effective heating solutions in their spaces.