GAS RESIDENTIAL HEATERS

INSTALLING

TO WALL

Continued

4.

If installing bottom mounting screw


into hollow or solid wall, install wall


anchor. Follow steps 1 through 5 under


Attaching To Wall Anchor Method, page


7.


If installing bottom mounting screw


into wall stud, drill hole at marked


location using 9/64" drill bit.

5.

Replace heater on wall.

6.

Insert bottom anchor screw through


back panel into bottom anchor or drilled


hole (see Figure 11).

7.

Tighten screw until heater is firmly


secured to wall. Do not over tighten.


Note: Do not replace front panel at this

CAUTION: Use only new, black iron or steel pipe. Inter- nally-tinned copper tubing may be used in certain areas. Check your local codes. Use pipe 3/8" diameter or greater to allow proper gas volume to heater. If pipe is too small, undue loss of pressure will occur.

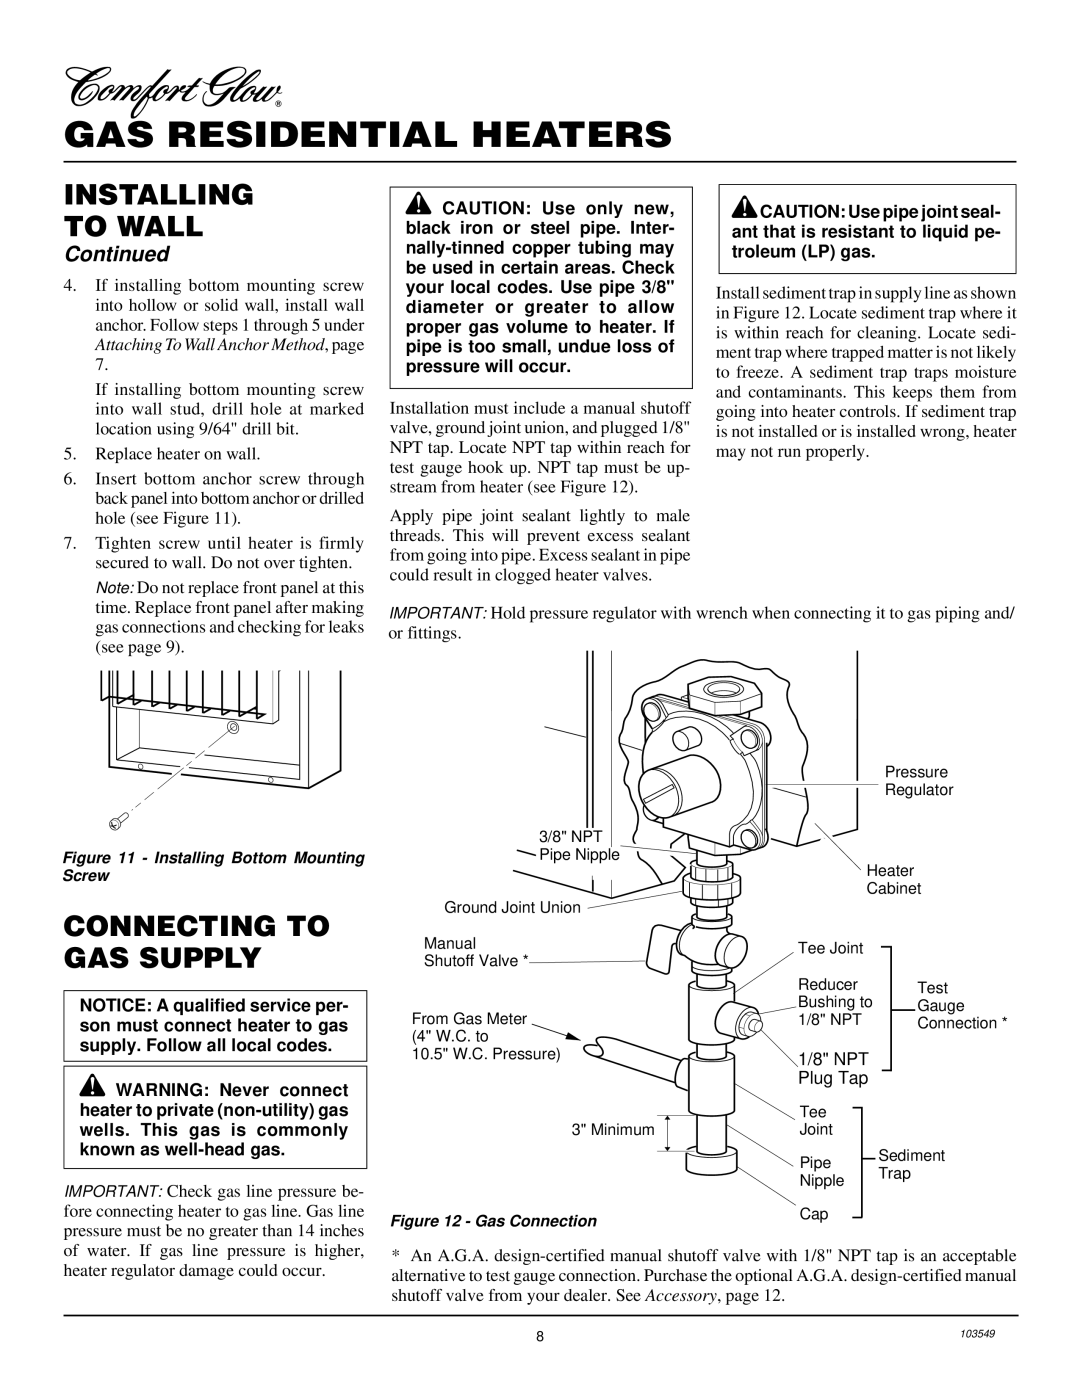
Installation must include a manual shutoff valve, ground joint union, and plugged 1/8" NPT tap. Locate NPT tap within reach for test gauge hook up. NPT tap must be up- stream from heater (see Figure 12).

Apply pipe joint sealant lightly to male threads. This will prevent excess sealant from going into pipe. Excess sealant in pipe could result in clogged heater valves.

CAUTION: Use pipe joint seal- ant that is resistant to liquid pe- troleum (LP) gas.

Install sediment trap in supply line as shown in Figure 12. Locate sediment trap where it is within reach for cleaning. Locate sedi- ment trap where trapped matter is not likely to freeze. A sediment trap traps moisture and contaminants. This keeps them from going into heater controls. If sediment trap is not installed or is installed wrong, heater may not run properly.

time. Replace front panel after making

gas connections and checking for leaks

(see page 9).

IMPORTANT: Hold pressure regulator with wrench when connecting it to gas piping and/ or fittings.

Figure 11 - Installing Bottom Mounting Screw

CONNECTING TO GAS SUPPLY

NOTICE: A qualified service per- son must connect heater to gas supply. Follow all local codes.

WARNING: Never connect heater to private (non-utility) gas wells. This gas is commonly known as well-head gas.

IMPORTANT: Check gas line pressure be- fore connecting heater to gas line. Gas line pressure must be no greater than 14 inches

3/8" NPT Pipe Nipple

Ground Joint Union

Manual

Shutoff Valve *

From Gas Meter (4" W.C. to

10.5" W.C. Pressure)

3" Minimum

Figure 12 - Gas Connection

Pressure

Regulator

Heater

Cabinet

Tee Joint


Reducer


Test

Bushing to


Gauge

1/8" NPT


Connection *

1/8" NPT


Plug Tap


Tee


Joint


Pipe


Sediment


Trap

Nipple


Cap


of water. If gas line pressure is higher, heater regulator damage could occur.

*An A.G.A. design-certified manual shutoff valve with 1/8" NPT tap is an acceptable alternative to test gauge connection. Purchase the optional A.G.A. design-certified manual shutoff valve from your dealer. See Accessory, page 12.

8

103549

Page 8
Image 8
Desa CGN10RL installation manual Connecting to GAS Supply, NPT Plug Tap

CGN10RL specifications

Desa CGN10RL is a state-of-the-art gas-powered generator designed for both residential and commercial applications, offering reliability and efficiency. With a robust 10,000-watt peak output and a continuous output of 8,000 watts, this generator ensures that users can power essential appliances and tools with ease, making it an ideal choice for home emergency power, outdoor activities, and job sites.

One of the main features of the Desa CGN10RL is its powerful engine, which is designed for durability and long life. The generator utilizes a 420cc engine that is specifically engineered to provide high performance under various conditions. This engine is equipped with an automatic voltage regulator that ensures stable output, protecting connected devices from voltage fluctuations. The recoil start system provides quick and reliable starting, even in cold weather.

The CGN10RL incorporates advanced noise reduction technologies, allowing for quieter operation compared to standard generators. This is particularly beneficial in residential areas or during nighttime use, where noise levels can be a concern. The design includes a soundproofing casing that minimizes noise output while maintaining excellent ventilation for cooling.

In terms of fuel efficiency, the Desa CGN10RL has a large fuel tank capacity of 7 gallons, which provides extended run times of up to 12 hours at half load. This means less frequent refueling, which is a significant advantage for users who need sustained power for extended periods. The generator is designed to run on standard propane or natural gas, giving users flexibility in fuel choices.

The generator is also equipped with multiple outlets, including 120V and 240V options, enabling users to connect various devices simultaneously. The inclusion of a 12V DC outlet adds versatility, allowing it to charge batteries and small electronics. Furthermore, the CGN10RL features built-in circuit breakers that protect against overloads, enhancing safety for users.

Portability is another key characteristic of the Desa CGN10RL. It comes with heavy-duty wheels and a comfortable handle, making transportation to different locations effortless. Its compact design allows for easy storage when not in use.

In summary, the Desa CGN10RL generator stands out with its powerful engine, advanced noise reduction, impressive fuel efficiency, versatile output options, and portability. These features make it a reliable choice for users looking for a high-quality generator that can handle a variety of applications while maintaining ease of use and safety.