Manuals
/
Desa
/
Household Appliance
/
Electric Heater
Desa
CGP10R Connecting To Gas Supply, Gas Residential Heaters, Installing To Wall, Continued
Models:
CGP10RL
CGP10R
1
8
20
20
Download
20 pages
11.63 Kb
5
6
7
8
9
10
11
12
Troubleshooting
Install
Parts list
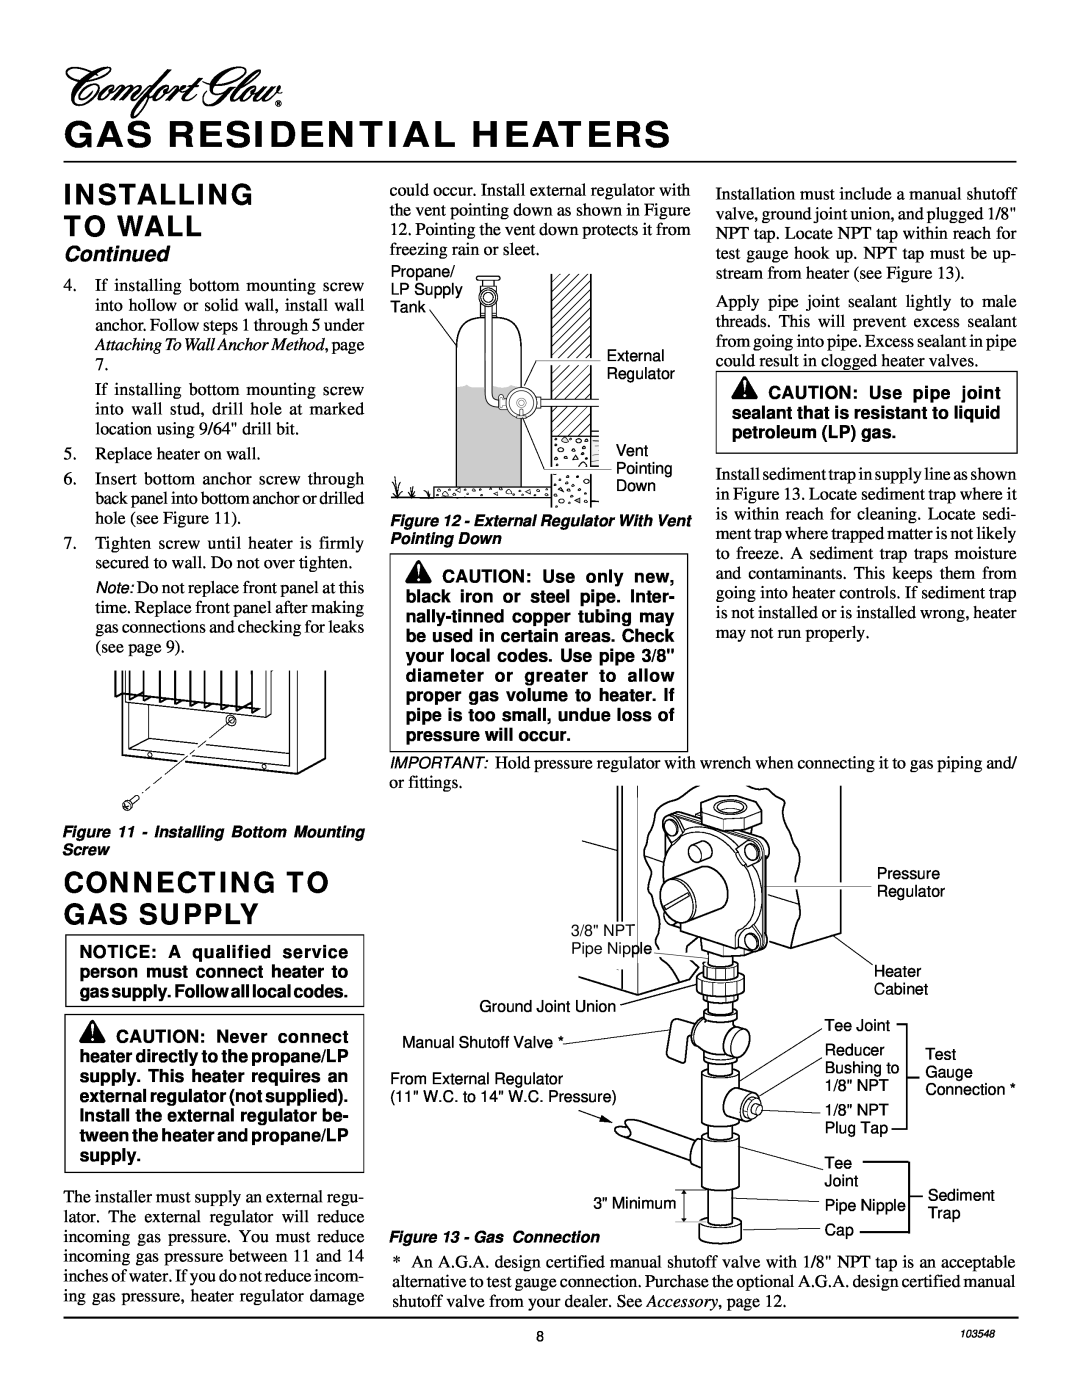
Connecting To Gas Supply
Warranty
Maintenance
Observedproblem
Manual Lighting Procedure
Safety
Page 8
Image 8
Page 7
Page 9
Page 8
Image 8
Page 7
Page 9
Contents
OWNER’S OPERATION AND INSTALLATION MANUAL
INFRARED VENT-FREEPROPANE/LP GAS HEATER
CGP10R
CGP10RL
SAFETY INFORMATION
PRODUCT FEATURES
GAS RESIDENTIAL HEATERS
LOCAL CODES
PRODUCT IDENTIFICATION
AIR FOR COMBUSTION AND VENTILATION
Unusually Tight Construction
PROVIDING ADEQUATE VENTILATION
Continued
GAS RESIDENTIAL HEATERS
AIR FOR COMBUSTION AND VENTILATION
DETERMINING AIR FLOW FOR HEATER LOCATION
AIR FOR COMBUSTION AND VENTILATION
Continued
Ventilation Air From Inside Building
Ventilation Air From Outdoors
INSTALLING TO WALL
INSTALLATION ITEMS
GAS RESIDENTIAL HEATERS
CHECK GAS TYPE
INSTALLING TO WALL
Installing Two Mounting Screws
Installing Bottom Mounting Screw
Continued
CONNECTING TO GAS SUPPLY
INSTALLING TO WALL
GAS RESIDENTIAL HEATERS
Continued
CHECKING GAS CONNECTIONS
PRESSURE TESTING GAS SUPPLY PIPING SYSTEM
PRESSURE TESTING HEATER GAS CONNECTIONS
Test Pressures In Excess Of 1/2 PSIG
FOR YOUR SAFETY READ BEFORE LIGHTING
OPERATING HEATER
LIGHTING INSTRUCTIONS
TO SELECT HEATING LEVEL
MANUAL LIGHTING PROCEDURE
INSPECTING BURNER
TO TURN OFF GAS TO APPLIANCE
OPERATING HEATER
SPECIFICATIONS
ACCESSORY
TROUBLESHOOTING
OBSERVED PROBLEM
TROUBLESHOOTING
OBSERVEDPROBLEM
Continued
POSSIBLE CAUSE
TECHNICAL SERVICE
SERVICE HINTS
TROUBLESHOOTING
OBSERVEDPROBLEM
CLEANING AND MAINTENANCE
REPLACEMENT PARTS
SERVICE PUBLICATIONS
PARTS CENTRALS
ILLUSTRATED PARTS BREAKDOWN CGP10R CGP10RL
GAS RESIDENTIAL HEATERS
8 4 7 22 25 5 6
GRH VP11A
PARTS LIST CGP10R CGP10RL
PART
NUMBER
DESCRIPTION
GAS RESIDENTIAL HEATERS
Page
COMFORT GLOW VENT-FREERESIDENTIAL GAS HEATERS
WARRANTY INFORMATION
LIMITED WARRANTY
Top
Page
Image
Contents