OWNER’S MANUAL

OPERATING

HEATER

Continued

MANUAL LIGHTING

PROCEDURE

1.Follow steps 1 through 5 under Light- ing Instructions, page 12.

2.With control knob pressed in, strike match. Hold match to pilot until pi- lot lights.

3.Keep control knob pressed in for 30 seconds after lighting pilot. After 30 seconds, release control knob. Follow steps 8 and 9 under Lighting Instruc- tions, page 12.

INSPECTING

BURNER

Check pilot flame pattern and burner flame pattern often.

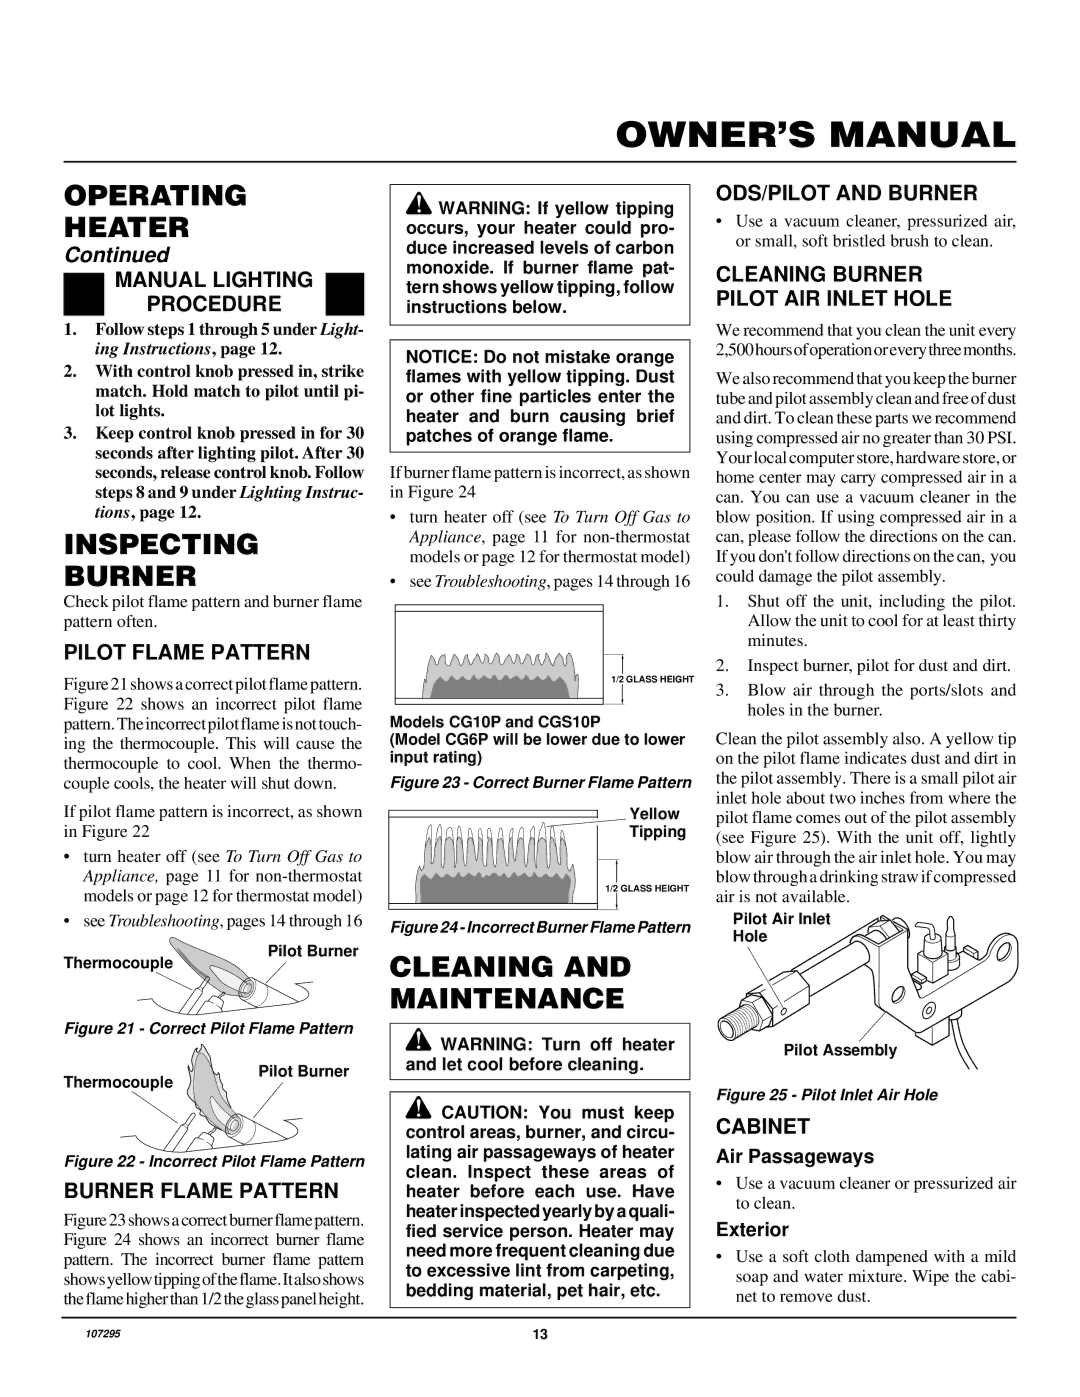
PILOT FLAME PATTERN

Figure 21 shows a correct pilot flame pattern. Figure 22 shows an incorrect pilot flame pattern. The incorrect pilot flame is not touch- ing the thermocouple. This will cause the thermocouple to cool. When the thermo- couple cools, the heater will shut down.

If pilot flame pattern is incorrect, as shown in Figure 22

turn heater off (see To Turn Off Gas to Appliance, page 11 for non-thermostat models or page 12 for thermostat model)

seeTroubleshooting, pages 14 through 16

Pilot Burner

Thermocouple

GOOD PILOT/LP

GRH/OV 007

Figure 21 - Correct Pilot Flame Pattern

WARNING: If yellow tipping occurs, your heater could pro- duce increased levels of carbon monoxide. If burner flame pat- tern shows yellow tipping, follow instructions below.

NOTICE: Do not mistake orange flames with yellow tipping. Dust or other fine particles enter the heater and burn causing brief patches of orange flame.

If burner flame pattern is incorrect, as shown in Figure 24

turn heater off (see To Turn Off Gas to Appliance, page 11 for non-thermostat models or page 12 for thermostat model)

seeTroubleshooting, pages 14 through 16

1/2 GLASS HEIGHT

Models CG10P and CGS10P

(Model CG6P will be lower due to lower input rating)

Figure 23 - Correct Burner Flame Pattern

Yellow

Tipping

1/2 GLASS HEIGHT

Figure 24 - Incorrect Burner Flame Pattern

CLEANING AND MAINTENANCE

WARNING: Turn off heater and let cool before cleaning.

ODS/PILOT AND BURNER

Use a vacuum cleaner, pressurized air, or small, soft bristled brush to clean.

CLEANING BURNER PILOT AIR INLET HOLE

We recommend that you clean the unit every 2,500hoursofoperationoreverythreemonths.

We also recommend that you keep the burner tube and pilot assembly clean and free of dust and dirt. To clean these parts we recommend using compressed air no greater than 30 PSI. Your local computer store, hardware store, or home center may carry compressed air in a can. You can use a vacuum cleaner in the blow position. If using compressed air in a can, please follow the directions on the can. If you don't follow directions on the can, you could damage the pilot assembly.

1.Shut off the unit, including the pilot. Allow the unit to cool for at least thirty minutes.

2.Inspect burner, pilot for dust and dirt.

3.Blow air through the ports/slots and holes in the burner.

Clean the pilot assembly also. A yellow tip on the pilot flame indicates dust and dirt in the pilot assembly. There is a small pilot air inlet hole about two inches from where the pilot flame comes out of the pilot assembly (see Figure 25). With the unit off, lightly blow air through the air inlet hole. You may blow through a drinking straw if compressed air is not available.

Pilot Air Inlet

Hole

Pilot Assembly

Thermocouple

Pilot Burner

BAD PILOT/LPGRH/OV 008

Figure 22 - Incorrect Pilot Flame Pattern

BURNER FLAME PATTERN

Figure 23 shows a correct burner flame pattern. Figure 24 shows an incorrect burner flame pattern. The incorrect burner flame pattern showsyellowtippingoftheflame.Italsoshows the flame higher than 1/2 the glass panel height.

CAUTION: You must keep control areas, burner, and circu- lating air passageways of heater clean. Inspect these areas of heater before each use. Have heater inspected yearly by a quali- fied service person. Heater may need more frequent cleaning due to excessive lint from carpeting, bedding material, pet hair, etc.

Figure 25 - Pilot Inlet Air Hole

CABINET

Air Passageways

Use a vacuum cleaner or pressurized air to clean.

Exterior

Use a soft cloth dampened with a mild soap and water mixture. Wipe the cabi- net to remove dust.

107295

13

Page 13
Image 13
Desa CG6P, CGS10P, CG10P installation manual Inspecting Burner, Cleaning and Maintenance

CG10P, CG6P, CGS10P specifications

Desa CGS10P, CG10P, and CG6P represent a line of advanced generator sets designed to meet the demanding energy needs of various applications, including residential, commercial, and industrial use. Their reliability and performance make them a popular choice among consumers looking for stable power solutions.

One of the standout features of the Desa CGS series is their robust engine technology. Each model is equipped with high-quality engines designed for efficiency and durability. The CGS10P, for example, features a powerful engine that delivers a substantial output, making it suitable for larger power requirements. The CG10P and CG6P, while slightly lower in output, still provide dependable power for most everyday applications.

The generators are equipped with advanced inverter technology, which allows them to produce clean and stable electricity. This is essential for powering sensitive electronics and appliances without the risk of surges or fluctuations that could lead to damage. The inverter technology also contributes to improved fuel efficiency, allowing users to maximize their runtime while minimizing fuel costs.

Portability is another critical characteristic of the Desa CGS series. These generators are designed with compactness in mind, making them easy to transport and store. Many models come with built-in handles and lightweight designs, allowing users to move them effortlessly for outdoor activities, camping, or emergency power situations.

The noise level of the Desa CGS series has been optimized to ensure a quieter operation compared to traditional generators. This acoustic engineering means that users can rely on these generators for power without disturbing neighbors or creating an unbearable noise during operation.

Safety features are paramount in the design of these generators. Each model includes automatic shut-off mechanisms that activate in case of low oil pressure or overheating, ensuring the longevity of the unit and the safety of users. Additionally, the CGS series often incorporates multiple outlets, providing versatility for connecting various devices.

In summary, the Desa CGS10P, CG10P, and CG6P generators combine advanced engine technology, inverter capabilities, and user-friendly design, making them ideal for diverse power needs. Their reliability, fuel efficiency, and safety features position them as excellent choices for anyone in need of a dependable power supply. Whether for home use, outdoor events, or as a backup during outages, these generators are equipped to handle a variety of situations efficiently.