18

FIREPLACE INSTALLATION

Installing Optional Blower Accessories (Cont.)

FIREPLACE INSTALLATION

Continued

Model BKT Installation

Note: When installing the BKT thermostatically-controlled blower, you must first secure the thermal switch bracket to the blower if it has not already been factory installed.

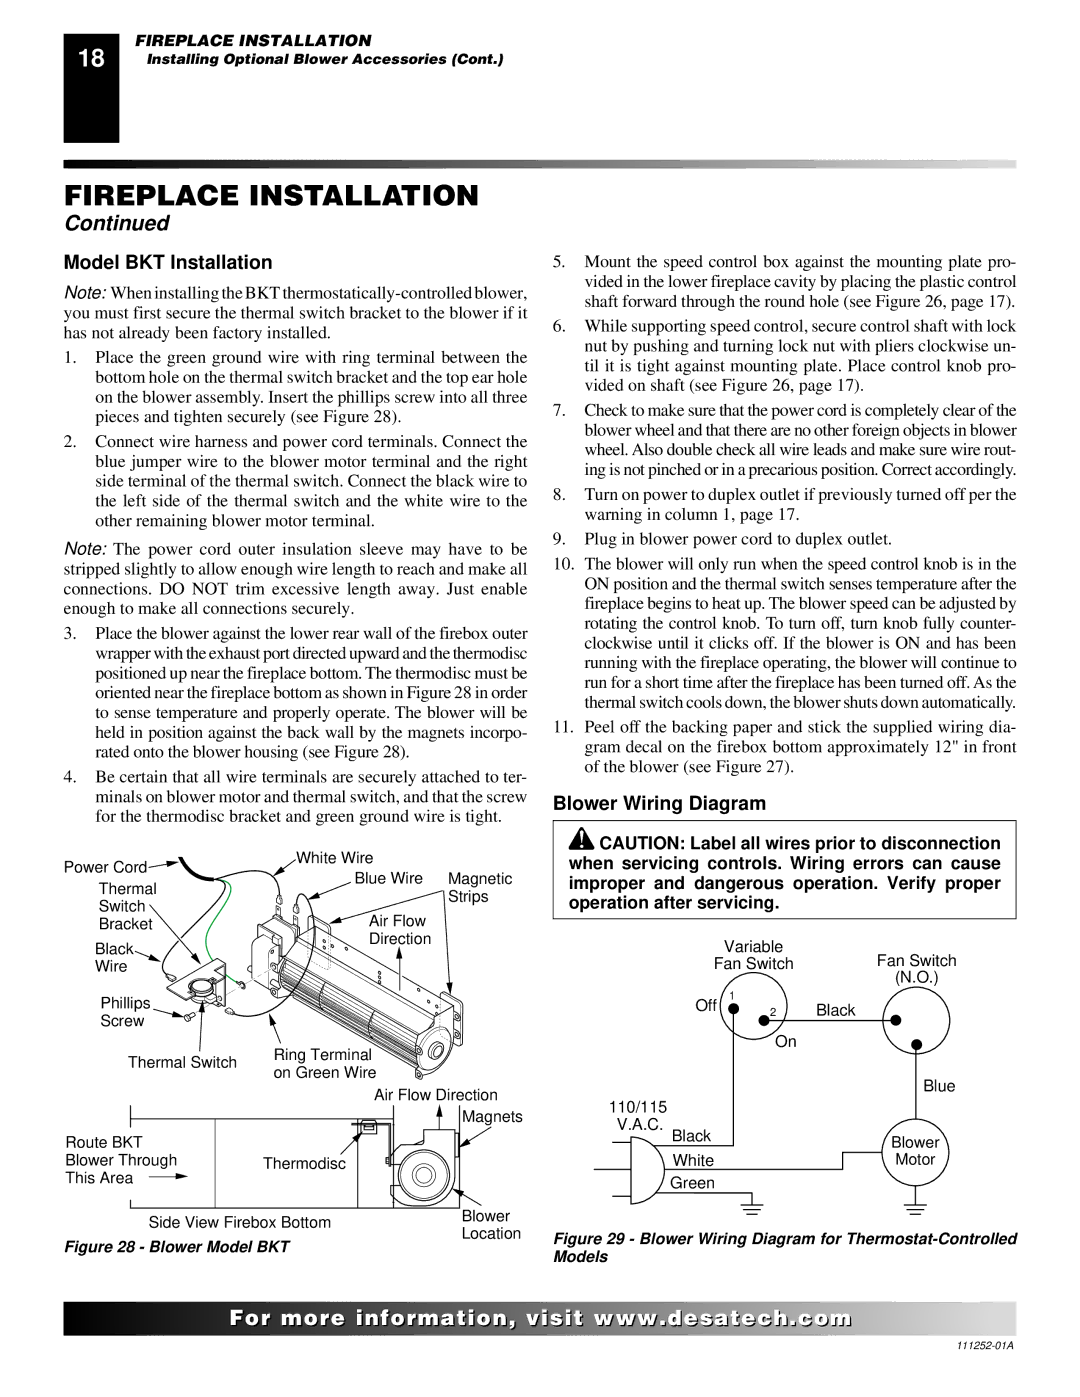
1.Place the green ground wire with ring terminal between the bottom hole on the thermal switch bracket and the top ear hole on the blower assembly. Insert the phillips screw into all three pieces and tighten securely (see Figure 28).

2.Connect wire harness and power cord terminals. Connect the blue jumper wire to the blower motor terminal and the right side terminal of the thermal switch. Connect the black wire to the left side of the thermal switch and the white wire to the other remaining blower motor terminal.

Note: The power cord outer insulation sleeve may have to be stripped slightly to allow enough wire length to reach and make all connections. DO NOT trim excessive length away. Just enable enough to make all connections securely.

3.Place the blower against the lower rear wall of the firebox outer wrapper with the exhaust port directed upward and the thermodisc positioned up near the fireplace bottom. The thermodisc must be oriented near the fireplace bottom as shown in Figure 28 in order to sense temperature and properly operate. The blower will be held in position against the back wall by the magnets incorpo- rated onto the blower housing (see Figure 28).

4.Be certain that all wire terminals are securely attached to ter- minals on blower motor and thermal switch, and that the screw for the thermodisc bracket and green ground wire is tight.

Power Cord

White Wire

Blue Wire Magnetic

Thermal

Strips

Switch

Air Flow

Bracket

Black

Direction


Wire


Phillips


Screw


Thermal Switch

Ring Terminal

on Green Wire


Air Flow Direction


Magnets

Route BKT


Blower Through

Thermodisc

This Area


Side View Firebox Bottom

Blower

Location

Figure 28 - Blower Model BKT


5.Mount the speed control box against the mounting plate pro- vided in the lower fireplace cavity by placing the plastic control shaft forward through the round hole (see Figure 26, page 17).

6.While supporting speed control, secure control shaft with lock nut by pushing and turning lock nut with pliers clockwise un- til it is tight against mounting plate. Place control knob pro- vided on shaft (see Figure 26, page 17).

7.Check to make sure that the power cord is completely clear of the blower wheel and that there are no other foreign objects in blower wheel. Also double check all wire leads and make sure wire rout- ing is not pinched or in a precarious position. Correct accordingly.

8.Turn on power to duplex outlet if previously turned off per the warning in column 1, page 17.

9.Plug in blower power cord to duplex outlet.

10.The blower will only run when the speed control knob is in the ON position and the thermal switch senses temperature after the fireplace begins to heat up. The blower speed can be adjusted by rotating the control knob. To turn off, turn knob fully counter- clockwise until it clicks off. If the blower is ON and has been running with the fireplace operating, the blower will continue to run for a short time after the fireplace has been turned off. As the thermal switch cools down, the blower shuts down automatically.

11.Peel off the backing paper and stick the supplied wiring dia- gram decal on the firebox bottom approximately 12" in front of the blower (see Figure 27).

Blower Wiring Diagram

CAUTION: Label all wires prior to disconnection when servicing controls. Wiring errors can cause improper and dangerous operation. Verify proper operation after servicing.


Variable

Fan Switch


Fan Switch


(N.O.)


Off 1

2

Black


On


Blue


110/115


V.A.C.


Black


Blower


White


Motor

Green

Figure 29 - Blower Wiring Diagram for Thermostat-Controlled Models

For..com

111252-01A

Page 18
Image 18
Desa CHDV36NRA installation manual Model BKT Installation, Blower Wiring Diagram

CHDV36NRA specifications

Desa CHDV36NRA is a robust and innovative heating solution designed to provide optimal comfort for residential and commercial spaces. This versatile unit is specifically engineered to deliver efficient warmth during the colder months while maintaining energy efficiency, making it an ideal choice for homeowners and businesses alike.

One of the main features of the Desa CHDV36NRA is its powerful heating capacity. With a heat output rating suitable for medium to large rooms, this unit ensures that spaces are warmed quickly and uniformly. It operates using natural gas or propane, giving users the flexibility to choose their preferred fuel source based on availability and cost.

Energy efficiency is a key characteristic of the CHDV36NRA. This model is equipped with advanced heating technologies, such as an electronic ignition system, which eliminates the need for standing pilot lights. This not only conserves energy but also enhances safety by reducing the risk of gas leaks. Additionally, the unit boasts a high efficiency rating, allowing users to save on energy bills without sacrificing comfort.

The design of the Desa CHDV36NRA combines functionality with aesthetics. Its sleek and modern appearance allows it to blend seamlessly with various interior styles. The unit is available in different finishes, enabling users to select one that complements their décor. The large viewing window provides an inviting view of the flames, creating a cozy ambiance in any space.

Another notable feature of the CHDV36NRA is its user-friendly controls. The unit comes with a remote control option, allowing users to adjust settings effortlessly from a distance. This convenience is enhanced by programmable thermostats that help maintain desired temperatures while optimizing energy consumption.

Safety is a top priority for the Desa CHDV36NRA. The unit is designed with multiple safety features, including an automatic shut-off system that activates in case of abnormal operation. This ensures peace of mind for users, knowing that their heater is equipped to handle unforeseen situations.

In summary, the Desa CHDV36NRA stands out for its efficient heating capabilities, modern design, and user-friendly features. With a focus on energy conservation and safety, it is an excellent choice for those seeking reliable and effective heating solutions for their spaces. As homeowners and businesses look to improve their heating systems, the Desa CHDV36NRA represents an ideal combination of performance, efficiency, and style.