OWNER’S MANUAL

INSTALLATION

Continued

2.Replace the injector (see Figure 17) with the propane/LP pilot injector with the red stripe.

3.Replace and tighten the pilot line to the bracket.

4.Continue with step 3 under Natural Gas Installation, page 10.

Pilot

Injector

Figure 17 - Installing Propane/LP Pilot Orifice

TESTING BURNER FOR LEAKS

1.Generously apply soapy solution to all connections.

WARNING: Never check for gas leaks with open flame.

2.Light the burner with the shut-off valve no more than half open and holding a match slightly in front of the pan (see Lighting Instructions, page 12).

3.Inspect all connections for bubbles, raw gas odor, or flame from any area other than the burner (leaks). If leaks are de- tected, shut off the gas valve immedi- ately. Tighten, or reassemble the loose connection(s) using pipe joint com- pound until burner system is leak free.

4.When the burner is tested and leak free, observe the individual tongues of flame on the burner. Note: The burner design includes more ports on the outside of the bar. Make sure that all ports are clear and producing flame evenly across the burner. If any ports appear blocked, clear them by removing the burner manifold and reaming the ports with a modified paper clip or other suitable tool.

5.When finished testing, turn the gas shut- off valve OFF to extinguish all flames.

ADDING PAN MATERIAL

1.Open the bag of Ash Bed Material (ver- miculite) and spread it evenly across the burner pan to the top. You may over- flow the front and sides of the pan to cover the entire pan and connecting hardware. Do not cover GA9050 series or GA9150 series valve.

2.Open the glowing embers and evenly cover the Ash Bed Material (vermicu- lite) in the burner pan.

INSTALLING THE GRATE AND LOGS

1.Place the grate over the burner pan where the two outer horizontal supports on the grate fit into the two pan posi- tioning notches in the rear vertical edge of the pan.

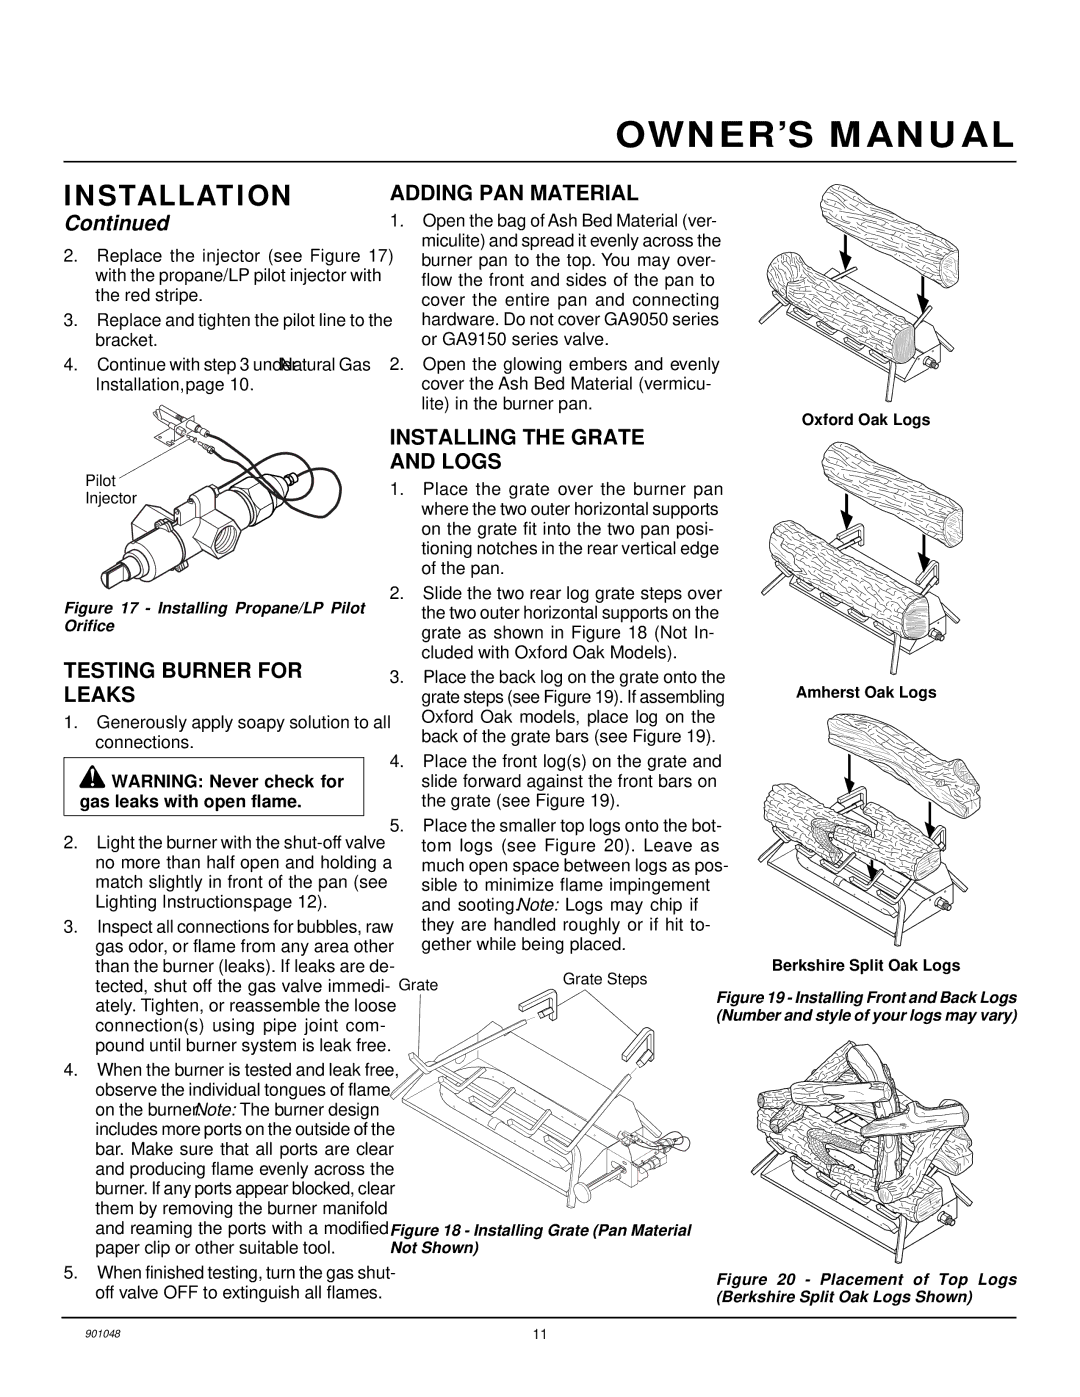
2.Slide the two rear log grate steps over the two outer horizontal supports on the grate as shown in Figure 18 (Not In- cluded with Oxford Oak Models).

3.Place the back log on the grate onto the grate steps (see Figure 19). If assembling Oxford Oak models, place log on the back of the grate bars (see Figure 19).

4.Place the front log(s) on the grate and slide forward against the front bars on the grate (see Figure 19).

5.Place the smaller top logs onto the bot- tom logs (see Figure 20). Leave as much open space between logs as pos- sible to minimize flame impingement and sooting. Note: Logs may chip if they are handled roughly or if hit to- gether while being placed.

Grate

Grate Steps


Figure 18 - Installing Grate (Pan Material Not Shown)

Oxford Oak Logs

Amherst Oak Logs

Berkshire Split Oak Logs

Figure 19 - Installing Front and Back Logs (Number and style of your logs may vary)

Figure 20 - Placement of Top Logs (Berkshire Split Oak Logs Shown)

901048

11

Page 11
Image 11
Desa CPVSR24, CPVSR18, CVDR24, CVSR18, CVSR24 Testing Burner for Leaks, Adding PAN Material, Installing the Grate and Logs

CPVSR18, and CVDR30, CPVSR24, CVSR24, CVDR24 specifications

Desa CVSR18, CVDR18, CVDR24, CVSR24, and CPVSR24 are a range of advanced heating solutions designed for various industrial and commercial applications. These systems combine a sophisticated blend of technology, efficiency, and ease of use, making them ideal for maintaining optimal thermal comfort.

The CVSR and CVDR series feature a unique vertical design that maximizes space efficiency while ensuring powerful heating capabilities. The model names indicate their heating capacities, with CVSR18 and CVDR18 offering output ratings of 18 kW, and the CVDR24 and CVSR24 providing a robust 24 kW. This scalability makes them suitable for a wide variety of environments, from large warehouses to smaller industrial facilities.

One of the key characteristics of these units is their high efficiency. Employing advanced combustion technology, the Desa heating systems reduce energy consumption while delivering superior heating performance. This not only translates to lower operational costs but also contributes to a reduced environmental footprint, aligning with contemporary sustainability goals.

The CVSR series utilizes a sealed combustion design, meaning that air is drawn from outside the building for combustion, improving indoor air quality and comfort. Meanwhile, the CVDR variants are designed for direct vent applications, allowing for flexible installation options. The direct vent feature ensures that exhaust gases are effectively expelled outside without interfering with indoor air circulation.

In addition to their energy efficiency and innovative design, the CPVSR24 model stands out due to its enhanced control capabilities. It includes smart technology integration that allows for remote monitoring and management, offering users greater control over their heating systems. This feature is particularly beneficial for businesses seeking to optimize operational efficiency by adjusting heating output based on real-time conditions.

Another notable aspect of these models is their durability. Constructed with robust materials, the Desa models are designed to withstand harsh operating conditions. Regular maintenance is made straightforward, ensuring longevity and reliability in performance.

Overall, Desa CVSR18, CVDR18, CVDR24, CVSR24, and CPVSR24 represent a comprehensive suite of heating solutions that prioritize performance, convenience, and sustainability. Their innovative features make them a strategic choice for those looking to enhance their heating systems while minimizing energy consumption and environmental impact.