VANGUARD
UNVENTED
INSTALLATION
Continued
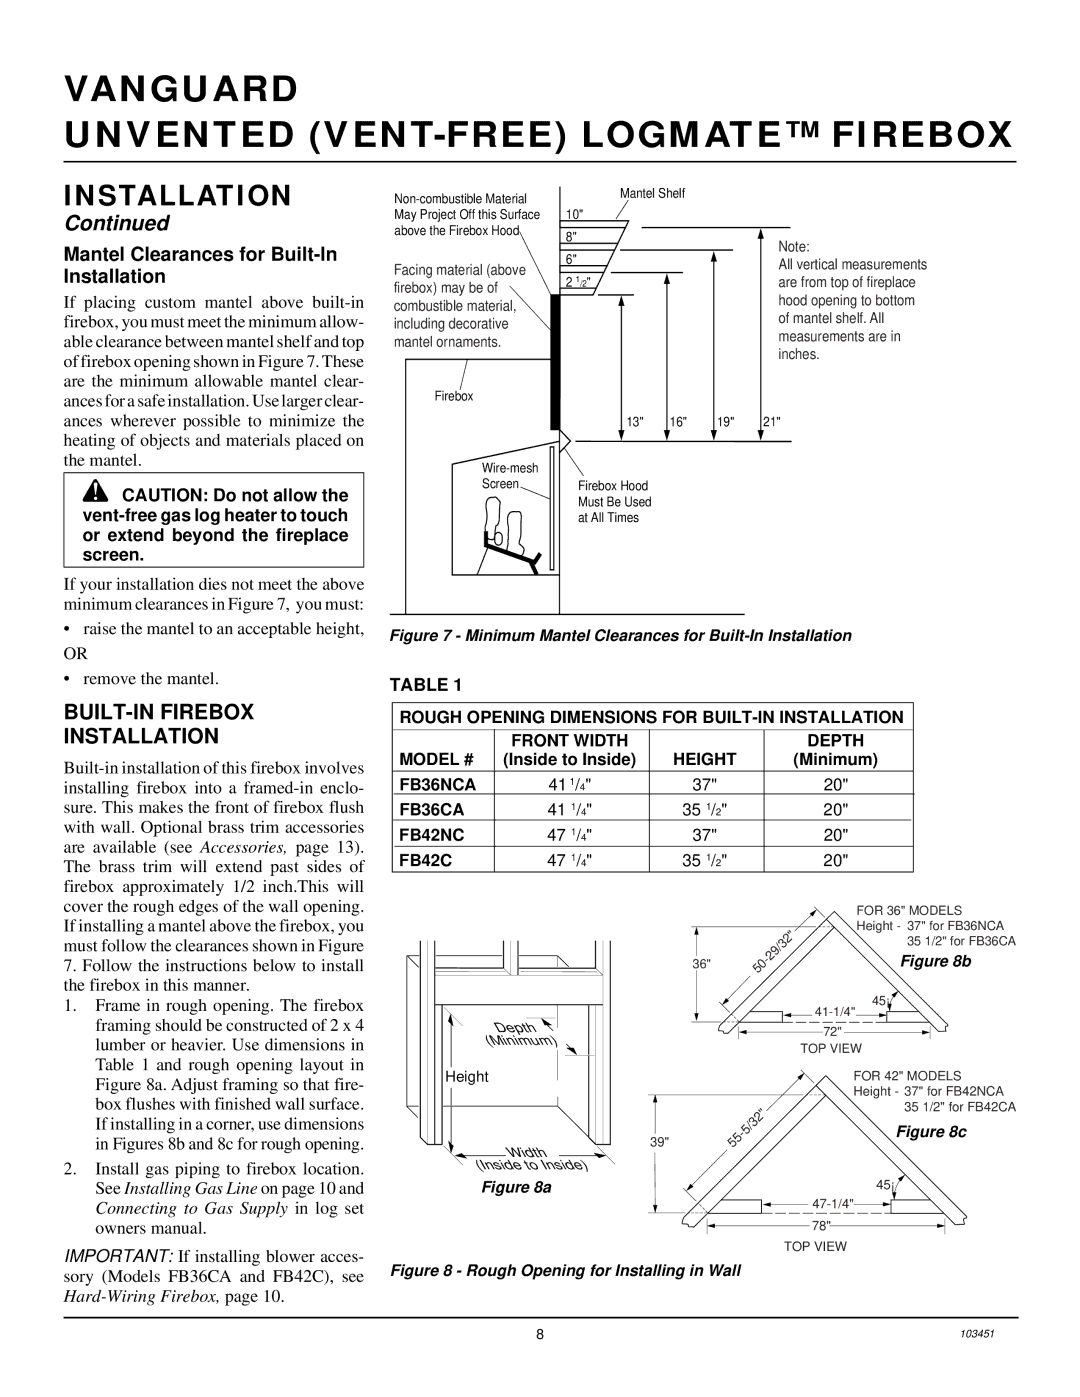
Mantel Clearances for Built-In Installation
If placing custom mantel above
![]() CAUTION: Do not allow the
CAUTION: Do not allow the
If your installation dies not meet the above minimum clearances in Figure 7, you must:
Facing material (above firebox) may be of combustible material, including decorative mantel ornaments.
Firebox
Screen
Mantel Shelf
8"
6"
2 1/2"
13" | 16" |
Firebox Hood
Must Be Used
at All Times
19"
Note:
All vertical measurements are from top of fireplace hood opening to bottom of mantel shelf. All measurements are in inches.
21"
•raise the mantel to an acceptable height,
OR
•remove the mantel.
BUILT-IN FIREBOX
INSTALLATION
7.Follow the instructions below to install the firebox in this manner.
Figure 7 - Minimum Mantel Clearances for Built-In Installation
TABLE 1
ROUGH OPENING DIMENSIONS FOR
|
| FRONT WIDTH |
| DEPTH | |
| MODEL # | (Inside to Inside) | HEIGHT | (Minimum) | |
|
|
|
|
|
|
| FB36NCA | 41 1/4" | 37" | 20" |
|
| FB36CA | 41 1/4" | 35 1/2" | 20" |
|
| FB42NC | 47 1/4" | 37" | 20" |
|
| FB42C | 47 1/4" | 35 1/2" | 20" |
|
|
|
| FOR 36" MODELS | |
|
|
| Height - 37" for FB36NCA | |
|
| |||
|
| 35 1/2" for FB36CA | ||
|
| Figure 8b | ||
36" | ||||
50 | ||||
|
|
| ||
|
|
| 45° | |
1. Frame in rough opening. The firebox |
framing should be constructed of 2 x 4 |
lumber or heavier. Use dimensions in |
Table 1 and rough opening layout in |
Figure 8a. Adjust framing so that fire- |
box flushes with finished wall surface. |
If installing in a corner, use dimensions |
in Figures 8b and 8c for rough opening. |
2. Install gas piping to firebox location. |
See Installing Gas Line on page 10 and |
Connecting to Gas Supply in log set |
owners manual. |
IMPORTANT: If installing blower acces- sory (Models FB36CA and FB42C), see
Depth (Minimum)
Height
| 39" | |
Width | 55 | |
| ||
|
| |
(InsidetoInside) |
|
|
Figure 8a
Figure 8 - Rough Opening for Installing in Wall
![]()
![]()
![]()
72"
TOP VIEW
FOR 42" MODELS Height - 37" for FB42NCA
35 1/2" for FB42CA
Figure 8c
45°![]()
78"
TOP VIEW
8 | 103451 |