What to do if YOU Smell GAS
Table of Contents
Safety Information
Product Features
Local Codes
Product Identification
Unpacking
AIR for Combustion Ventilation
Providing Adequate Ventilation
Following are excerpts from National Fuel
Unusually Tight Construction
Determining FRESH-AIR Flow for Heater Location
Determining if You Have a Confined or Unconfined Space
Installation
Ventilation AIR
Check GAS Type
Ventilation Air From Inside Building
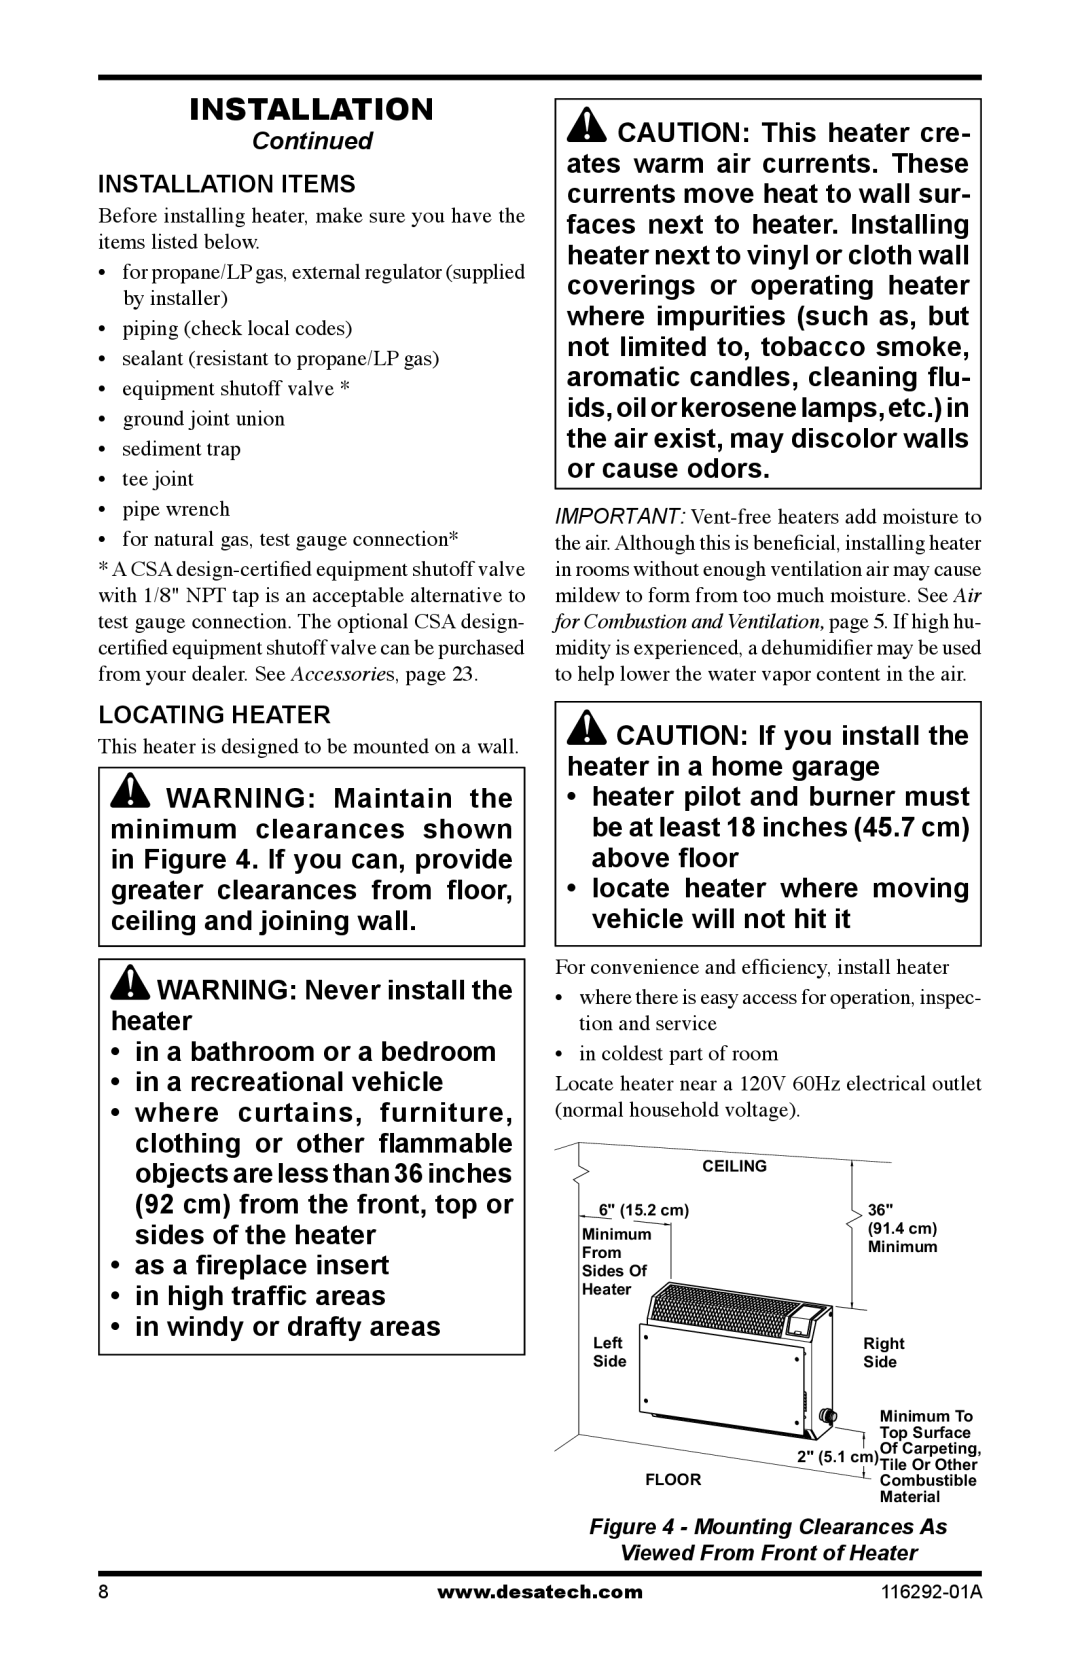
This heater is designed to be mounted on a wall
Installation Items
Locating Heater
Installing Heater to Wall
Attaching Mounting Bracket To Wall
Is provided with heater
For attaching mounting bracket to wall studs
Placing Heater On Mounting Bracket
Connecting to GAS Supply
Installing Bottom Mounting Screws
Important For natural gas, check gas line
Tor damage could occur
Propane/LP
Checking GAS Connections
Min. Natural Gas
Test Pressures In Excess Of 1/2 Psig 3.5 kPa
Test Pressures Equal To or Less Than 1/2 Psig 3.5 kPa
Equipment Open Shutoff Valve Closed
Gas Meter Equipment
Connecting to Electrical Supply
For Your Safety Read Before Lighting
Operating Heater
Extension Cord
Lighting Instructions
To Turn OFF GAS To Appliance
Thermostat Control Operation
Shutting Off Heater
Manual Lighting Procedure
Inspecting Heater
Burner Flame Pattern
Pilot Flame Pattern
Cleaning Maintenance
Pilot Assembly Pilot Air Inlet
ODS/PILOT and Burner
Burner Pilot AIR Inlet
Troubleshooting
Observed Problem Possible Cause Remedy
Goes out when control knob is Control knob not pressed
Delayed ignition of burner Manifold pressure is too low
Burner orifice is clogged Clean burner see Cleaning
ODS/pilot lights but flame
Walls or furniture Cleaners, etc. may turn into
No power to electric outlet 60Hz outlet
Slight smoke or odor during
Air passageways on heater
Ment above
LSL18NT, SL18NT and VSL18NT LSL18PT, SL18PT and VSL18PT
Specifications
Wiring Diagrams
Accessories
Technical Service
Replacement Parts
Service Publications Service Hints
Illustrated Parts Breakdown
Models LSL18NT, LSL18PT, SL18NT, SL18PT, VSL18NT and VSL18PT
Parts List
Parts Centrals
116292-01A
Warranty Information
Keep this Warranty
Model Serial No Date of Purchase
Industrial Drive P.O. Box Patent Pending
QUÉ Hacer SI Percibe Olor a GAS
Tabla DE Contenido
Información DE Seguridad
Información DE
Códigos Locales
Desempaque
Características DEL Producto
Aire Para Combustión Ventilación
Cómo Proveer LA Ventilación Adecuada
Construcción inusualmente sellada
Espacio confinado y no confinado
Aire Para Ventilación
Aire del interior de la construcción para ventilación
Aire del exterior para ventilación
Instalación
Verifique EL Tipo DE GAS
Este calentador está diseñado para montarse en una pared
Artículos DE Instalación
Ubicación DEL Calentador
Instalación DEL Calentador EN LA Pared
Soporte de montaje
Desmontaje del panel anterior del calentador
Panel de vidrio Separador Tornillo
Zando una broca de 9/64 de pulgada
Con los orificios que perforó en la pared
En los maderos de la pared
Doble el anclaje de pared como se muestra en la figura
Conexión AL Suministro DE GAS
Instalación de los tornillos de montaje inferiores
Quite el calentador del soporte de montaje
Calentador Pared Separador
Unión T Unión terminal Buje reduc
Tor a 1/8
De pulgada Válvula de
Con rosca Cierre del Tipo NPT Tapón Equipo
Cierre de Equipo Cerrada
Medidor
De gas
Tanque de suministro de propano o gas LP Válvula de
Funcionamiento DEL Calentador
Conexión a LA Alimentación Eléctrica
Cable DE Extensión
Para SU SEGURIDAD, LEA Esto Antes DE Encenderlo
Apague el piloto
Funcionamiento DEL
Instrucciones DE Encendido
Funcionamiento DEL
Patrón DE LA Llama DEL
Calentador
Procedimiento DE
Limpieza Y Mantenimiento
Piloto CON ODS Y Quemador
Entrada DE Aire AL Piloto DEL Quemador
Gabinete
Solución DE Problemas
Problema Observado Causa Posible Remedio
La posición del regulador de gas no es la correcta
Reemplace el regulador de gas
Causa Posible Remedio
El problema desaparecerá
Hay aire en la línea de gas Hasta que se elimine el aire
Línea de gas
Los conductos de aire en el
Cia anterior
Diagramas DE Cableado
Especificaciones
LSL18NT, SL18NT y VSL18NT
LSL18PT, SL18PT y VSL18PT
Accesorios
Servicio Técnico
Publicaciones DE Servicio
Piezas DE Repuesto
Clasificación Ilustrada DE Piezas
Modelos LSL18NT, LSL18PT, SL18NT, SL18PT, VSL18NT Y VSL18PT
Lista DE Piezas
Laporte’s Parts & Service 2444 N th Street
Centrales DE Piezas
Notas
Información DE Garantía
Guarde Esta Garantía