INSTALLATION VENTILATION OPERATION

5

INSTALLATION

Continued

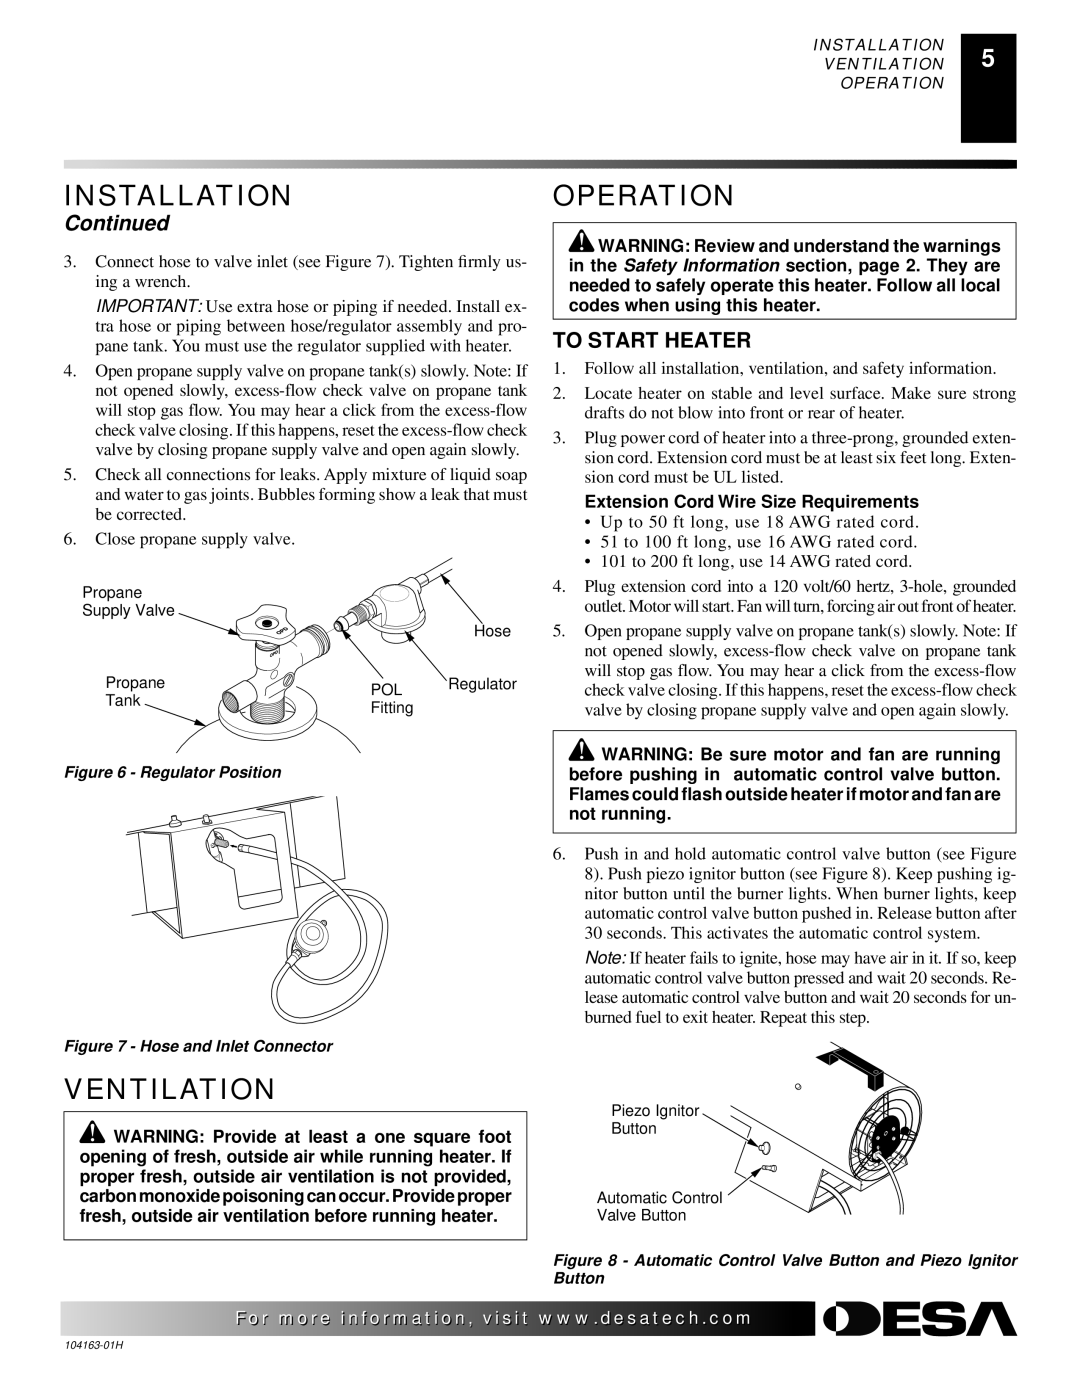
3.Connect hose to valve inlet (see Figure 7). Tighten firmly us- ing a wrench.

IMPORTANT: Use extra hose or piping if needed. Install ex- tra hose or piping between hose/regulator assembly and pro- pane tank. You must use the regulator supplied with heater.

4.Open propane supply valve on propane tank(s) slowly. Note: If not opened slowly, excess-flow check valve on propane tank will stop gas flow. You may hear a click from the excess-flow check valve closing. If this happens, reset the excess-flow check valve by closing propane supply valve and open again slowly.

5.Check all connections for leaks. Apply mixture of liquid soap and water to gas joints. Bubbles forming show a leak that must be corrected.

6.Close propane supply valve.

Propane


Supply Valve


Hose

Propane

POL

Regulator

Tank


Fitting


Figure 6 - Regulator Position


OPERATION

WARNING: Review and understand the warnings in the Safety Information section, page 2. They are needed to safely operate this heater. Follow all local codes when using this heater.

TO START HEATER

1.Follow all installation, ventilation, and safety information.

2.Locate heater on stable and level surface. Make sure strong drafts do not blow into front or rear of heater.

3.Plug power cord of heater into a three-prong, grounded exten- sion cord. Extension cord must be at least six feet long. Exten- sion cord must be UL listed.

Extension Cord Wire Size Requirements

Up to 50 ft long, use 18 AWG rated cord.

51 to 100 ft long, use 16 AWG rated cord.

101 to 200 ft long, use 14 AWG rated cord.

4.Plug extension cord into a 120 volt/60 hertz, 3-hole, grounded outlet. Motor will start. Fan will turn, forcing air out front of heater.

5.Open propane supply valve on propane tank(s) slowly. Note: If not opened slowly, excess-flow check valve on propane tank will stop gas flow. You may hear a click from the excess-flow check valve closing. If this happens, reset the excess-flow check valve by closing propane supply valve and open again slowly.

WARNING: Be sure motor and fan are running before pushing in automatic control valve button. Flames could flash outside heater if motor and fan are not running.

6.Push in and hold automatic control valve button (see Figure 8). Push piezo ignitor button (see Figure 8). Keep pushing ig- nitor button until the burner lights. When burner lights, keep automatic control valve button pushed in. Release button after 30 seconds. This activates the automatic control system.

Note: If heater fails to ignite, hose may have air in it. If so, keep automatic control valve button pressed and wait 20 seconds. Re- lease automatic control valve button and wait 20 seconds for un- burned fuel to exit heater. Repeat this step.

Figure 7 - Hose and Inlet Connector

VENTILATION

WARNING: Provide at least a one square foot opening of fresh, outside air while running heater. If proper fresh, outside air ventilation is not provided, carbon monoxide poisoning can occur. Provide proper fresh, outside air ventilation before running heater.

Piezo Ignitor

Button

Automatic Control

Valve Button

Figure 8 - Automatic Control Valve Button and Piezo Ignitor Button

For more information, visit www.desatech.com

104163-01H

Page 5
Image 5
Desa REM30LP owner manual Ventilation, To Start Heater

REM30LP specifications

Desa REM30LP is a cutting-edge, energy-efficient heating solution designed for residential and commercial spaces. Characterized by its advanced technology, the REM30LP delivers optimal performance while ensuring a comfortable environment. This unit operates on LP (liquid propane) gas, making it a practical choice for homes and businesses seeking an effective heating alternative.

One of the main features of the Desa REM30LP is its impressive heating capacity. It can provide warmth for areas up to 1,000 square feet, making it suitable for large living rooms, workshops, or commercial settings. The unit utilizes a forced air heating system that rapidly circulates warm air, ensuring that every corner of the space is heated uniformly.

Another key characteristic of the REM30LP is its compact design. Unlike traditional heaters, which can be bulky and difficult to position, the REM30LP's sleek profile allows it to fit neatly in various locations without occupying significant floor space. This makes it an attractive option for users with limited room or those looking to maintain an uncluttered aesthetic.

The Desa REM30LP integrates several advanced technologies to enhance its performance and energy efficiency. One notable feature is its electronic ignition system, which eliminates the need for matches or lighter fluid. This not only improves safety but also ensures reliable starts every time the heater is activated. Additionally, the unit boasts safety features such as automatic shut-off systems and tip-over protection, providing peace of mind for homeowners.

Efficiency is further maximized by the heater's adjustable thermostat. Users can easily set their preferred temperature, and the REM30LP will automatically adjust its output to maintain consistent heating levels. This precision helps to save on energy costs while ensuring comfort.

In terms of installation, the Desa REM30LP offers versatility. It can be vented directly outdoors, allowing for a more flexible installation process in various spaces. This feature is particularly beneficial in homes where interior venting may not be feasible.

In conclusion, the Desa REM30LP is a compact, efficient, and effective heating solution that is perfect for a range of environments. With its advanced technologies, versatile installation options, and robust safety features, it stands out as a reliable choice for those in need of high-quality heating.