80,000 BTU/HR

PROPANE CONSTRUCTION HEATER

INSTALLATION

WARNING: Review and un- derstand the warnings in the Safety Information section, page

2.They are needed to safely op- erate this heater. Follow all local codes when using this heater.

WARNING: Test all gas pip- ing and connections for leaks after installation or servicing. Never use an open flame to check for a leak. Apply a mixture of liquid soap and water to all joints. Bubbles forming show a leak. Correct all leaks at once.

1.Provide propane supply system (see Propane Supply, page 3).

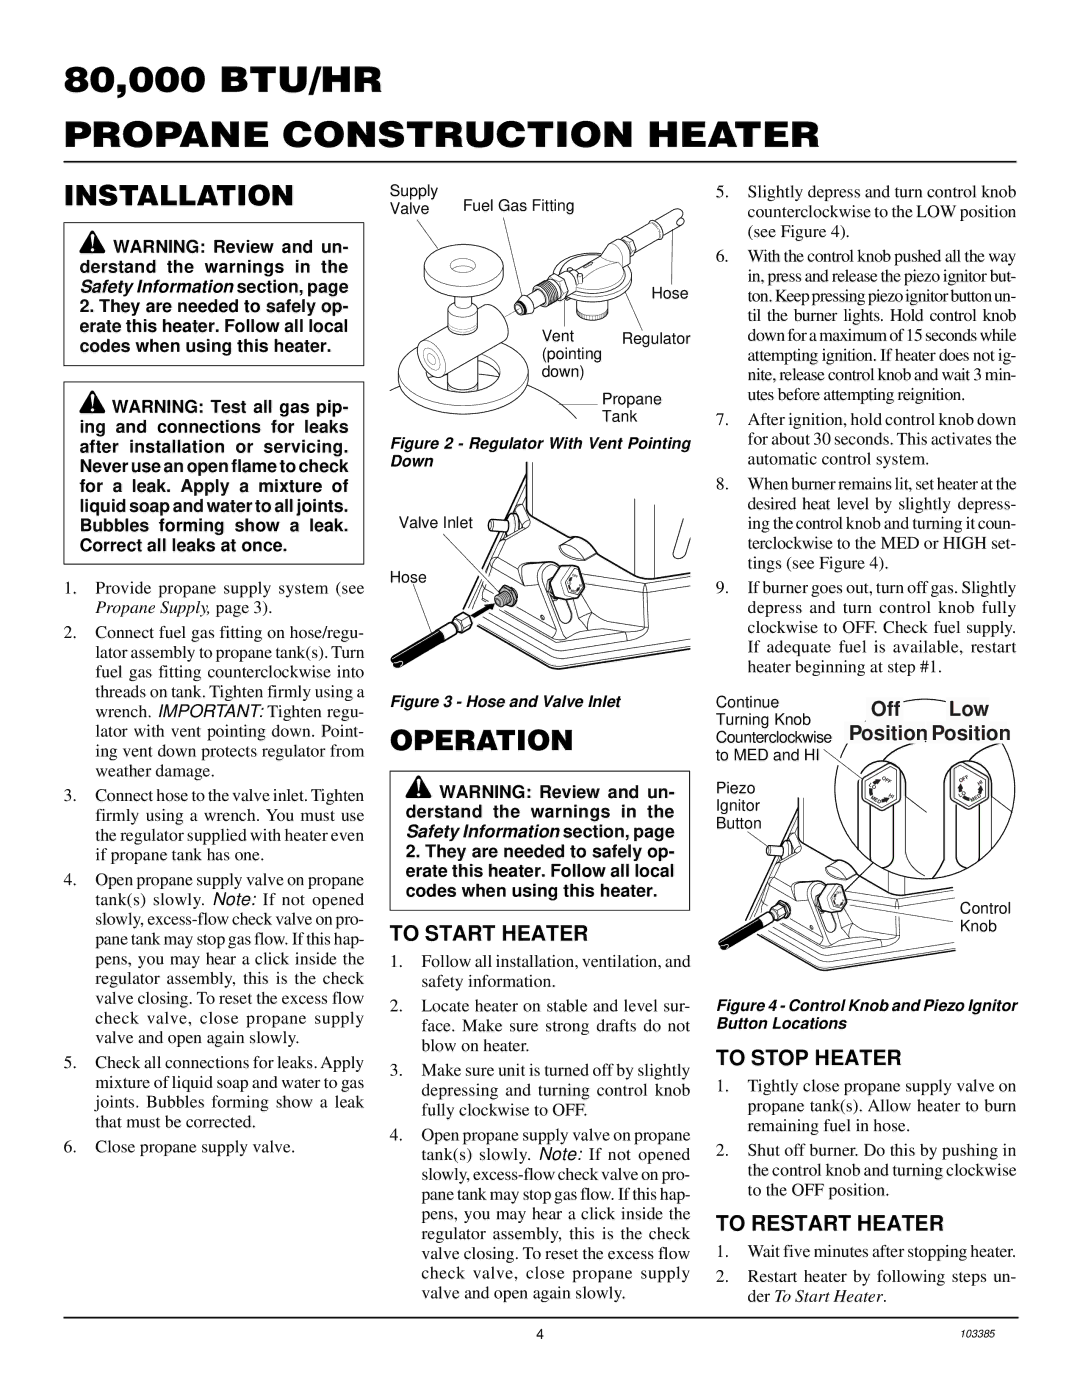
2.Connect fuel gas fitting on hose/regu- lator assembly to propane tank(s). Turn fuel gas fitting counterclockwise into threads on tank. Tighten firmly using a wrench. IMPORTANT: Tighten regu- lator with vent pointing down. Point- ing vent down protects regulator from weather damage.

3.Connect hose to the valve inlet. Tighten firmly using a wrench. You must use the regulator supplied with heater even if propane tank has one.

4.Open propane supply valve on propane tank(s) slowly. Note: If not opened slowly, excess-flow check valve on pro- pane tank may stop gas flow. If this hap- pens, you may hear a click inside the regulator assembly, this is the check valve closing. To reset the excess flow check valve, close propane supply valve and open again slowly.

5.Check all connections for leaks. Apply mixture of liquid soap and water to gas joints. Bubbles forming show a leak that must be corrected.

6.Close propane supply valve.

Supply

Fuel Gas Fitting

Valve

Hose

Vent Regulator (pointing

down)

Propane

Tank

Figure 2 - Regulator With Vent Pointing Down

Valve Inlet


Hose

LO

HI


OFF


MED


Figure 3 - Hose and Valve Inlet

OPERATION

WARNING: Review and un- derstand the warnings in the Safety Information section, page

2.They are needed to safely op- erate this heater. Follow all local codes when using this heater.

TO START HEATER

1.Follow all installation, ventilation, and safety information.

2.Locate heater on stable and level sur- face. Make sure strong drafts do not blow on heater.

3.Make sure unit is turned off by slightly depressing and turning control knob fully clockwise to OFF.

4.Open propane supply valve on propane tank(s) slowly. Note: If not opened slowly, excess-flow check valve on pro- pane tank may stop gas flow. If this hap- pens, you may hear a click inside the regulator assembly, this is the check valve closing. To reset the excess flow check valve, close propane supply valve and open again slowly.

5.Slightly depress and turn control knob counterclockwise to the LOW position (see Figure 4).

6.With the control knob pushed all the way in, press and release the piezo ignitor but- ton. Keep pressing piezo ignitor button un- til the burner lights. Hold control knob down for a maximum of 15 seconds while attempting ignition. If heater does not ig- nite, release control knob and wait 3 min- utes before attempting reignition.

7.After ignition, hold control knob down for about 30 seconds. This activates the automatic control system.

8.When burner remains lit, set heater at the desired heat level by slightly depress- ing the control knob and turning it coun- terclockwise to the MED or HIGH set- tings (see Figure 4).

9.If burner goes out, turn off gas. Slightly depress and turn control knob fully clockwise to OFF. Check fuel supply. If adequate fuel is available, restart heater beginning at step #1.

Continue

Off

Low

Turning Knob

Position

Position

Counterclockwise

to MED and HI


Piezo

LO

OFF

OFF

HI


Ignitor

MED

HI

LO

MED


Button


OFF


LO

HI


Control

MED


Knob

Figure 4 - Control Knob and Piezo Ignitor Button Locations

TO STOP HEATER

1.Tightly close propane supply valve on propane tank(s). Allow heater to burn remaining fuel in hose.

2.Shut off burner. Do this by pushing in the control knob and turning clockwise to the OFF position.

TO RESTART HEATER

1.Wait five minutes after stopping heater.

2.Restart heater by following steps un- der To Start Heater.

4

103385

Page 4
Image 4
Desa TC80V, RCP80V owner manual Installation, To Start Heater, To Stop Heater, To Restart Heater

RCP80V, TC80V specifications

The Desa TC80V and RCP80V are cutting-edge technologies designed for industrial and commercial applications. These robust models are part of the highly regarded line of equipment from Desa, known for their reliability, efficiency, and innovative features.

The Desa TC80V is a premier heating unit that excels in both performance and energy efficiency. It integrates advanced combustion technologies, optimizing fuel usage and reducing emissions. Part of its appeal lies in its compact design, making it suitable for various spaces without compromising on heat output. The TC80V operates with a user-friendly digital control panel that allows operators to set precise temperatures and monitor performance in real-time, ensuring that environments remain comfortable and conducive to productivity.

On the other hand, the Desa RCP80V is a high-performance cooling system that offers exceptional versatility. It utilizes a state-of-the-art refrigeration cycle that promotes maximum cooling efficiency while minimizing energy consumption. The RCP80V features a variable speed compressor that adjusts the cooling output based on the ambient conditions. This adaptability not only enhances comfort but also lowers operational costs, making it an economical choice for businesses seeking reliable climate control solutions.

Both models boast impressive durability and build quality, designed to withstand harsh operating conditions. They are equipped with corrosion-resistant materials, ensuring a long lifespan and reducing maintenance needs. Furthermore, these units incorporate advanced safety features, including automatic shut-off systems and temperature monitoring, to guarantee safe operation in any environment.

The Desa TC80V and RCP80V are also designed with energy efficiency in mind. They meet and exceed industry standards for energy consumption, making them environmentally friendly choices that contribute to a company’s sustainability goals. With features such as programmable timers and energy-saving modes, they help reduce overall energy costs while delivering optimal performance.

In summary, the Desa TC80V and RCP80V are distinguished by their advanced technologies, user-friendly controls, exceptional durability, and energy-efficient operations. These models represent the future of heating and cooling solutions, making them ideal choices for businesses looking to invest in reliable and cost-effective equipment. Whether for heating or cooling needs, Desa has created a solution that combines innovation with practicality.