20

FIREPLACE INSTALLATION

Checking Gas Connections (Cont.)

Installing Optional Wall Mount Switch - GWMS2

FIREPLACE INSTALLATION

Continued

2.Cap off open end of gas pipe where equipment shutoff valve was connected.

3.Pressurize supply piping system by either opening propane/LP supply tank valve for propane/LP gas fireplace or opening main gas valve located on or near gas meter for natural gas fire- place, or using compressed air.

4.Check all joints of gas supply piping system. Apply noncorro- sive leak detection fluid to all joints. Bubbles forming show a leak. Correct all leaks at once.

5.Reconnect fireplace and equipment shutoff valve to gas sup- ply. Check reconnected fittings for leaks.

Test Pressures Equal To or Less Than 1/2 PSIG (3.5 kPa)

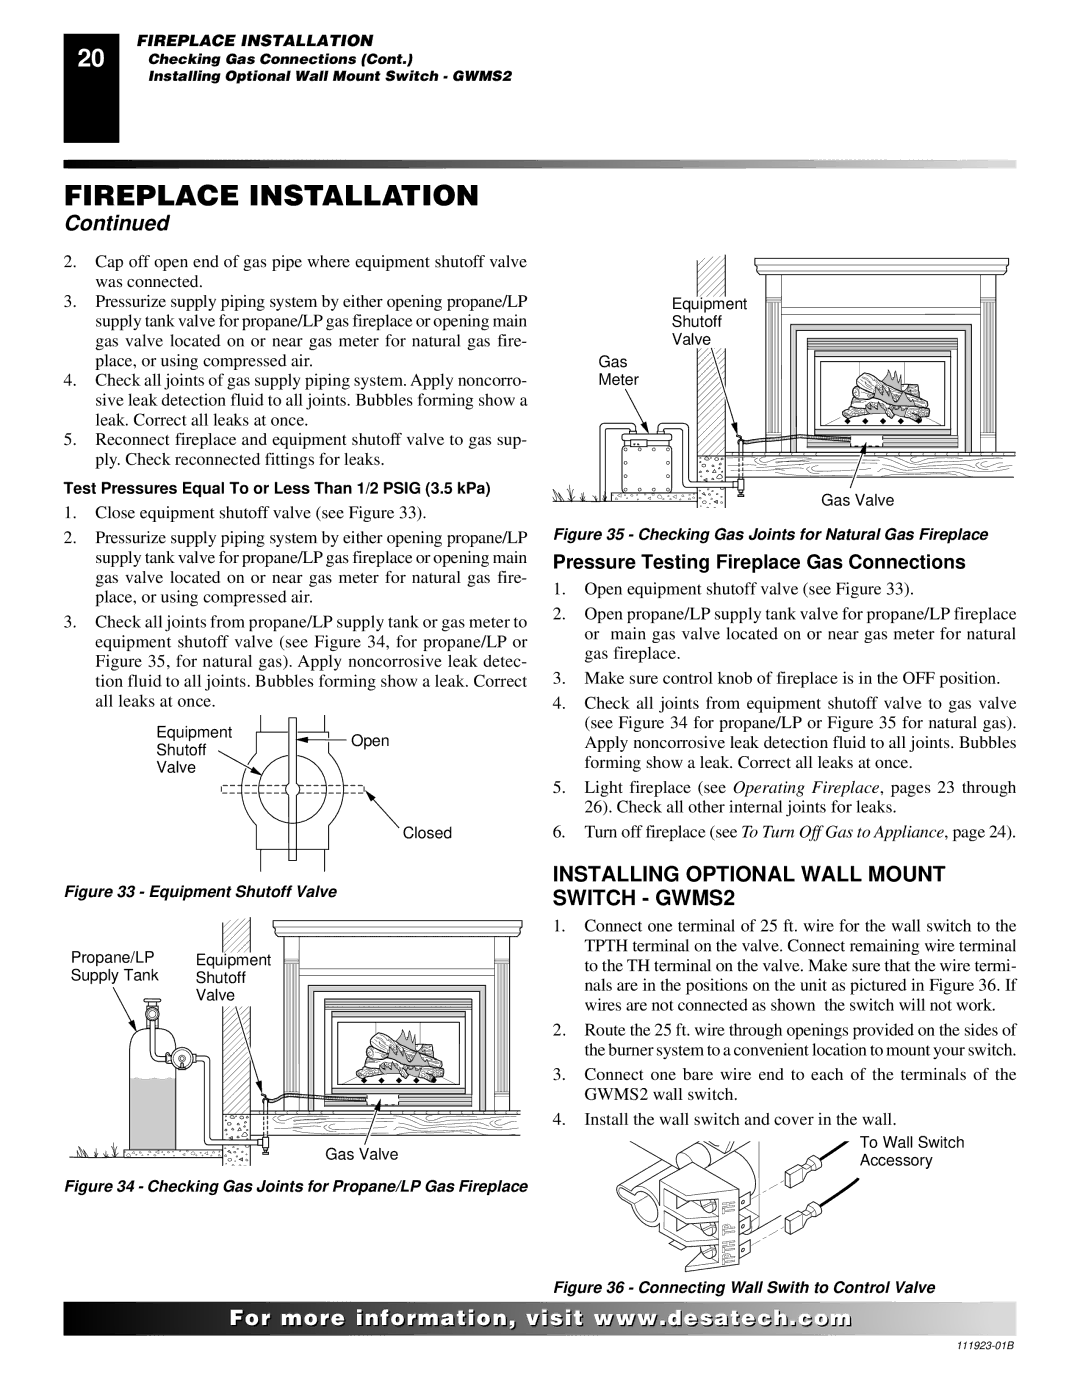
1.Close equipment shutoff valve (see Figure 33).

2.Pressurize supply piping system by either opening propane/LP supply tank valve for propane/LP gas fireplace or opening main gas valve located on or near gas meter for natural gas fire- place, or using compressed air.

3.Check all joints from propane/LP supply tank or gas meter to equipment shutoff valve (see Figure 34, for propane/LP or Figure 35, for natural gas). Apply noncorrosive leak detec- tion fluid to all joints. Bubbles forming show a leak. Correct all leaks at once.

Equipment

Open

Shutoff


Valve


Closed

Equipment

Shutoff

Valve

Gas

Meter

Gas Valve

Figure 35 - Checking Gas Joints for Natural Gas Fireplace

Pressure Testing Fireplace Gas Connections

1.Open equipment shutoff valve (see Figure 33).

2.Open propane/LP supply tank valve for propane/LP fireplace or main gas valve located on or near gas meter for natural gas fireplace.

3.Make sure control knob of fireplace is in the OFF position.

4.Check all joints from equipment shutoff valve to gas valve (see Figure 34 for propane/LP or Figure 35 for natural gas). Apply noncorrosive leak detection fluid to all joints. Bubbles forming show a leak. Correct all leaks at once.

5.Light fireplace (see Operating Fireplace, pages 23 through 26). Check all other internal joints for leaks.

6.Turn off fireplace (see To Turn Off Gas to Appliance, page 24).

Figure 33 - Equipment Shutoff Valve

Propane/LP

Equipment

Supply Tank

Shutoff


Valve


Gas Valve

Figure 34 - Checking Gas Joints for Propane/LP Gas Fireplace

INSTALLING OPTIONAL WALL MOUNT SWITCH - GWMS2

1.Connect one terminal of 25 ft. wire for the wall switch to the TPTH terminal on the valve. Connect remaining wire terminal to the TH terminal on the valve. Make sure that the wire termi- nals are in the positions on the unit as pictured in Figure 36. If wires are not connected as shown the switch will not work.

2.Route the 25 ft. wire through openings provided on the sides of the burner system to a convenient location to mount your switch.

3.Connect one bare wire end to each of the terminals of the GWMS2 wall switch.

4.Install the wall switch and cover in the wall.

To Wall Switch

Accessory

Figure 36 - Connecting Wall Swith to Control Valve

For..com

111923-01B

Page 20
Image 20
Desa (V)K36N SERIES Installing Optional Wall Mount Switch GWMS2, Pressure Testing Fireplace Gas Connections

(V)K36P SERIES, (V)K36N SERIES specifications

Desa (V)K36P Series and (V)K36N Series represent a significant advancement in the world of high-efficiency heating solutions, known for their innovative features and technologies that cater to varying heating needs. These series are engineered for both residential and commercial applications, offering flexibility and efficiency to meet diverse climate requirements.

One of the standout features of the Desa (V)K36P and (V)K36N Series is their advanced combustion technology. Utilizing a unique burner design, these units maximize energy output while minimizing emissions. This is particularly important in today's environmentally-conscious market, where efficient energy use and reduced carbon footprints are critical.

Moreover, these series incorporate advanced heat exchanger technologies that ensure optimal thermal efficiency. This design minimizes heat loss and enhances the performance of the heating system, allowing users to enjoy comfortable indoor temperatures without excessive energy costs. The durable materials used in the construction of these heat exchangers also contribute to their longevity and reliability, making them a worthy investment.

Another notable characteristic of the Desa (V)K36P and (V)K36N Series is their user-friendly control systems. Features such as digital thermostats and programmable settings allow users to customize their heating schedules with ease, ensuring their living or working spaces remain comfortable at all times. Additionally, some models come equipped with Wi-Fi connectivity, enabling remote operation and monitoring via smartphone applications.

In terms of safety, the Desa series does not compromise. Each unit includes multiple safety features, such as overheat protection, flame failure detection, and pressure relief systems, ensuring that users can rely on their heaters with peace of mind.

Installation and maintenance are also made simpler with the Desa (V)K36P and (V)K36N Series. These models are designed for straightforward installation, minimizing disruptions during setup. They also require minimal maintenance, which reduces long-term service costs for users.

In conclusion, the Desa (V)K36P and (V)K36N Series stand out in the market due to their innovative technologies, high efficiency, user-friendly controls, and robust safety measures. These qualities make them excellent choices for anyone seeking reliable and effective heating solutions in a variety of settings.