22

FIREPLACE INSTALLATION

Installing Optional Brick Liner Models BL42DA(SA), BL42DHA(SA)

FIREPLACE INSTALLATION

Continued

INSTALLING OPTIONAL BRICK LINER MODELS BL42DA(SA), BL42DHA(SA)

WARNING: If fireplace has been running, turn off and unplug fireplace. Let cool before installing brick liner.

This brick liner kit is optional. You may purchase brick liner from your local retailer or see Accessories, page 37.

CAUTION: Always handle brick panels with two hands. Do not force brick panels into place. Exces- sive force will break brick panels.

1.Remove top and bottom louvers to allow access to door latches.

2.Remove screen, unlock door latches and open glass door. See Removing/Replacing Glass Door, steps 1 and 2, page 21.

3.If installing brick liner in new fireplace, go to step 4. If install- ing brick liner in an existing fireplace, carefully remove logs, lava rock, and ember material.

4.Remove three screws from deflector shield on the inside top of firebox. Set shield and screws aside.

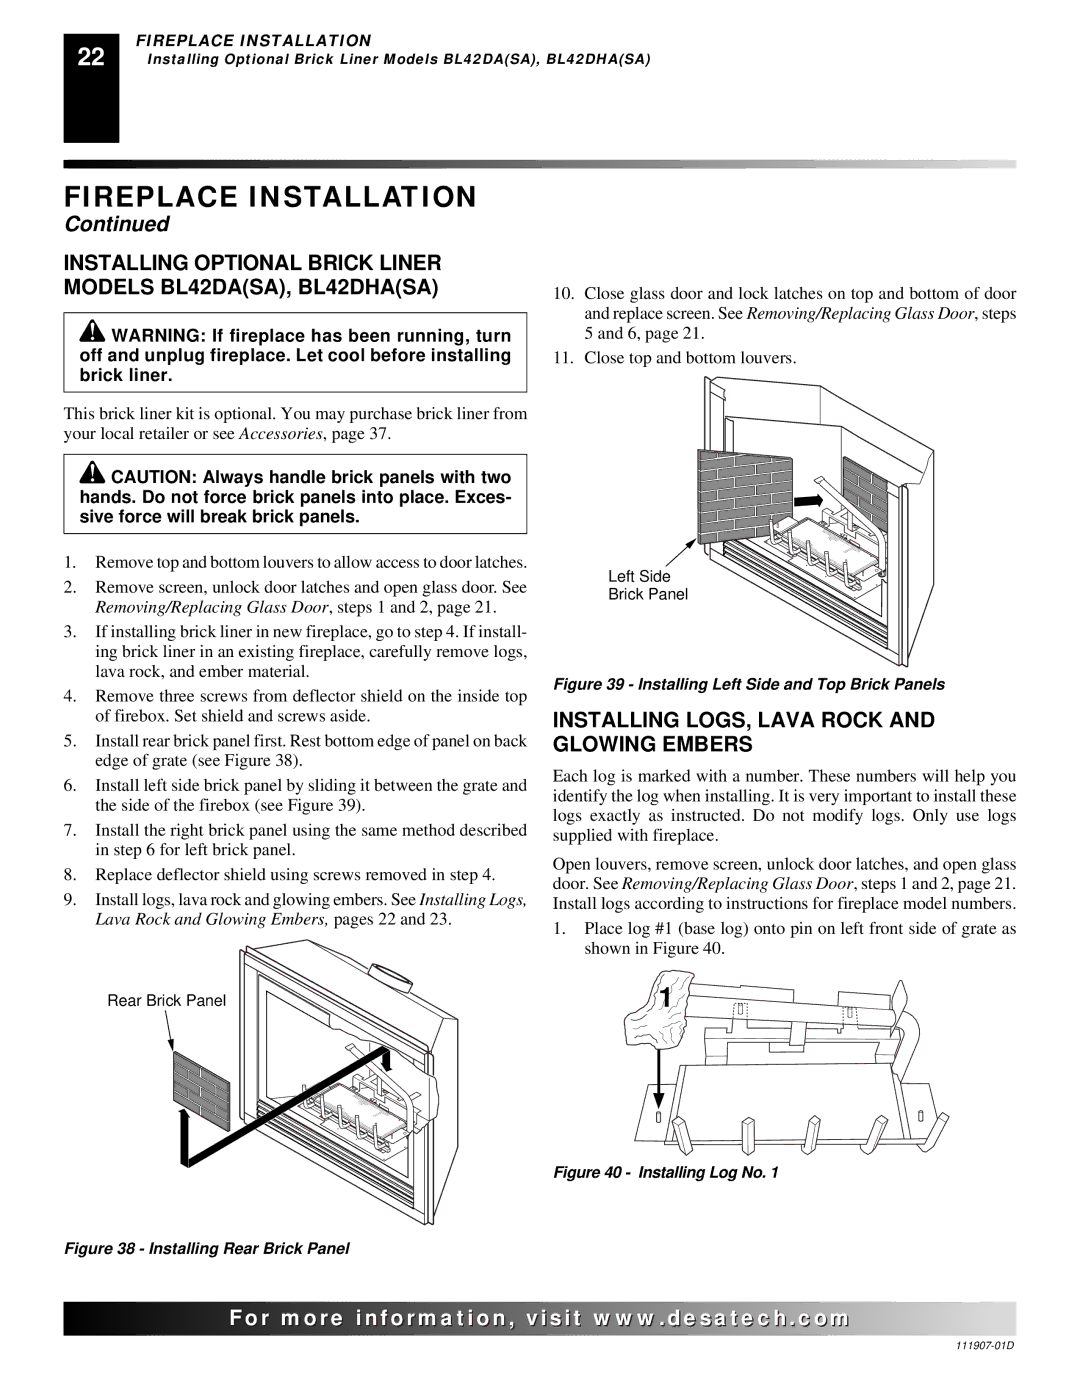
5.Install rear brick panel first. Rest bottom edge of panel on back edge of grate (see Figure 38).

6.Install left side brick panel by sliding it between the grate and the side of the firebox (see Figure 39).

7.Install the right brick panel using the same method described in step 6 for left brick panel.

8.Replace deflector shield using screws removed in step 4.

9.Install logs, lava rock and glowing embers. See Installing Logs, Lava Rock and Glowing Embers, pages 22 and 23.

Rear Brick Panel

Figure 38 - Installing Rear Brick Panel

10.Close glass door and lock latches on top and bottom of door and replace screen. See Removing/Replacing Glass Door, steps 5 and 6, page 21.

11.Close top and bottom louvers.

Left Side

Brick Panel

Figure 39 - Installing Left Side and Top Brick Panels

INSTALLING LOGS, LAVA ROCK AND GLOWING EMBERS

Each log is marked with a number. These numbers will help you identify the log when installing. It is very important to install these logs exactly as instructed. Do not modify logs. Only use logs supplied with fireplace.

Open louvers, remove screen, unlock door latches, and open glass door. See Removing/Replacing Glass Door, steps 1 and 2, page 21. Install logs according to instructions for fireplace model numbers.

1.Place log #1 (base log) onto pin on left front side of grate as shown in Figure 40.

1

Figure 40 - Installing Log No. 1

For..com

111907-01D

Page 22
Image 22
Desa V42EN-A Installing Optional Brick Liner Models BL42DASA, BL42DHASA, Installing LOGS, Lava Rock and Glowing Embers

V42EN-A, VV42EPB(1), V42EP-A, VV42ENB(1) specifications

Desa VV42ENB(1), VV42EPB(1), V42EN-A, and V42EP-A are innovative products designed to enhance residential heating and hot water solutions. These units are a part of a modern era in energy-efficient home appliances that aim to provide comfort while minimizing environmental impact.

The VV42ENB(1) and VV42EPB(1) models are particularly notable for their energy efficiency. They incorporate advanced technology that significantly reduces energy consumption compared to traditional heating systems. The VV42ENB(1), which operates using natural gas, is designed for environments where gas is readily available, while the VV42EPB(1) utilizes propane, making it ideal for areas without natural gas supply. The flexibility in fuel sources provides homeowners with more options tailored to their specific needs.

Both models are equipped with a high-efficiency burner that optimizes fuel combustion, ensuring efficient heat transfer and reduced greenhouse gas emissions. The integrated smart thermostat feature allows users to program their heating schedules, which not only enhances comfort but also contributes to energy conservation by reducing wastage when the home is unoccupied.

Transitioning to the V42EN-A and V42EP-A models, these units are designed to cater to different heating requirements. Featuring advanced electronic ignition systems, they provide reliable operation with minimal maintenance requirements. The aesthetic design of these models allows them to blend seamlessly into any home decor while the durable materials ensure longevity and resilience under various conditions.

Furthermore, the V42EN-A and V42EP-A models come with enhanced safety features, including auto shut-off systems and flame failure devices that protect against unintended incidents. Homeowners can trust that these units will operate safely and efficiently.

In summary, the Desa VV42ENB(1), VV42EPB(1), V42EN-A, and V42EP-A are remarkable advancements in home heating technology. Their focus on energy efficiency, user-friendly features, and safety makes them a perfect choice for modern households looking to enhance comfort while maintaining a commitment to sustainability. With options for different fuels and advanced functionalities, they stand as a testament to innovation in the heating industry. These models promise not only to keep homes warm but also to do so in an environmentally responsible manner.