Assembling Mantel

IMPORTANT: More than one person is required to lift assembled mantel. Lift mantel by leg assemblies. Lifting by header or mantel top could damage mantel.

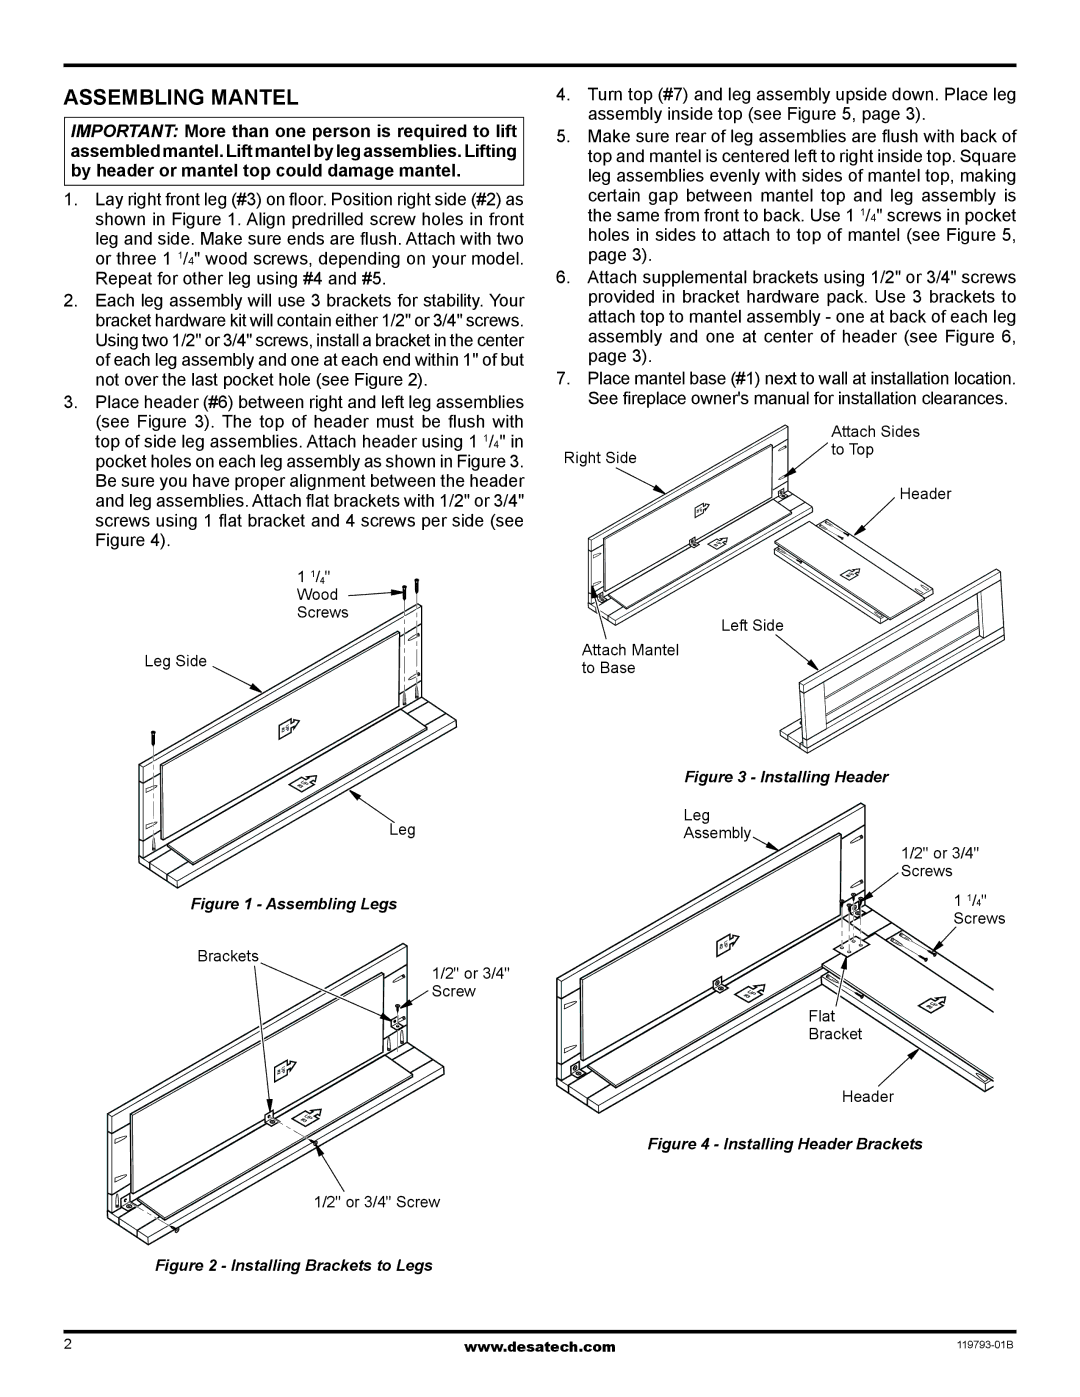
1.Lay right front leg (#3) on floor. Position right side (#2) as shown in Figure 1. Align predrilled screw holes in front leg and side. Make sure ends are flush. Attach with two or three 1 1/4" wood screws, depending on your model. Repeat for other leg using #4 and #5.

2.Each leg assembly will use 3 brackets for stability. Your bracket hardware kit will contain either 1/2" or 3/4" screws. Using two 1/2" or 3/4" screws, install a bracket in the center of each leg assembly and one at each end within 1" of but not over the last pocket hole (see Figure 2).

3.Place header (#6) between right and left leg assemblies

(see Figure 3). The top of header must be flush with top of side leg assemblies. Attach header using 1 1/4" in pocket holes on each leg assembly as shown in Figure 3. Be sure you have proper alignment between the header and leg assemblies. Attach flat brackets with 1/2" or 3/4" screws using 1 flat bracket and 4 screws per side (see

Figure 4).

1 1/4" Wood Screws

Leg Side

Leg

Figure 1 - Assembling Legs

Brackets

1/2" or 3/4"

Screw

1/2" or 3/4" Screw

Figure 2 - Installing Brackets to Legs

4.Turn top (#7) and leg assembly upside down. Place leg assembly inside top (see Figure 5, page 3).

5.Make sure rear of leg assemblies are flush with back of top and mantel is centered left to right inside top. Square leg assemblies evenly with sides of mantel top, making certain gap between mantel top and leg assembly is the same from front to back. Use 1 1/4" screws in pocket holes in sides to attach to top of mantel (see Figure 5, page 3).

6.Attach supplemental brackets using 1/2" or 3/4" screws provided in bracket hardware pack. Use 3 brackets to attach top to mantel assembly - one at back of each leg assembly and one at center of header (see Figure 6, page 3).

7.Place mantel base (#1) next to wall at installation location.

See fireplace owner's manual for installation clearances.


Attach Sides

Right Side

to Top


Header

Left Side

Attach Mantel to Base

Figure 3 - Installing Header

Leg

Assembly

1/2" or 3/4"

Screws

1 1/4" Screws

Flat

Bracket

Header

Figure 4 - Installing Header Brackets

www.desatech.com

119793-01B

Page 2
Image 2
Desa WS26CP, WD26CPA installation instructions Assembling Mantel, Place header #6 between right and left leg assemblies

WD26CPA, WS26CP specifications

Desa WD26CPA and WS26CP are innovative heating solutions designed to cater to the needs of both residential and commercial spaces. These models are a part of a new generation of heating systems that prioritize efficiency, sustainability, and user convenience.

One of the standout features of the Desa WD26CPA is its advanced combustion technology. This model employs a state-of-the-art combustion system that ensures optimal efficiency while reducing emissions. By utilizing a unique heat exchanger design, it maximizes heat output while minimizing fuel consumption, making it both an environmentally friendly and cost-effective option for users.

On the other hand, the WS26CP focuses on providing versatile heating options. Its dual fuel capability allows users to switch between propane and natural gas, depending on availability and personal preference. This flexibility not only enhances convenience but also ensures that users can choose the most economical fuel option for their needs.

Both models feature user-friendly digital thermostats that allow for precise temperature control. This means users can set their desired temperature effortlessly, ensuring comfort in any environment. Furthermore, the programmable timer functionality enables users to schedule heating periods, conserving energy when heating is not needed.

In terms of safety, both the WD26CPA and WS26CP are equipped with multiple safety features. These include automatic shut-off systems that activate in case of a malfunction, as well as flame failure devices that help prevent gas leaks. These features provide peace of mind for users, knowing that safety is prioritized in the design of these heaters.

The aesthetic design of these models is also noteworthy. With sleek lines and modern finishes, the WD26CPA and WS26CP can seamlessly integrate into a variety of interior styles. This makes them not only functional but also visually appealing additions to any room.

In summary, the Desa WD26CPA and WS26CP stand out in the market due to their advanced technologies, flexible fuel options, and emphasis on safety and user convenience. They cater to a diverse range of heating needs, making them ideal choices for those seeking efficient, reliable, and stylish heating solutions. These models embody a commitment to innovation and sustainability, ensuring warmth and comfort for users without compromising the environment.