3.Mount the 14.5" x 26" (368 x 660 mm) platform to the saw using four 3" (76.2 mm) long wood screws through the holes in the base fence (Fig. 24). Four screws must be used to properly secure the material. When the special set-up is used, the platform will be cut into two pieces. Ensure the screws are tightened properly, otherwise material could loosen and cause injury. Ensure the platform is firmly flat on the table, against the fence, and centered evenly from left to right.
 WARNING: Ensure the saw is mounted firmly to a stable flat surface. Failure to do so could cause the saw to be unstable and fall causing personal injury.
4.Place the workpiece to be cut on top of the platform mounted to the table. Ensure the workpiece is firmly against the back of the base fence (Fig. 25).
5.Secure the material before cutting. Cut slowly through the material using a out-down-and- back motion. Failure to clamp securely or cut slowly could result in the material coming loose and causing injury.
After several cuts are made at various miter angles other than 0º, the platform may weaken and not properly support the work. Install a new, unused platform to the saw after presetting the desired miter angle.
 CAUTION: Continued use of a platform with several kerfs may cause loss of material control and possible injury.
MAINTENANCE
 WARNING: To reduce the risk of injury, turn unit off and disconnect it from power source before installing and removing accessories, before adjusting or when making repairs. An accidental start-up can cause injury.
 WARNING: To reduce the risk of serious personal injury, DO NOT touch the sharp points on the blade with fingers or hands while performing any maintenance.
DO NOT use lubricants or cleaners (particularly spray or aerosol) in the vicinity of the plastic guard. The polycarbonate material used in the guard is subject to attack by certain chemicals.
•All bearings are sealed. They are lubricated for life and need no further maintenance.
•Periodically clean all dust and wood chips from around AND UNDER the base and the rotary table. Even though slots are provided to allow debris to pass through, some dust will accumulate.
•The brushes are designed to give you several years of use. If they ever need replacement follow the instructions under Brushes or return the tool to the nearest service center for repair.
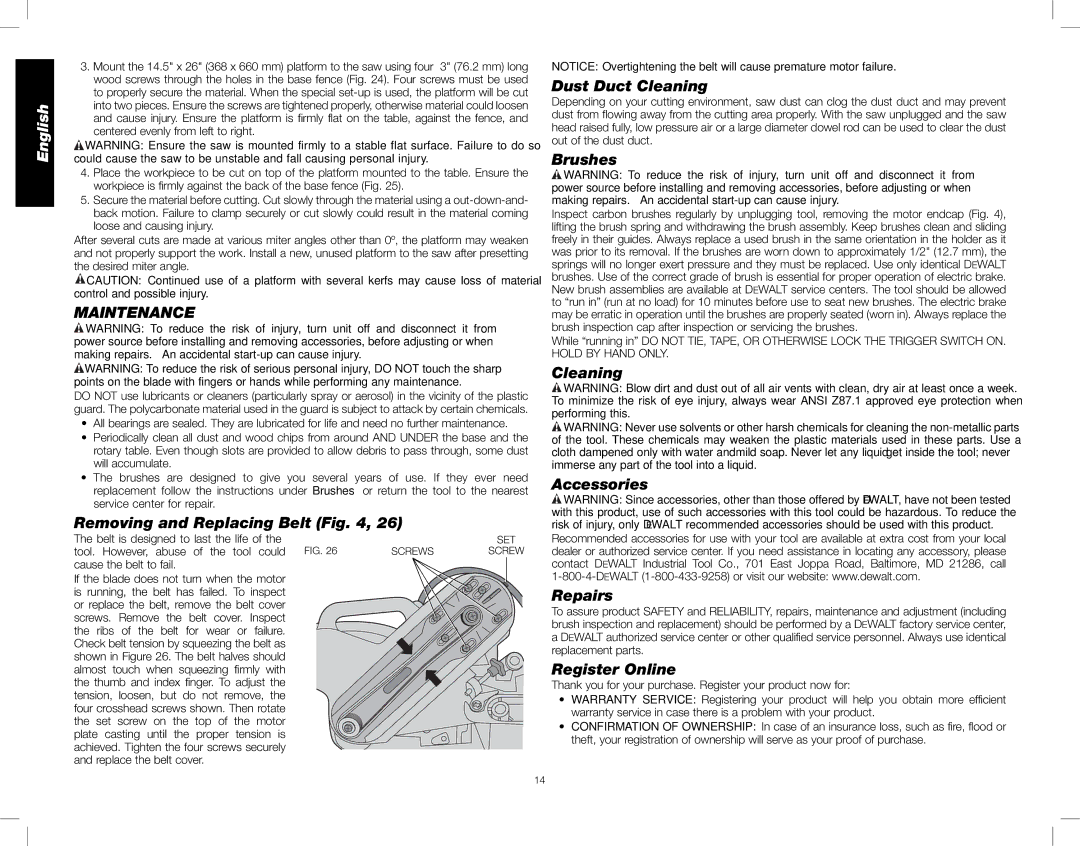
Removing and Replacing Belt (Fig. 4, 26)
The belt is designed to last the life of the | | | SET |
tool. However, abuse of the tool could | FIG. 26 | SCREWS | SCREW |
cause the belt to fail. | | | |
If the blade does not turn when the motor | | | |
is running, the belt has failed. To inspect | | | |
or replace the belt, remove the belt cover | | | |
screws. Remove the belt cover. Inspect | | | |
the ribs of the belt for wear or failure. | | | |
Check belt tension by squeezing the belt as | | | |
shown in Figure 26. The belt halves should | | | |
almost touch when squeezing firmly with | | | |
the thumb and index finger. To adjust the | | | |
tension, loosen, but do not remove, the | | | |
four crosshead screws shown. Then rotate | | | |
the set screw on the top of the motor | | | |
plate casting until the proper tension is | | | |
achieved. Tighten the four screws securely | | | |
and replace the belt cover. | | | |
NOTICE: Overtightening the belt will cause premature motor failure.
Dust Duct Cleaning
Depending on your cutting environment, saw dust can clog the dust duct and may prevent dust from flowing away from the cutting area properly. With the saw unplugged and the saw head raised fully, low pressure air or a large diameter dowel rod can be used to clear the dust out of the dust duct.
Brushes
 WARNING: To reduce the risk of injury, turn unit off and disconnect it from power source before installing and removing accessories, before adjusting or when making repairs. An accidental start-up can cause injury.
Inspect carbon brushes regularly by unplugging tool, removing the motor endcap (Fig. 4), lifting the brush spring and withdrawing the brush assembly. Keep brushes clean and sliding freely in their guides. Always replace a used brush in the same orientation in the holder as it was prior to its removal. If the brushes are worn down to approximately 1/2" (12.7 mm), the springs will no longer exert pressure and they must be replaced. Use only identical DEWALT brushes. Use of the correct grade of brush is essential for proper operation of electric brake. New brush assemblies are available at DEWALT service centers. The tool should be allowed to “run in” (run at no load) for 10 minutes before use to seat new brushes. The electric brake may be erratic in operation until the brushes are properly seated (worn in). Always replace the brush inspection cap after inspection or servicing the brushes.
While “running in” DO NOT TIE, TAPE, OR OTHERWISE LOCK THE TRIGGER SWITCH ON.
HOLD BY HAND ONLY.
Cleaning
 WARNING: Blow dirt and dust out of all air vents with clean, dry air at least once a week. To minimize the risk of eye injury, always wear ANSI Z87.1 approved eye protection when performing this.
 WARNING: Never use solvents or other harsh chemicals for cleaning the non-metallic parts of the tool. These chemicals may weaken the plastic materials used in these parts. Use a cloth dampened only with water and mild soap. Never let any liquid get inside the tool; never immerse any part of the tool into a liquid.
Accessories
 WARNING: Since accessories, other than those offered by DEWALT, have not been tested with this product, use of such accessories with this tool could be hazardous. To reduce the risk of injury, only DEWALT recommended accessories should be used with this product.
Recommended accessories for use with your tool are available at extra cost from your local dealer or authorized service center. If you need assistance in locating any accessory, please contact DEWALT Industrial Tool Co., 701 East Joppa Road, Baltimore, MD 21286, call 1-800-4-DEWALT (1-800-433-9258) or visit our website: www.dewalt.com.
Repairs
To assure product SAFETY and RELIABILITY, repairs, maintenance and adjustment (including brush inspection and replacement) should be performed by a DEWALT factory service center, a DEWALT authorized service center or other qualified service personnel. Always use identical replacement parts.
Register Online
Thank you for your purchase. Register your product now for:
•WARRANTY SERVICE: Registering your product will help you obtain more efficient warranty service in case there is a problem with your product.
•CONFIRMATION OF OWNERSHIP: In case of an insurance loss, such as fire, flood or theft, your registration of ownership will serve as your proof of purchase.