MITER CONTROL (FIG. 5)
The miter lock handle and miter latch button allow you to miter your saw to 60° right and 50° left. To miter the saw, lift the miter lock handle, push the miter latch button and set the miter angle desired on the miter scale. Push down on the miter lock handle to lock the miter angle.
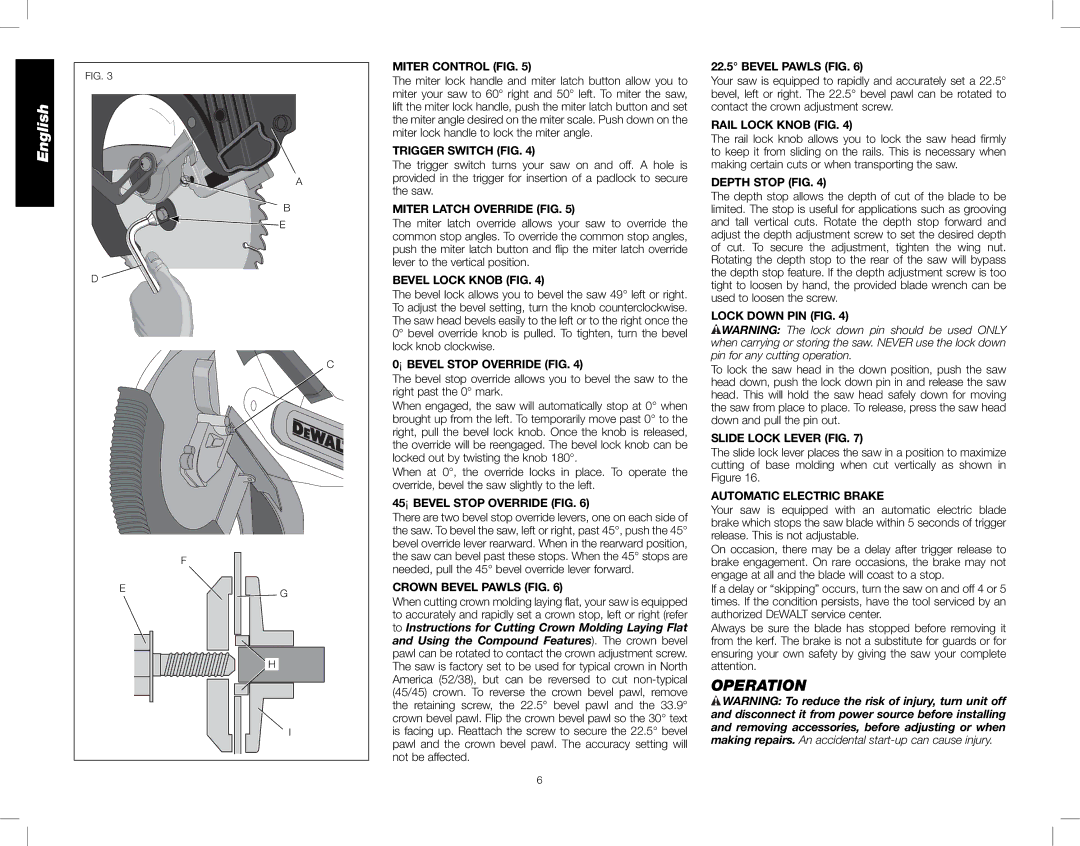
TRIGGER SWITCH (FIG. 4)
The trigger switch turns your saw on and off. A hole is provided in the trigger for insertion of a padlock to secure the saw.
MITER LATCH OVERRIDE (FIG. 5)
The miter latch override allows your saw to override the common stop angles. To override the common stop angles, push the miter latch button and flip the miter latch override lever to the vertical position.
BEVEL LOCK KNOB (FIG. 4)
The bevel lock allows you to bevel the saw 49° left or right. To adjust the bevel setting, turn the knob counterclockwise. The saw head bevels easily to the left or to the right once the 0° bevel override knob is pulled. To tighten, turn the bevel lock knob clockwise.
0° BEVEL STOP OVERRIDE (FIG. 4)
The bevel stop override allows you to bevel the saw to the right past the 0° mark.
When engaged, the saw will automatically stop at 0° when brought up from the left. To temporarily move past 0° to the right, pull the bevel lock knob. Once the knob is released, the override will be reengaged. The bevel lock knob can be locked out by twisting the knob 180°.
When at 0°, the override locks in place. To operate the override, bevel the saw slightly to the left.
45° BEVEL STOP OVERRIDE (FIG. 6)
There are two bevel stop override levers, one on each side of the saw. To bevel the saw, left or right, past 45°, push the 45° bevel override lever rearward. When in the rearward position, the saw can bevel past these stops. When the 45° stops are needed, pull the 45° bevel override lever forward.
CROWN BEVEL PAWLS (FIG. 6)
When cutting crown molding laying flat, your saw is equipped to accurately and rapidly set a crown stop, left or right (refer to Instructions for Cutting Crown Molding Laying Flat and Using the Compound Features). The crown bevel pawl can be rotated to contact the crown adjustment screw. The saw is factory set to be used for typical crown in North America (52/38), but can be reversed to cut non-typical (45/45) crown. To reverse the crown bevel pawl, remove the retaining screw, the 22.5° bevel pawl and the 33.9° crown bevel pawl. Flip the crown bevel pawl so the 30° text is facing up. Reattach the screw to secure the 22.5° bevel pawl and the crown bevel pawl. The accuracy setting will not be affected.
22.5° BEVEL PAWLS (FIG. 6)
Your saw is equipped to rapidly and accurately set a 22.5° bevel, left or right. The 22.5° bevel pawl can be rotated to contact the crown adjustment screw.
RAIL LOCK KNOB (FIG. 4)
The rail lock knob allows you to lock the saw head firmly to keep it from sliding on the rails. This is necessary when making certain cuts or when transporting the saw.
DEPTH STOP (FIG. 4)
The depth stop allows the depth of cut of the blade to be limited. The stop is useful for applications such as grooving and tall vertical cuts. Rotate the depth stop forward and adjust the depth adjustment screw to set the desired depth of cut. To secure the adjustment, tighten the wing nut. Rotating the depth stop to the rear of the saw will bypass the depth stop feature. If the depth adjustment screw is too tight to loosen by hand, the provided blade wrench can be used to loosen the screw.
LOCK DOWN PIN (FIG. 4)
 WARNING: The lock down pin should be used ONLY when carrying or storing the saw. NEVER use the lock down pin for any cutting operation.
To lock the saw head in the down position, push the saw head down, push the lock down pin in and release the saw head. This will hold the saw head safely down for moving the saw from place to place. To release, press the saw head down and pull the pin out.
SLIDE LOCK LEVER (FIG. 7)
The slide lock lever places the saw in a position to maximize cutting of base molding when cut vertically as shown in Figure 16.
AUTOMATIC ELECTRIC BRAKE
Your saw is equipped with an automatic electric blade brake which stops the saw blade within 5 seconds of trigger release. This is not adjustable.
On occasion, there may be a delay after trigger release to brake engagement. On rare occasions, the brake may not engage at all and the blade will coast to a stop.
If a delay or “skipping” occurs, turn the saw on and off 4 or 5 times. If the condition persists, have the tool serviced by an authorized DEWALT service center.
Always be sure the blade has stopped before removing it from the kerf. The brake is not a substitute for guards or for ensuring your own safety by giving the saw your complete attention.
OPERATION
 WARNING: To reduce the risk of injury, turn unit off and disconnect it from power source before installing and removing accessories, before adjusting or when making repairs. An accidental start-up can cause injury.